소개
Apple announced a trio of new laptops, and boy are they keeping our teardown table busy. We started with the entry-level MacBook Pro "Escape Edition," and today we've reached the top of the line. With twice the fans, over a million more pixels, and the new Touch Bar that attempts to replace our tried-and-true function keys, it can only mean one thing: it's time to tear down the new 15" MacBook Pro with Touch Bar.
Can't get enough of our teardowns? Follow along on Facebook, Instagram, or Twitter to keep in touch with the latest and greatest hardware teardowns and repair news!
필요한 것
-
-
The MacBook Pro 15" packs a million pixels over the 13-inch models we've already torn down. Here's a preview of the tech we're expecting to find inside today:
-
15.4" LED-backlit Retina display with 2880 × 1800 resolution (220 dpi), P3 color gamut
-
2.6 GHz Skylake quad-core Intel Core i7 (Turbo Boost up to 3.5 GHz) with integrated Radeon Pro 450 with 2GB of GDDR5 memory
-
16 GB of 2133 MHz LPDDR3 onboard memory
-
256 GB PCIe-based onboard SSD (Configurable to 512 GB, 1 TB, or 2 TB SSD)
-
Four Thunderbolt 3 (USB-C) ports supporting charging, DisplayPort, Thunderbolt, USB 3.1 Gen 2
-
Touch Bar with integrated Touch ID sensor
-
Force Touch trackpad
-
-
-
Stack them if you have them. Here we have the MacBook Pro 13" layered on top of today's main attraction, the MacBook Pro 15"—and apart from the size difference, they appear near identical. We're itching to see how similar (or not) they are inside.
-
The MacBook Pro 15" identifies as model A1707, which fits nicely between the A1706 and A1708 from our previous two teardowns.
-
Just like the previous MBP line, there are long air intake vents under the left and right sides. If this computer is anything like its little brother, these vents should serve double-duty as speaker outlets.
-
-
-
Houston, we have lift-off! This teardown has achieved first stage separation.
-
On initial inspection, the 15" MBP looks ... like a scaled up version of the 13" model. We do notice a difference in the battery layout, but overall it's like looking at twins.
-
Look who we ran into again! The connector to nowhere.
-
We'd still rather see a removable/upgradeable SSD, particularly in a machine targeted at pros—but this way if your logic board bites the dust, there might at least be a chance of recovering your data with Apple's help. Keep making those backups though.
-
-
-
Removing the trackpad requires as little effort as it did with other two 2016 MBP models—we simply spin out thirteen T5 screws and the trackpad is ours.
-
And this one is a monster, nearly holding its own beside an iPad mini 2.
-
We're not surprised to find the same ICs on this trackpad as we did in both 13" MBPs. However, with the increased size, Apple had to add a second touch controller to digitize all that extra trackpad:
-
STMicroelectronics STM32F103VB ARM Cortex-M3 MCU
-
Broadcom BCM5976C1KUFBG Touch Controller x2
-
Maxim Integrated MAX11291ENX 24-Bit, 6-Channel Delta-Sigma ADC
-
Monolithic Power Systems MP24830 white LED driver
-
-
-
Touchpad IC Identification, continued:
-
Bosch Sensortec BMA282 accelerometer
-
Texas Instruments TMP421 remote/local temperature sensor
-
Macronix MX25L2006EZUI-12G 2 Mb serial NOR flash memory
-
Maxim Integrated MAX9028 comparator
-
-
-
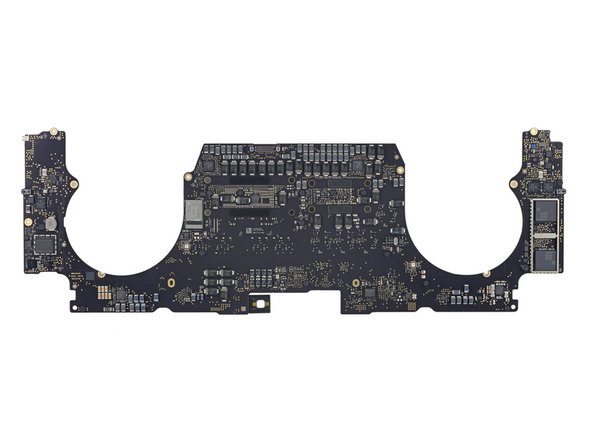
Moving right along, it's time to get this logic board out. It's a little wider in the middle, but shares the same mustachioed symmetry of its smaller sibling.
-
Pulling off the new-and-improved heat sink (again, screwed through the back of the logic board), exposes the CPU and GPU.
-
-
-
Time to take a gander at this
octopuslobo and see what makes it the leader of the pack. Highlights include: -
Intel Core i7-6700HQ 2.6 GHz (up to 3.5 GHz) quad-core processor
-
Micron MT52L1G32D4PG-093 4 GB LPDDR3 (four chips for 16 GB total)
-
AMD Radeon Pro 450 GPU
-
Elpida (Micron) EDW4032BABG-70-F 512 MB GDDR5 RAM (four chips for 2 GB total)
-
Intel JHL6540 Thunderbolt 3 controller (one for each set of USB-C ports)
-
Intel SR2NH (likely a platform controller hub)
-
Texas Instruments CD3215C00 (labeled as Apple's T1 chip in their keynote; however, that does not appear to be true)
-
-
-
-
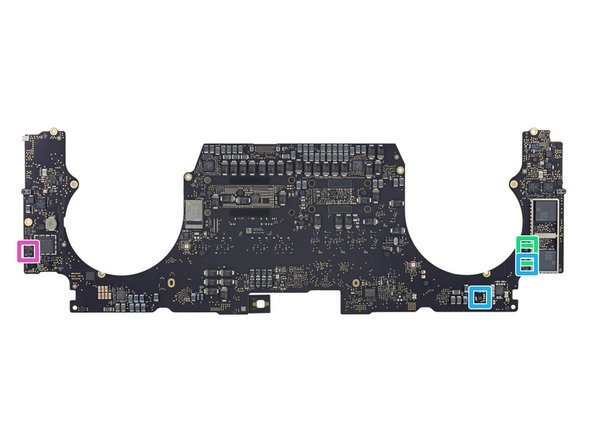
Other chips jockeying for position on this side of the board:
-
Samsung K4E4E324EE-PGCF 512 MB LPDDR3 DRAM, likely with a custom Apple-made SSD controller layered beneath
-
Samsung K9PHGY8S7E-1CK0 flash storage (two 64 GB chips for 128 GB on this side)
-
Renesas R4F2113XLG H8S/2113 family microcontroller
-
Texas Instruments TM4EA23I ? system management controller
-
Texas Instruments SN650839 Power Management
-
NXP Semiconductor PN66V NFC controller
-
Texas Instruments TMP442 dual remote/local temperature sensor
-
-
-
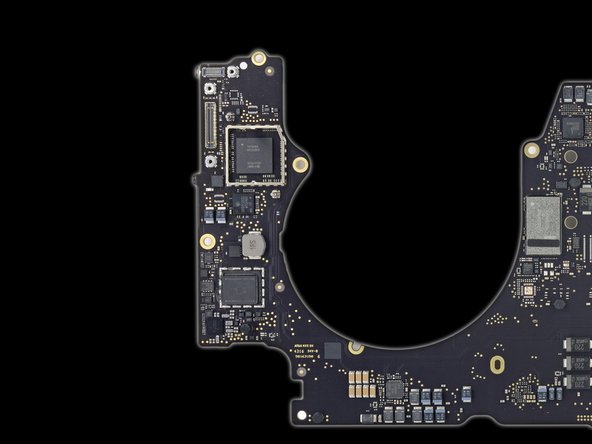
Taking a look at the flip-side of the logic board, we find:
-
Samsung K9PHGY8S7E-1CK0 flash storage (two more 64 GB chips for 128 GB on this side and 256 GB total)
-
Texas Instruments CD3215C00 USB type-C power delivery controller
-
Winbond SpiFlash W25Q64FVIQ 64 Mb serial flash memory
-
Texas Instruments TPS51980A synchronous buck controller
-
Renesas (formerly Intersil) ISL95828HRTZ CPU PWM controller
-
Intersil ISL6277 AMD CPU PWM controller
-
Apple APL1023 343S00137 (the same chip appeared in our teardown of the MBP 13" Touch Bar, and is very likely the T1 controller that runs the Touch Bar)
-
-
-
And the IC party continues:
-
Murata/Apple 339S00056 Wi-Fi Module (very similar to this Murata chip)
-
Apple 338S00193-A1 power management
-
Texas Instruments TMP513A remote/local temperature sensor
-
Samsung S2FPS04X01 SSD power management
-
Texas Instruments TPS22969 6 A load switch
-
Renesas (formerly Intersil) ISL9239 battery charger
-
Maxim Integrated MAX77596 300 mA buck converter
-
-
-
IC Identification, continued pt. 1:
-
Cirrus Logic audio codec (CS42Lxx) and audio amplifier (likely)
-
Maxim Integrated MAXxxxx ? audio amplifier (likely)
-
NXP Semiconductor CBTL06142E DisplayPort/PCI Express multiplexer (likely)
-
Vishay SIC635 power stage
-
Vishay SIC535 power stage
-
Diodes Incorporated IRF3575 60 A power block
-
Other power stages/MOSFETs mostly by Texas Instruments
-
-
-
IC Identification, continued pt. 2:
-
Winbond W25Q64FV 64 Mb serial NOR flash memory
-
STMicroelectronics M24C64-F 64 Kb serial EEPROM memory
-
Macronix MX25U3235F 32 Mb serial NOR flash memory
-
Macronix MX25L2006EZUI-12G 2 Mb serial NOR flash memory
-
Winbond W25Q80DVUXIE 8 Mb serial NOR flash memory
-
ON Semiconductor CAT93C86BHU4x-GT3 16 Kb serial EEPROM memory
-
ON Semiconductor serial EEPROM memory
-
-
-
IC Identification, continued pt. 3:
-
Texas Instruments INA213 current sense amplifier
-
Texas Instruments INA214 current sense amplifier
-
Texas Instruments TPS62130B 3 A step-down converter
-
Texas Instruments TPS22966 6 A load switch
-
Texas Instruments TPS22965 6 A load switch
-
Texas Instruments REF3330 voltage reference
-
ON Semiconductor EMI8032MUTAG common mode filter w/ ESD protection
-
-
-
Anxious to get a peek at the third take on Apple's reengineered thermal architecture, we free the fans from the four T3 screws securing them to the rear case.
-
And they come out hassle-free. No glue on this puppy!
-
This fan is also sporting completely different blades from the ones we previously encountered.
-
-
-
After recently struggling to free the strongly adhered battery in the 13" MacBook Pro with Touch Bar, we decided to let this battery remain glued in its home.
-
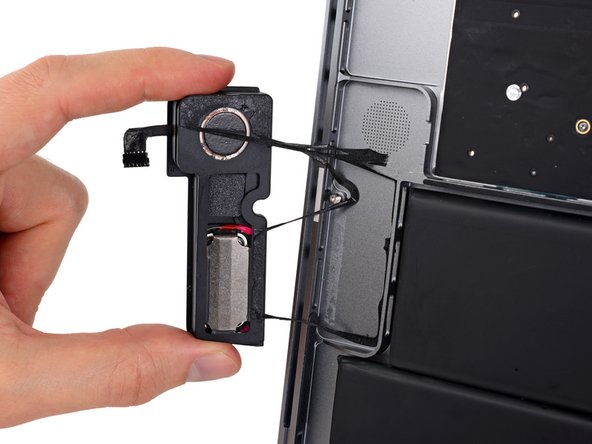
This 15" MacBook Pro has a similar speaker grille when compared to its smaller 13" counterpart. Most of the grille doesn't include full through-holes, prompting us to question why the dimples, Apple?
-
Survey says: weight savers so it goes faster when you put wheels on it.
-
-
-
After once again accidentally separating the digitizer from the OLED panel, we turn our tools to the LED display.
-
Two teardown engineers, an opening pick, X-Acto knife, isopropyl alcohol, a heat gun, and an iOpener all came to this OLED teardown party, but Apple's adhesive was still too much for our glue separation squad.
-
- The trackpad is easy to access and straightforward to replace.
- Use of proprietary pentalobe screws makes servicing and repair unnecessarily difficult.
- The entire battery assembly is strongly glued into the case, complicating replacement.
- The processor, RAM, and flash memory are soldered to the logic board.
- The Touch Bar adds a second, difficult-to-replace screen to damage.
- The Touch ID sensor doubles as the power switch, and is paired with the T1 chip on the logic board. Fixing a broken power switch may require help from Apple, or a new logic board.


최종 결론
수리 용이성 점수


(10은 가장 쉬운 수리를 뜻합니다)

댓글 112개
Why is it NOT a "pro" laptop?
Eric -
U are a joke lol
A horse walks into a bar, and the bartender asks, "Why the long face?"
Now THAT is a joke.