소개
This guide is a teardown of the Z-Edge 3 dashcam showing the internal components and how to access them. This is not a repair guide - just a teardown guide. This is an easy teardown.
필요한 것
-
-
Remove the four case screws - 2 ea from the grey button panels using J000 phillips screwdriver bit
-
-
-
Locate a small hole in the case to insert an opening tool along the edge (in this view I had already popped the case open) and run the tool along the edge (ok, I cheated and used my fingernail to do it once I got the lip slightly opened)
-
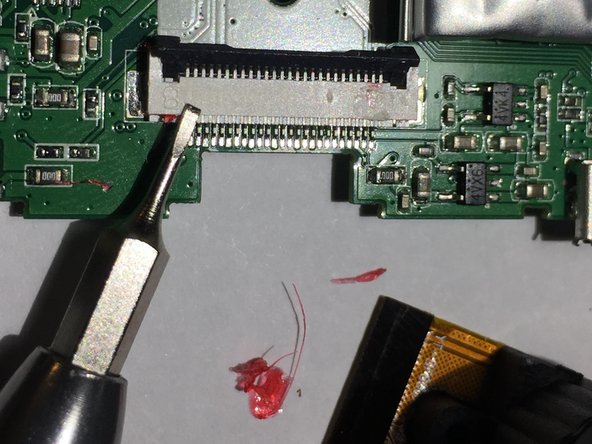
Watch that the LCD is connected to the body via FPC flexible cable. (No worries though, thanks to some pretty red adhesive they dropped onto the connector release....more on that shortly)
-
-
-
-
Look there! Did someone bleed on that FPC connector for the LCD or is that adhesive?
-
Starting at the connector, you can take the 1.0 flat head bit from the ifixit toolkit and carefully scrape the bits of that semi-hard adhesive off the ends of the connector lock. Then slip the spudger between the lock and connector body to release the cable and remove the LCD
-
-
-
There are six phillips head screws holding the PCB to the housing (sort of....the two in the middle of the PCB hold the camera module to the board but go ahead and remove those too)
-
The J00 phillips screwdriver bit should work nicely on these screws
-
If you look closely at the FPC cable connector...yep I dinged the hold down piece pretty badly scraping the adhesive...but you'll see I was more gentle and effective with the adhesive on the camera module FPC cable connector!
-
-
-
After the PCB board is taken loose from the housing, we see that we have two wires attaching a small speaker to the housing,
-
The speaker is easily removed with a thin pry tool slipped into the speaker cavity or, a lesser preferred method that I used, grab the two wires close to the speaker and carefully but firmly lift the front edge of the speaker upwards to get the initial adhesive to release. At that point you can grab the speaker and pull it out from the cavity.
-
-
-
The only thing holding the camera to the board at this point is another flexible printed circuit cable with some adhesive on the connector and hold down.
-
This time I started from the connector end and carefully but with pressure used my 1.0 flathead bit to cleanly scrape off the goo.
-
Flip up the connector hold down "latch" with a spudger or the flathead bit and remove the flex cable and pull the camera module out.
-
-
-
I couldn't quite make out the writing on the bottom of the camera module nor could I find anything similar online.
-
-
-
Battery module showing type and presumably, date of manufacturing?
-
Sorry, I didn't remove the battery from the board.
-
The battery is held down on a pad with adhesive. It can be lifted carefully from the pad taking care on the side with the yellow cellophane which has a circuit board.
-
....and that's the end of the teardown. I hope it was useful!
-


다른 3명이 해당 안내서를 완성하였습니다.
팀

댓글 9개
is the battery glued down? mine stopped working and i feel like it’s due to a failed battery. I need to replace it, but not sure how difficult it is to remove or what to replace with
Adam Leach - 답글
EDIT: I’ve successfully followed your steps up until the battery removal.
It’s held on with a little bit of adhesive but its completely wrapped in this plastic and the wires seem to be soldered on.
Looks like more time and tools are needed to replace this battery.
Adam Leach - 답글
Hey Adam,
Good question. I pulled mine just now to see and you’re right, it is a pad with adhesive holding it down. Be careful lifting it as there is a tiny circuit board on the pad end. Unfortunately I have had the replacement camera fail in exactly the same way and I contacted their support but they will not replace this second defective one. These unfortunately are not reliable. Post back if you are able to get yours working with a replacement battery. I think the battery might only be used for the parking mode but I’m not sure. My voltage measurement on my battery is zero with this installed. For grins I may try to plug it in and then check the voltage across the connection on the circuit board. Good luck.
Dan
I’m able to power on my camera board (I have it plugged into the PC USB), it triggers the computer USB storage but the PC will not mount the card storage. With it plugged into the PC USB port the battery charging voltage is 4.1VDC. I’m not sure that I ever used the parking mode so I don’t know how log it takes to deplete the battery but I don’t think it stays charged very long.
The battery also retains the date and time, which I believe will cause the camera to overwrite the newest (now seemingly oldest due to incorrect date) video. My theory is that you are in an accident, camera is recording, you shut the car off to check damage, you restart car to move. Now you just overwrote the video of the accident. the circuit board attached to the battery is likely the protection circuit to keep the battery from over charging/discharging. As long as the replacement battery has the board, is a pouch style and somewhere near the same capacity, it should work electrically. I considered replacing my battery with 3 externally mounted D cell batteries connected in series with a silicon diode so the camera can’t try to recharge them. The stock battery is claimed to be 210mAH, a D cell is 10,000mAH. 1.5V x 3 = 4.5V. 4.5V - 0.7V + 3.8V. 3.8V should be within the voltage range to work fine. My guess is the batteries would last 6 months and be readily available and easy to change.