주요 콘텐츠로 건너뛰기

Apple's 2012 first-generation 7.9-inch iPad mini, with 16, 32, or 64 GB of storage and an A5 processor.

630 질문 전체 보기

Th screen stays black after a digitizer replacement.

I successfully replaced the digitizer of a customer's iPad Mini with the soldering method.

I connected everything and tested, and it was successful except for the home button. I disconnected the digitizer flex and the screen flex and the battery also. I wanted to test again and connected everything. I tried to turn on the Mini, but only had sound and no screen. The screen stays black.

iTunes recognises the Ipad Mini, and I did a DFU in hopes that it would work, but no success. NO SCREEN.

What can I do? iTunes says the battery is 100% charged.

답변되었습니다! 답변 보기 저도 같은 문제를 겪고 있습니다

좋은 질문 입니까?

점수 24
댓글 15개

Do you see picture just no backlight?

If I push the powerbutton, the Apple logo apears, but no backlite. Just seen this with the screen turned up into the sun.

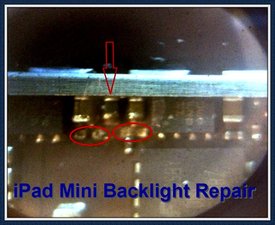
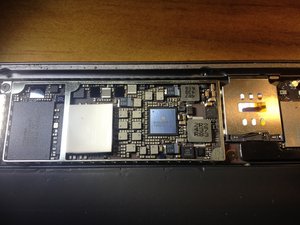
I need a clear picture of the fuse that must be jumped, or how to use the Bare Conductive Pen to create a jump across the fuse to "what?".

Replaced touch screen. Now have no picture. What fuse do in have to bypass. Can you post a picture or video. Thanks for the help

i have the same problem ho can i fix it can u please help me

댓글 10개 더보기

댓글 달기

답변 30개

선택된 답변

Block Image

Make the jumper or replace the fuse.

해당 답변은 도움이 되었습니까?

점수 18

댓글 25개:

thx for the reply, the screen seems to be working normal today. I ignored the Ipad yesterday and this morning it was just fine.

Just the digitizer seems to be not working on a small area on the top were you need to slide to power off. Could that be a bad soldering on the flat cable?

More than likely it's a bad soldering but in the process it may have been damaged so you may need a new digitizer.

Hello,

Just a question about the non-working backlight.

I have the same problem.

Where the fuse that I should replace?

YoloRepair ca ,,,so if I'm seeing your pic correctly I would need to jump the 3 points outlined in green ????

I cannot stress this enough. Restart the ipad by holding the power button and home button OR unplug and replug the battery.

If that fails

If you look at the pic I posted the green line is the path the line takes.

The red line is the fuse (you're essentially bypassing it - you could replace it) if its blown replace or bypass.

Having a multimeter is crucial for this type of work. Otherwise you could damage the ipad further. Plus it will help you determine what is at fault (most times it's the fuse)

Strong soldering skills are a must.

댓글 20개 더보기

댓글 달기
가장 유용한 답변

Wow.... Ok let me sum this up so no more people are confused by this pic. The path of the electricity to operate the back light follows the green line from the top right of the pic thru the fuse marked in red to the connector. To bypass the fuse all you have to do is lay a bead of solder on top of the fuse that connects the left and right side of the fuse pad. You do not need jumper wires or anything else. If you want the correct fix, replace it. But this works as I have done it before. You can test the fuse for an open first with a multimeter to make sure this is the issue you are having. Put the meter on the continuity setting, touch the right side of the fuse with one lead and the left side of the fuse with the other lead. If you have no continuity then lay solder across the top of the fuse, making a bridge for the electricity to flow past it. If you have continuity (usually .02-.03 ohms) your problems is somewhere else in the circuit.

To add to this: the fuse is there for protection just like any fuse is in any electrical circuit. It you successfully bypass it with the solder method, make sure you don't make the same mistake again as you may end up with irreparable board damage. What causes this problem to happen in the first place? Good question. It's caused by disconnecting the screen while the iPad powered or possibly turning on the iPad on accident while the screen is unplugged. Easy solution is to have to make sure that you disconnect the battery before disconnecting the LCD connector and reconnecting the battery after the LCD has been reconnected to the board during reassembly.

해당 답변은 도움이 되었습니까?

점수 20

댓글 8개:

You're my savior! Worked perfectly.

How do I remove the plate covering the fuse on the motherboard? I cant seem to get anything under the top of it and i'm not going to be able to do this with a normal sized soldering iron am I?

can you please show a picture ipad2 jumper please i will donate

Ryan, Can you help by doing this jumping on an ipad mini? I have zero equipment to do this and definitely need assistance. How can we get in touch with you?

Good thing there is someone willing to give a thorough explanation of the fix. I cannot thank you enough man

댓글 3개 더보기

댓글 달기

Block Image

Here is a close up of the iPad mini backlight fuse---ideally you would replace it for a robust long lasting solution which is very straightforward to do with the right equipment and experience. If you insist on jumping it, you would need to lay a bead of solder across the top of this component with the red arrow.

Keep in mind--this picture is an image that I took to send to a customer that came to me from this very thread that knocked off the two essential components circled in red while digging around trying to make the jumper. The capacitor just to the right of the backlight fuse is only found on the iPad mini and the iPad 4 and is difficult to source if you damage it and have to replace it. The capacitor on the left is essential and required. The two small components that are missing in this picture are also essential and must be replaced, not jumped, if they are damaged. These "DIY rescue" repairs can quickly get very expensive so BE CAREFUL!!

jessa

I've decided to post some DIY fails here. This is such a straightforward, inexpensive fix to send out for...it always makes me sad when I get these trainwreck minis sent to me. Repair is noble when you use the right tools.

Block Image

DIY Fail---This is exactly why NOT to jump the fuse. This guy burned up his diode with this way too big wire.

Block Image

This is a great way to short out your iPad, except it was already done. If your jumper has continuity with ground (like this one) you're done.

해당 답변은 도움이 되었습니까?

점수 7

댓글 7개:

Update: DIY iPad mini backlight repair...

I have three iPad mini's now from folks from this very thread that have tried to jump the backlight fuse and then ended up knocking off tiny components around that area. One of them didn't even realize that he'd knocked off a resistor and capacitor in front of the fuse just by probing it. Another knocked off four small resistors at the power button side of the board under some tape just from trying to remove the shield. Another thought he could just jump a nearby tiny resistor that fell off and shorted the LCD voltage to ground!

Sourcing and replacing these missing components can be a HUGE drag--especially if the solder pads are torn and a line must be traced to the previous component in that trace. Ugh! Tedious hours of work.

It is *so* easy to do the repair correctly and replace the fuse with the right tools. I use a Hakko FM 2023 mini hot tweezer and a microscope to desolder some of the shield, and then pinch the tiny fuse, pop it off. Pinch the new fuse, pop it on. Done.

It takes about an hour to do it complete with testing, I can send it back open or sealed with your screen. Give me a shout if you don't want to take the risk of this going down the rabbit hole.

If you are going to take a stab at it--BE CAREFUL. USE MAGNIFICATION. and of course first try the steps above that m0t3x outlined!

If you do end up knocking off components, then I can still help you now that I've done these other three.

A full dozen minis have come to me for DIY rescue repair from this thread, and I finally got one I couldn't save. Death by RadioShack conductive pen "bare paint". That stuff made a massive short and since it wasn't solder, I t wouldn't come off without tearing up the mask and exposing copper.

If you'd like a little help replacing your fuse feel free to contact me via my profile.

This was about 200 backlight repairs ago, since then I've seen about 2 or 3 others that I couldn't repair--presumably drop damage somewhere...coil, diode measure fine, voltage produced going to coil, continuity through to LCD connector, all filters measuring fine.???

This one had a ton of conductive paint in it which may not have caused the short, but just masked it and it was really annoying to wash out. Underneath, the solder mask had been scratched off in the customer's self-admitted many attempts to jump the fuse. The nub of the diode-side pad at the filter was mashed into the exposed ground mask --not dissimilar from screwdriver damage that mashes two layers of the board together. I couldn't tease them apart it was shorted out permanently as far as I was concerned. I would be interested in knowing how you would approach repairing it. I just prefer collaboration over competition--there is plenty to learn for everyone. If you are interested in solving difficult problems for free, I can hook you up!

Not really sure where Ryan thinks he can accuse Jessa of anything... Seems like an unnecessarily rude comment - especially to someone who is just trying to help and is not being rude at all. Ryan, I suggest that you take a deep breath and think before you type. There's no need to be rude here. Everyone should be trying to help in the spirit of repair and community. Keep the attacking language off this site and on the forums it belongs on!

I've been searching around this thread and Jessa seems to have confidence, knowledge and willingness to share. I'm very impressed and I support Joshua's comment 100%.

댓글 2개 더보기

댓글 달기

Jumping the backlight filter is a bad idea guys--that will likely cause you (or your customer's) backlight coil to fail prematurely. This is especially true if you are putting a mini back together and testing your digitizer soldering job, home button etc and keep plugging/unplugging the LCD. The filter is an easy part to replace--about $5 on eBay. In fact, replacing the whole backlight coil, filter, and ic is less than $20 for parts cost and takes just a few minutes with a hot air station and a little experience. The mini does seem particularly sensitive to the sudden change in voltage that comes from unplugging the LCD. I've learned this the hard way!

해당 답변은 도움이 되었습니까?

점수 4
댓글 달기

Steps you should take before advanced soldering techniques.

1. Hold Power and Home Button for Hard Reset

2. Unplug battery cable, reconnect, power on

3. Check your LCD connector for damage, dirt, metal, lint, etc

a. Check LCD connector on the motherboard for same

4. Curse yourself for not unplugging the battery while working on it

5. Multi meter the green traces that YoloRepair pointed out

6. Perform a fuse replacement, or a jump. - Recommended you seek pro help, because this type of repair requires a stereoscope and a extremely steady hand with soldering skills.

-----------------------------------------------

Making Jumper Steps

1. Make sure it's that part - http://i39.tinypic.com/3130ry8.jpg

2. Give yourself access to both side, I made small cut on shield

3. Remove blown fuse, replace or jump. I chose jump - http://i44.tinypic.com/2lbno5k.jpg

4. Test - WOOHOO! Thanks YoloRepair <3 - http://i39.tinypic.com/2924cyb.jpg

5. Clean excess flux and leave repair area in best shape possible - http://i40.tinypic.com/mbtok3.jpg

6. Test everything again, close it, and get sigh of relief.

7. Thank YoloRepair once more.

해당 답변은 도움이 되었습니까?

점수 3

댓글 4개:

I did the soldering but I still have a black screen. It was working great before I tried replacing the glass screen. If I hold the home button it says "siri not available connect to the internet" any ideas?

your backlight is still out because the backlight diode, commonly called backlight ic, is damaged. The backlight diode is very sensitive and easy to damage. If you replace the backlight diode, you will likely bring back your backlight---and at the same time you might as well properly replace the fuse with a new one. If you don't want to send your board out to have it done professionally, and you want to try to replace the backlight diode DIY, just remember that the diode is a directional component--you'll need to place the new one in the same orientation as the original with the side with the lines facing the home button side of the iPad.

Hi, How do you unplug battery cable on iPad 3, which one is it?

What's the component directly below the fuse? I've knocked it off!!

댓글 달기

I agree with the answers relating to the backlight. This happens all of the time, from either too much heat (when tearing the iPad down), or damaging some of the connectors on the motherboard that the electric current for the backlight flows through. Happens commonly with DIY attempts which means, if you're DIYing an iPad repair, be MORE CAREFUL than careful. Be neurotic about it.

해당 답변은 도움이 되었습니까?

점수 2
댓글 달기

이미지 내용 보기:

Block Image

해당 답변은 도움이 되었습니까?

점수 2

댓글 1개:

Hi Mark,

You got no pads here any more. This mini can be saved, but it will have to get the "long jumper" solution to link directly from the backlight diode to the LCD connector area. Almost always, the backlight diode is burned out when the mini looks like this. This is an advanced rework project now.

댓글 달기

On the iPad mini anytime you unplug the LCD you must unplug the battery and plug it back in or that will happen. Please don't do all the things others may tell you to do to it unless you really can afford to buy anther one. I do this everyday simple is always the best place to start.

해당 답변은 도움이 되었습니까?

점수 1
댓글 달기

I have a similar situation.

I replaced my screen and after putting it 80% back together I wanted to test the digitizer and noticed there was a 1-2inch vertical black strip almost center of the screen.

So when it powers on, only the right half of the apple shows and when the home screen loads there is the black bar going down the middle.

I tried reseating the ribbon cable but I'm not sure what I'm doing wrong because I'm still getting the same bar.

Should I press harder on the ribbon cable? Did the LCD go bad?

The directions I followed left the battery connected, but I ended up disconnecting the battery (AFTER I disconnected the LCD) so I hope I didnt mess anything up by doing that.

Please let me know how to test, and what to check. Thanks

해당 답변은 도움이 되었습니까?

점수 1

댓글 3개:

LCD is bad---very easy to do, it is thin and doesn't like to flex. You'll need to buy a new LCD to solve.

I need some insight please. Is the LCD faulty/broken if the backlight lights up and one or more black lines appear on the LCD? Or does it have a blown fuse?

3 things that could mainly be causing that:

1. Defective / broken LCD

2. Not plugged in all the way/correctly.

3. When installing, damage may have somehow occurred to the connector, unplug and check if any pins are missing, if so, remove and replace connector. I recommend gravity soldering in this instance as it's the easiest way to install the connector to the board.. Hope this helps. -John

댓글 달기

Disconnecting the battery and letting it sit for about 90-120 seconds worked for me! Thanks for whoever mentioned that.

해당 답변은 도움이 되었습니까?

점수 0

댓글 2개:

in the process of powering off the ipad after testing a newly installed digitizer I inadvertently raised the LCD thus disconnected the flex connector, not wanting to reconnect the LCD without removing power I thought no issues I just have to disconnect the battery...surprise, In order to do so I would have the pretty much disassemble the unit to get the MB to raise enough to disconnect the battery. I'm actually not stopped at this point and started searching for a solution which is what brought me to this link as I've had other ipads not have backlighting after reconnecting with power on. Though I think this is a terrible and intentional design by Apple I do agree experienced comments above that one should not have to blow a fuse when such a seemingly trivial issue occurs.

Is there any other way that I can unseat the battery connector without lifting the motherboard?

Thanks to all for the questions and comments, even the inexperience'd comments are helpful,

Tony--it sounds like you are not talking about an iPad mini here, so you might want to submit this as its own question. But to answer your question: "How can I disconnect the battery on an iPad (2,3,4) without full disassembly of the board?" You don't have to pull all the screws of the MB in order to be able to pop it up enough of the adhesive to reset it. You don't even have to disconnect the cables if you don't want to.

댓글 달기

Martin, there are "fingers" on the sheild that wrap around the frame that supports it. Use a pick or fine tweezers an pop them up while working your way around it.

해당 답변은 도움이 되었습니까?

점수 0

댓글 17개:

Ryan, is there any possible way we could send these broken iPads into you to have you fix this problem so many of us are having?

Brandon, YES I will help anyone out who may need it. If you want to send the entire unit with the replacement parts, I can send it back repaired and looking professionally serviced. I can replace the digitizer whether it is the full assembly (which includes the IC chip and home circuit pre-installed) or if its just the digitizer itself and swap over your old IC chip and circuit. If a broken digitizer wasn't your problem, that's ok too. I can replace any part whether it be a charge port, battery, power flex cable, headphone jack, camera etc. Anyone can e-mail me for contact information or even if you just have a question.

Ryan, I ran a line of solder across the fuse and it worked like a charm! Thanks for the help!!

Dale, glad to hear about your sucess but I can't take all the credit. I just wanted to further elaborate on what was going on.

Also guys there is a trace pen available that should also work on bypassing the fuse. It's used in place of soldering if you don't have the correct size tip or skill set. A small dab on top should do the trick. Sorry I didn't think of it til now. I believe Radio Shack sells it but you can find it online. It leaves behind metallic particles to make a conductive path.

댓글 12개 더보기

댓글 달기

good news everyone. i bought a conductive paint from radioshack, $10. got into the logic board and used a needle to place a TINY glob over the red filter in the picture above. fixed the problem. I don't know how to solder. works fine so far.

Update

here's the link to radioshack product

해당 답변은 도움이 되었습니까?

점수 0

댓글 1개:

Be CAREFUL with this product. I have now had two mini's come in that we're completely shorted out after using this.

댓글 달기

I had the same exact problem with the backlight. I replaced my digitizer due to a cracked screen and then the backlight went out. I unplugged the battery, then I unplugged the LCD, put it back together and it worked! Make sure your LCD cable is fully seated in the slot.

해당 답변은 도움이 되었습니까?

점수 0

댓글 2개:

thanks for the tip. I have the same problem and was mad about it but thanks to you i can sleep now

Similar for me... Replaced cracked screen, re-assembled, tested before sealing closed; powered on and only got black screen and thought it was backlight fuse issue, looked closely and saw a faint "x" at the top of screen and "home button" symbol at the bottom, read this blog and realized it might not be a blown fuse; so I tried re-setting properly pressing power and home buttons simultaneously and that did the trick, Apple symbol showed up and it functioned normally; thanks for all the good comments 11/07/15 Sergio542

댓글 달기

Guys avoid these problems! Always always disconnect the battery before disconnecting any other cable. As for the the digitizer going crazy after installation always be sure to place a PC of kapton tape over the flex next to the home button. Cover all the exposed chips.

해당 답변은 도움이 되었습니까?

점수 0

댓글 1개:

My parts vendor has started putting tape on them. Had this problem all the time.

댓글 달기

I replace my digitizer and follow all the steps, but when i test it by turning it on didn't shows anything, was just black but Itunes recognize it when I plug it, so I was so mad and leave it in my desk because was 3:30 am next day I went to work and when I come back home the ipad was working just fine..

해당 답변은 도움이 되었습니까?

점수 0
댓글 달기

thanks for this solution...100% working jumper for ipad mini no light.

해당 답변은 도움이 되었습니까?

점수 0

댓글 1개:

Good job Omar! Realistically you will either re-break or sell your iPad before anything else "may burn out" in the backlight circuit. Let everyone know how you did it!

댓글 달기

Can someone in EU help me with the aforementioned issue? When i say help me i mean send it over for a fix! Let me know thanks!

해당 답변은 도움이 되었습니까?

점수 0
댓글 달기

My back light wasn't working, left battery plugged in and flicked off the lcd.....ahhhh I know.

Anyway, I replaced the diode and it worked ok when tested initally, then I put it back together and the back light wasn't working again. I test the diode and it is faulty so I replace it and now the screen doesn't come on at all.

Any ideas ?

해당 답변은 도움이 되었습니까?

점수 0

댓글 14개:

Are you sure you mean diode instead of backlight filter? It wouldn't make sense to initially replace the diode since the filter is the part that fails. However, if you have no backlight after replacing the filter, then you probably do have diode failure and need to replace the diode. Be careful, the diode has directionality. Make sure you've placed the new diode in the same direction as the original.

Also make sure the digitizer is seated in a he digitizer connector and that the digitizer connector isn't damaged-the iPad mini backlight depends on the digitizer connection as well

Michael---iFixit Answers is happy when you just make a comment on your original post, instead of multiple new 'answers'

I have never seen a situation where the diode would fail in the absence of the filter failing---what made you conclude that the diode had failed but not the filter? Sounds like something unusual is going on with your iPad. Check to make sure none of the EMI brackets are shorting the line?

I wouldn't be surprised if the fact that you let the magic smoke out of the diode makes the dim Apple disappear. As you know, no component can work without its magic smoke. It sounds like something else is going on with this one, do you have any pictures of the backlight fuse area and diode?

The mini requires a digitizer in place to produce a full display. In any event, your next step is to check out the line for anything that could be causing a short and then put in a new diode.

Post your results and we can see if we can help

Jessa

Thanks for your reply Jessa. Well, I got the filter replaced and it still didn't work. I replaced the diode and it worked for a while.

But when bending the housing wire back into place, I managed to hit the diode or around that general area. The backlight was gone again after that. I replaced the diode again, but in doing so the new diode got stuck to the soldering iron for a few seconds and I think it fried it as there is no display no at all with the new diode installed and there is continuity in both directions on the diode.

The only sign of life is a tiny puff of smoke from the diode when I plug in the battery cable in.

I have tested the diode again and it hasn't any continuity in any direction now. The coil, filter and resistor (beside lcd cable) are good.

Hopefully Ill receive the new diodes tomorrow and I will update you on my progress. Has anyone ever heard of a totally blank black screen with a faulty diode?

"diode hasn't any continuity" this doesn't make sense to me---there should not be continuity across the diode. The leg closest to the coil should have continuity with the coil. The leg closest to the filter should have continuity with the filter and all the way to the LCD connector.

On diode testing--which is different from continuity testing, and is the way the diode's function is measured---a healthy diode should measure 1 (closed) in one direction and (switching the red/black probes) about 160 +/- in the other direction.

댓글 9개 더보기

댓글 달기

does anyone know if it is a backlight issue if when the iPad mini boots up it shows the apple logo bright but then it goes dim right before it is done loading the main page?

해당 답변은 도움이 되었습니까?

점수 0

댓글 6개:

that is what the mini does when there is no input at the digitizer connector. If a screen is connected and still same, check closely for any gold pins missing at the digitizer connector. If you can see missing pins, that is the problem--send out for new digitizer connector and it will solve and boot to normal display.

jessa

Hello, jessa, have a problem. Did a repair on a mini. Powered off, replaced digitizer and soldiered on old IC chip and home button. Before sealing everything up, I turned it on to test everything...a section of the LCD wasn't displaying anything and digitizer was 75% functional. Powered off and disconnected LCD and digitizer to recheck soldiering points. Reassembled and now won't turn on. No apple logo. No sound when plugging it into wall socket or computer for iTunes. ITunes does recognize the mini though being connected and password protected.

Gary--sounds like classic backlight. If the LCD has a black stripe/lines then it will need to be replaced as well.

Jesse, thanks for the reply. Why does this sound like "classic backlight"? If it was just backlight issue, wouldn't the iPad at least be dimly lit and have sound? I'm getting nothing... like it doesn't even power on.

Could this have something to do with the "lock" feature associated with the home button flex cable?

**Update on my first post... it appears when I plug it into wall charger, there is that "plugin" ding sound.**

The dim logo/chimes are not a reliable indicator of a backlight failure. It sounds like classic backlight to me because we know the iPad is powered on since it is recognized by iTunes. It now has no display after a recent disconnect when shortly before it had a display, even if the LCD was damaged. This is either that the LCD itself is now completely damaged (less likely) or that you have burned the backlight filter at this disconnect (classic). I would bet that under the microscope you'll see the physical damage to the backlight filter evident as a tiny pin !$$&* of solder bulging from the center of the filter, or it will look completely burned.

It is very unlikely that you damaged anything on the board relevant to backlight from your work with the touch ic and home flex. You may not have touch, but even a botched touch ic solder job will still show the apple logo. Post a clear close up of your backlight filter--bet it is burned.

댓글 1개 더보기

댓글 달기

Gary,

Sounds like something was soldered incorrectly or another component was damaged during the repair. I have actually fixed this issue a few times and ended up replacing one of the capacitors right next to the filter. There is also another filter jut below the one you repaired that may need replaced. Test with a different LCD screen as well. If you need to send it in just contact me.

해당 답변은 도움이 되었습니까?

점수 0

댓글 6개:

Please stop with the links--you know it is not cool by now :(

PS: read carefully, Gary did not solder at the backlight filter--he was soldering on the touch ic. His problem is most likely classic mini backlight, plus/minus the diode as well.

Thanks Jessa and all the others that responded. Considering it powered on fine after the repair, I wanted to wait 24hr in hopes that, like a few of the others, a few hours would correct the issue. It did not, so I went ahead and messed with the filter. I wanted to lay a line of solder from one end of the filter to the other, but as you know, it's delicate work and I've never done a soldering process that intricate. I have a soldering gun with a pencil tip about .6 millimeter at the pointed end. I cut TINY pieces of solder off a line and tried it like that first. Didn't lay right so I pulled it off and took a small section of one end of the filter off. Lol. "From bad to worse", right?

Not so. I assessed the situation and tried again. This time I cut more TINIER pieces and dabbed one tiny drop at a time and arched from one end of the part I kinda jacked up, to the other end of the filter. Results? I have a working iPad mini now! Of course, the LCD was still jacked, so will have to buy a brand new part for my brother-in-law. Lol, as long as I got it working though. Kudos to you, Jessa, your advice was much appreciated. To the others, as well. Happy holidays.

Congratulations Gary! It is always good to hear a success story :)

댓글 1개 더보기

댓글 달기

thank you ..

해당 답변은 도움이 되었습니까?

점수 0
댓글 달기

than you friends it help for me

해당 답변은 도움이 되었습니까?

점수 0

댓글 1개:

thank you for help

댓글 달기

I have a little different issue than yours after replacing the touch screen for my IPad Mini. The power was off, but I did not remove the battery connector before unplug the screen and the LCD connectors (I knew that it was a bad mistake).

After replacing the screen and put everything back together, I can see the back light came on with an apple logo. However, the back light went off after booting, and I can see the password screen. I took a flash light and shine behind the LCD for entering the password to see the screen working. The screen worked well at all corners, except the back light. I powered it off with a flash light behind the LCD, and I powered it back again. The same thing happened. The apple logo appeared with back light during the booting time and turned off after that.

It was working fine before replacing the screen. I did a backup with iTunes without any problem, but the back light is still turn off after booting.

Do you have any idea? Thanks in advanced.

해당 답변은 도움이 되었습니까?

점수 0

댓글 2개:

This is still going to backlight filter is my guess. It is just Soooooo common. Replace the filter, possibly also the diode and it will probably solve. If you see no damage to the filter and it has continuity, then second choice is that it is the LCD itself. Third choice is damage to the digitizer fpc connector --digitizer is required for display past the apple logo in the mini

Thanks for your recommendation. It was the fuse. Somehow, my fuse did not blow out totally, and it is read 95 Ohms on the multi-meter. I bypassed the fuse and the backlight came back, and the mini Ipad is now alive. Thanks again.

댓글 달기

Block Image

Thanks alot for this information, i had the same issue with an ipad mini at work, forgot to disconnect battery, so no backlight.

A little soldering did the job, perfect backlight again.

Thank you.

해당 답변은 도움이 되었습니까?

점수 0
댓글 달기

With the intent to fix the problem the squares for welding are disappared..know I don't know how to go on..any suggestions?

해당 답변은 도움이 되었습니까?

점수 0

댓글 2개:

please can you help me?

With the intent to fix the problem the squares for welding are disappared..now I don't know how to go on..can you help me?

Take a picture close up.

댓글 달기

I've done this repair on a couple of minis, but now I've got a mini 3 (a1599) with the same problem. Anyone know exactly where the fuse on this is? I can post a picture if needed.

Thanks!

Johnathan

해당 답변은 도움이 되었습니까?

점수 0

댓글 1개:

Hello Johnathan, have you find a solution for the fuse of ipad mini 3 (I have the same problem) thank you

댓글 달기

Block Image

This is the A1490 32gb board does anyone know ware the fuse is located?

해당 답변은 도움이 되었습니까?

점수 0
댓글 달기

Guys, before any dangerous or irreversible operation, remember to try to remove ONLY the battery for few minutes!

In my case it worked, I think there is some integrated protection to protect the fuse.

해당 답변은 도움이 되었습니까?

점수 0
댓글 달기

I have bridge the fuse on many iPad mini 1 (over 30) without any problem, don't know why this fuse blow, not always but often and i always disconnect the battery first... ***But never do a fuse bridge on IPad mini 2/3/4 the diode will burn in 2 seconds, i know because i have try once... well at least its easy enough to replace with solder paste and the fuse, the diode, the coil are less than $0.75 each if you got some good suppliers, on eBay they are a way too expensive !!

해당 답변은 도움이 되었습니까?

점수 0
댓글 달기

Anytime you jump a component there will be more issues in the future. The parts are there for a reason.

You should get it repaired correctly.

If you need help you can message me.

Or if you need the parts you can get them [on eBay]

해당 답변은 도움이 되었습니까?

점수 -1

댓글 4개:

MikeP-- Feel free to fill out your profile if you'd like folks to find you professionally.

Mike p if you are good at this little stuff I got few 2nd itouches that need some work. Let me know

Brian--we do micro soldering support for other repair shops and DIY customers all day every day. Feel free to contact me via the link in my profile by clicking my name here if you need some help. I know "mike p" also does good work and I think she is out of Michigan if that is closer.

This is the third time that I have made "Mike P" aware that it is a violation of this community's rules to post direct links to her business page.

댓글 달기

귀하의 답변을 추가하세요

tuningdude 님은 대단히 고마워 할 것입니다.
조회 통계:

24 시간 전: 1

7일 전: 16

30일 전: 50

전체 시간: 167,801