주요 콘텐츠로 건너뛰기

Guides for the LTE version of the iPad Mini 2. Announced October 22nd and released November 12th, 2013. The iPad mini 2, originally known as the iPad mini with Retina Display, has all the pixels of the iPad Air in a smaller 7.9" form factor.

62 질문 전체 보기

Replacing fpc connector because touch screen is not working

Hello

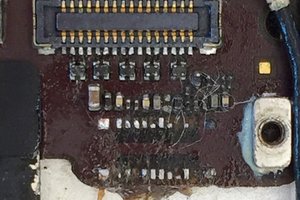
The touchscreen on my iPad is not working. The home button works fine. I have noticed a damaged pin in the fpc connector.

I wanted to ask is replacing FPC connector too advanced for a beginner? I have watched many videos showing how to do it and I feel fairly confident on doing it. Just wanted to make sure.

Any advice would be appreciated. Thanks

Update (04/13/2017)

Block Image

here is the picture.

답변되었습니다! 답변 보기 저도 같은 문제를 겪고 있습니다

좋은 질문 입니까?

점수 1
댓글 3개

You should add this as an edit to your question. This will keep things neater. Also, it's a good habit to always address the person you want to reach, like this @refectio. That way we get a notification. Otherwise, we won't know if you're trying to reach us. The only exception is if you comment in my answer where I will be automatically notified.

See my comment under my answer.

I tried to but it kept saying its marked as spam

It's there now...I don't type as fast as I think.

댓글 달기

답변 3개

선택된 답변

I guess that depends on your definition of a beginner. If you have decent tools and a steady hand, it can be done. That said, one side of that connector is very close to a row of small SMD components. It is very easy to blow them away or nudge them or create a ton of solder bridges. As with any micro-soldering reapir, it can go sideways very quickly. In general, I don't recommend beginners try this kind of repair until they have practiced on similar density boards.

Tell us more about your tools and experience.

해당 답변은 도움이 되었습니까?

점수 4

댓글 17개:

Thank you for the quick response.

The tools I already have.

Electric soldering iron gun

black & decker heat gun

Rosin Flux Pen

2.2mm desoldering wick braid

mobile phone repair tool kit

I have alot of experience in repairing mobile phones etc.

I've never really done any soldering before. I do not mind working on this iPad because I will be buying a new tablet anyway.

The video tutorials I have watched seem pretty straight forward, only thing is, in these videos they do not really explain too much as to what they are doing..

I admire your courage. The videos make it look easy because they are using 1-2 thousand dollars worth of top-end equipment and/or they have countless hours of micro-soldering experience. Don't underestimate the difficulties. The real challenge is not destroying everything surrounding the part you are trying to fix.

If you use a heat gun, that's what will happen. A heat gun is not for soldering. In order to use a soldering iron, it will need a very fine tip. I highly recommend that you order more than one connector; they melt very easily.

All that said, some folks are natural athletes...maybe you are blessed with fine motor skills beyond the norm. As long as you get into this knowing the risks you will learn something valuable either way.

Thanks again once again for the response.

I understand the possibility of damaging surrounding components but thought I would try covering them with kapton tape. I do know its a lot more complicated than that but I thought I can get away with it.

There's one thing I don't understand if you can help me.

From the videos I watch I understand

First applying flux surrounding the fpc connector and then using a heat gun to detach it.

Then clean up it up with soldering wick

Then they usually move the soldering iron across the pins. What are they doing here? Just before attaching the new pfc connector.

Some videos show them dragging the soldering iron across, some show them using some metal like thick wire, touching it and then applying it to the pins. Also these videos were not ones where they had they had to replace pads and create bridge's. Just to make it more clear as to what I am talking about

For example

5.44 in this video

https://youtu.be/7-n_QjWSYAc

Jessa is not using a heat gun but a hot air station. At 5:44, she is "tinning" the pads with fresh, leaded solder.

댓글 12개 더보기

댓글 달기

This is how things go, sometimes, when you try to desolder components from a logic board....

Block Image

해당 답변은 도움이 되었습니까?

점수 3

댓글 5개:

I want to laugh so badly but im going to attempt this repair in few minutes and I doubt it I will do any better.

@hptl17 take a deep breath and do it. Just know your limits and if you think things are going sideways, pause and decide what to do next.

@arbaman kudos (+1) for posting this. Sometimes our first repair goes super smooth and we think "I got this" but only realize later that it's not that easy. Other times they don't ... :>)

Okay I have taken it off but at the same time some of the pad things come off too. Should I quit now or carry on D: ?

@refectio unless one has a very good teacher, the only way of learning is transferring our knowledge to the unknown and learn by mistakes =:)

hi, what to do when the gold plate on logic board is missing like the picture above?

댓글 달기

This was a nice post read though I don’t repair. My IPad mini 2 has the same problem and I do soldering just not micro soldering. So yes I have contacted a nearby person who repairs and let’s see how much he quotes. Please guide me telling if it is overpriced or good

해당 답변은 도움이 되었습니까?

점수 0
댓글 달기

귀하의 답변을 추가하세요

HPTL 님은 대단히 고마워 할 것입니다.
조회 통계:

24 시간 전: 1

7일 전: 4

30일 전: 16

전체 시간: 6,056