주요 콘텐츠로 건너뛰기

Apple의 2016년 개정판 노트북은 전문 사용자를 대상으로 제작되었습니다. 15 인치, 2880 x 1800 Retina 화면, 쿼드-코어 Intel Core i7, 256 GB / 512 GB / 1 TB / 2 TB 저장 공간 옵션, 16 GB RAM, 그리고 Touch Bar가 장착 된 키보드가 특징입니다. 2016년 11월 출시되었습니다. 모델 A1707.

260 질문 전체 보기

Where are the "Power On Pads" for A1707, 2016

Hi,

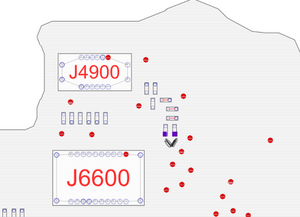
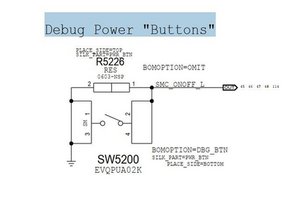
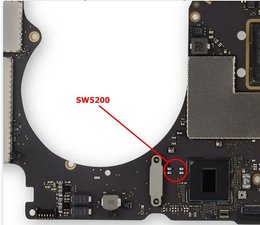
Anyone know where the "Power On Pads" are for the A1707, 2016 model?

Are they the 2 square pads about 1/2-1" above/north of the Trackpad cable plug?

Also, does the keyboard need to be unplugged for the power-on-pads to work for this model?

Currently, the mbp is not turning on with the normal power button. Hence, why I wanna try the power-on-pads.

Thanks

답변되었습니다! 답변 보기 저도 같은 문제를 겪고 있습니다

좋은 질문 입니까?

점수 2
댓글 달기

답변 2개

선택된 답변

As I recall, this is where they stopped featuring proper power on pads. There is a test point on the back of the board, which you could use, but I wager the easiest place to accomplish this is to use a resistor and a capacitor near the Touch ID and Audio connectors. This is on the same line as the Power On Pads from previous generations. It references SMC_ONOFF_L. This means it turns the System Management Controller on or off when the voltage is low (shorted to ground).

Block Image

Short these two components together

Block Image

The relevant Test Point—short it to any nearby ground

해당 답변은 도움이 되었습니까?

점수 1

댓글 4개:

Thanks for the info!

I assume the 1st option requires removing the logic board to gain access to the “back of board”? (I wanna avoid disassembly)

So, is the 2nd option easier and viewable by just removing back cover?

So, just short it from that small circled red pad on bottom-right (from that 5x5 grid of pads) to a ground (upper mid right) with some sort of wire, correct?

Edit:

I have the back cover off, and I could not find anything similar at all (no 5x5 grid [next to edge/battery?]).

Looks like a completely diff pcb, esp comparing with components/layout around the round cut outs (fans?).

Perhaps it looks different from the back side, idk.

@edgar27392 So I might have explained this in a weird order. The grid is indeed on the "bacK" of the back. The side that faces the keyboard when installed.

The One I would use is the one on the "front" side. So you don't have to take the board out. That would be the first image. There should be two itty bitty components right next to the audio and touch ID connectors.

I’ve found it! (tiny cap & resistor)

It’s under the hinge-cover & touch-id-cover (T3 screws).

Looks easy! Thanks for your knowledge.

So, guess I gotta order a T3 driver (all my few computer tools are for 2013 & older macbooks - T5, T6, T8, P5, TR-1).

I’ll report back once I receive the T3 driver and try it!

Side note/comment:

Many people say in various threads, that sometimes disconnecting the batt-data-cable & main batt-power-connector solves the turning ON issue.

I tried it (I even left it disconnected for 1-2 hours), and it still doesn’t turn on, after I reconnected everything.

I also tried turning it on, while batt was still disconnected, but with the usb-c-charger plugged in (since some mentioned this turned it on as well)…. but, that didn’t work neither.

So, perhaps something major happened within the logic board or the battery (some cells are def puffy).

Was working perfectly just a few days ago tho. Also, computer never has had any issues nor battery warnings.

Hope the power-on-pads (or, cap&res) works tho (once I get the T3 driver).

댓글 달기
가장 유용한 답변

@edgar27392 this is just to determine if there is a different way. @flannelist take a look on here. According to that, the debug for the power button is on the top side (keyboard side) of the board

Block Image

but if you look closer at the schematic, SW5200 is actually on the bottom side of the board (PLACE_SIDE=BOTTOM). Pin 1 is bottom left Pin 3 bottom right, 2 top left and 4 top right.

Block Image

Applying a simple jumper, like a paper clip or a flat tip screwdriver, and bridging 1/2 and 3/4 should accomplish the same thing. Please correct me if I am wrong here. Wouldn't be the first time :-)

해당 답변은 도움이 되었습니까?

점수 1

댓글 16개:

Nice work! I was looking at those too and wondering if they could do it.

I'll try bridging 1 > 2 and also 3 > 4 at the same time.

Edit:

Just tried it... no bueno.

Tried bridging/shorting 1>2 & 3>4 at same time with SS tweezers and surgical scissors.

Tried +10 times, also held for 10 secs. No response from computer at all.

(unless I bridged the wrong ones... but I def tried LowerLeft>UpperLeft and LR>UR)

@edgar27392 seems to be an issue other than the power button :-) If your battery is "puffy" start with that. Replace it and let's start anew once it's in.

@oldturkey03

I tried turning it on with battery and battery-data cables disconnected and usb-c-charger plugged in, but still didn't turn on. Would that rule out the battery?

@edgar27392 it should, but I am of old school which teaches to repair/replace what's broken, then re-evaluate. All we know for sure right now is that your computer has a power issue. Wasn't there something with bad USB-C controllers on this model? Let me check on that to be sure. I am old so I have more frequent lapse in the synapse ¯|_(ツ)_/¯

@oldturkey03 OoooooOOOO how did I not see those????? I definitely glanced right over them. Probably because I was looking at the boardview and not the schematic. But these would have been a much better bet than my nonsense.

@edgar27392 As for what the problem is. If batteries are slightly puffy. But you didn’t get any battery warnings and the fact that it doesn’t turn on even without power connected, this could be bad USB controllers. But it could also be a short circuit on the board. That could account for the swollen battery (though it could also be age). That’s still fixable, but you’ll need a multimeter to diagnose.

댓글 11개 더보기

댓글 달기

귀하의 답변을 추가하세요

Edgar 님은 대단히 고마워 할 것입니다.
조회 통계:

24 시간 전: 2

7일 전: 3

30일 전: 11

전체 시간: 141