주요 콘텐츠로 건너뛰기

ASUS D550MA-DS01 Hard Drive Replacement

필요한 것

  1. ASUS D550MA-DS01 Hard Drive Replacement, Keyboard Module: 1 단계, 이미지 1/2 ASUS D550MA-DS01 Hard Drive Replacement, Keyboard Module: 1 단계, 이미지 2/2
    • Before you begin, be sure to turn off your laptop and unplug it from the outlet.

    • Use a Philips #1 screwdriver to remove the nine screws from the back cover.

  2. ASUS D550MA-DS01 Hard Drive Replacement: 2 단계, 이미지 1/1
    • Turn the laptop over and open the display.

    • Insert the flat edge of the spudger into the crease of the keyboard cover.

    • While the spudger is in the crease, carefully pry open the casing by sliding the spudger along the edge.

    • Do not use excessive force to pry open the lid. You should hear each plastic clip snap open as you run the spudger along the edge.

  3. ASUS D550MA-DS01 Hard Drive Replacement: 3 단계, 이미지 1/2 ASUS D550MA-DS01 Hard Drive Replacement: 3 단계, 이미지 2/2
    • Make sure that the entire cover has been released from the plastic clips.

    • Slowly lift the cover open from the front of the laptop, but do not completely remove it.

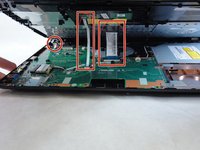
    • Note the locations of the three white and blue data cables connecting to the keyboard to the computer's main board.

  4. ASUS D550MA-DS01 Hard Drive Replacement: 4 단계, 이미지 1/1
    • If you are only replacing the battery, you can skip this step and the next. Shift the keyboard module away from the display and set it such that the fragile flex cables are not strained.

    • Disconnect the three data cables from the motherboard.

    • To unlock a ZIF connector, use the tip of a spudger or your fingernail to flip up the small, hinged locking flap. Carefully slide the unlocked cable out of the socket.

  5. ASUS D550MA-DS01 Hard Drive Replacement: 5 단계, 이미지 1/1
    • Remove the fully disconnected keyboard module from the laptop.

  6. ASUS D550MA-DS01 Hard Drive Replacement, Hard Drive: 6 단계, 이미지 1/2 ASUS D550MA-DS01 Hard Drive Replacement, Hard Drive: 6 단계, 이미지 2/2
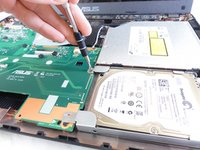
    • Remove the four screws that hold the hard drive in place with the Philips #1 screwdriver.

    • There are two screws connected to the motherboard and two screws connected directly to the case.

  7. ASUS D550MA-DS01 Hard Drive Replacement: 7 단계, 이미지 1/1
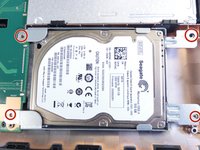
    • Remove the hard drive by sliding it to the right to disconnect it from the motherboard and lifting out.

    • Be sure to fully disconnect the hard drive from the motherboard to ensure that you do not damage the connectors.

    • If necessary, unscrew the old hard drive from the holster and screw the new one into the holster.

결론

To reassemble your device, follow these instructions in reverse order.

다른 2명이 해당 안내서를 완성하였습니다.

Richard Johnson

회원 가입일: 09/16/15

704 평판

안내서 5개 작성하였습니다

IUPUI, Team 1-2, Baechle Fall 2015 IUPUI, Team 1-2, Baechle Fall 2015 회원

IUPUI-BAECHLE-F15S1G2

3 회원들

안내서 8개 작성하였습니다

댓글 0개

댓글 쓰기

조회 통계:

24 시간 전: 0

7일 전: 0

30일 전: 8

전체 시간: 2,099