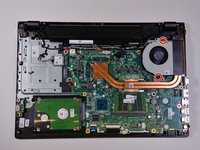
주요 콘텐츠로 건너뛰기

Acer Aspire V5-591G-75KE Fan and Heatsink Replacement

필요한 것

  1. Acer Aspire V5-591G-75KE Fan and Heatsink Replacement, Acer Aspire V5-591G-75KE Disassembly: 1 단계, 이미지 1/3 Acer Aspire V5-591G-75KE Fan and Heatsink Replacement, Acer Aspire V5-591G-75KE Disassembly: 1 단계, 이미지 2/3 Acer Aspire V5-591G-75KE Fan and Heatsink Replacement, Acer Aspire V5-591G-75KE Disassembly: 1 단계, 이미지 3/3
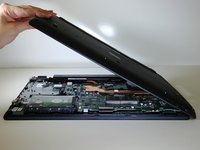
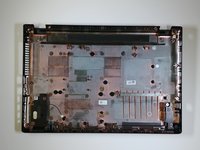
    • Close down the display and flip the device upside down.

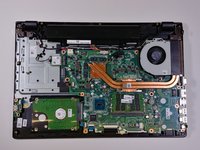
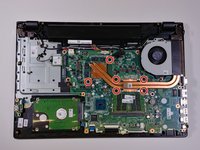
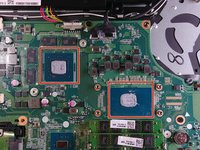
    • Use a Phillips #1 screwdriver to remove 18 black 10mm Phillips Head screws in order to loosen up the protective bottom casing.

  2. Acer Aspire V5-591G-75KE Fan and Heatsink Replacement: 2 단계, 이미지 1/2 Acer Aspire V5-591G-75KE Fan and Heatsink Replacement: 2 단계, 이미지 2/2
    • With the screws removed, flip the device right-side up and open up the display.

    • Run a plastic spudger tool along the seam of the face-plate in order to loosen up the protective bottom casing.

    • Popping sounds are normal, but forceful prying can damage delicate components. Be especially careful near the USB and HDMI ports.

  3. Acer Aspire V5-591G-75KE Fan and Heatsink Replacement: 3 단계, 이미지 1/2 Acer Aspire V5-591G-75KE Fan and Heatsink Replacement: 3 단계, 이미지 2/2
    • Close the display down once more, and flip the laptop upside down, with the hinge facing away from you.

    • Do not yank the bottom casing off. There is a small speaker wire that connects it to the motherboard.

    • Taking note of the small speaker wire, gently lift only the left side of the bottom casing.

  4. Acer Aspire V5-591G-75KE Fan and Heatsink Replacement: 4 단계, 이미지 1/3 Acer Aspire V5-591G-75KE Fan and Heatsink Replacement: 4 단계, 이미지 2/3 Acer Aspire V5-591G-75KE Fan and Heatsink Replacement: 4 단계, 이미지 3/3
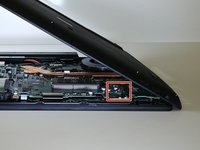
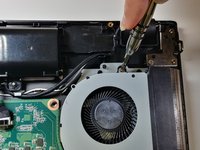
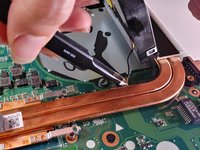
    • Using a pair of blunt tweezers, push on the tabs of the small white connector to separate it from the motherboard.

    • The entire bottom casing should lift with no resistance. If there is too much resistance, verify you removed all the screws, and run the plastic spudger tool around the face-plate again.

  5. Acer Aspire V5-591G-75KE Fan and Heatsink Replacement, Fan and Heatsink: 5 단계, 이미지 1/2 Acer Aspire V5-591G-75KE Fan and Heatsink Replacement, Fan and Heatsink: 5 단계, 이미지 2/2
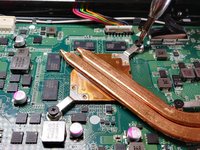
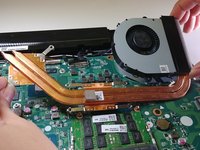
    • Use a Phillips Head size #1 screwdriver to remove the two silver-colored 10mm Phillips Head screws securing the fan to the motherboard.

    • There are two screw holes, but you might only find one screw.

  6. Acer Aspire V5-591G-75KE Fan and Heatsink Replacement: 6 단계, 이미지 1/2 Acer Aspire V5-591G-75KE Fan and Heatsink Replacement: 6 단계, 이미지 2/2
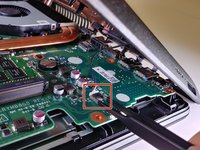
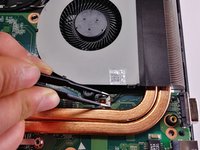
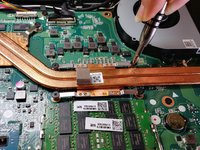
    • Use a pair of blunt tweezers to gently push on the 3-pin connector. This disconnects the fan from the motherboard.

    • You can lift up the fan if you need additional space to remove the connector.

  7. Acer Aspire V5-591G-75KE Fan and Heatsink Replacement: 7 단계, 이미지 1/3 Acer Aspire V5-591G-75KE Fan and Heatsink Replacement: 7 단계, 이미지 2/3 Acer Aspire V5-591G-75KE Fan and Heatsink Replacement: 7 단계, 이미지 3/3
    • Use a Phillips #1 screwdriver to remove 6 black 10mm Phillips Head screws that connect the copper heat-sink to the motherboard.

  8. Acer Aspire V5-591G-75KE Fan and Heatsink Replacement: 8 단계, 이미지 1/3 Acer Aspire V5-591G-75KE Fan and Heatsink Replacement: 8 단계, 이미지 2/3 Acer Aspire V5-591G-75KE Fan and Heatsink Replacement: 8 단계, 이미지 3/3
    • Once you separate the heat-sink from the motherboard, you will need to clean and re-apply thermal compound. Do not proceed unless you are prepared and you have the necessary materials.

    • Using both hands, gently lift the heat-sink and fan components from the motherboard.

    • Old thermal compound can dry up and adhere the heat-sink to the motherboard like glue. This may make removing the fan and heat-sink difficult.

    • Do not re-seat the fan and heat-sink without cleaning and re-applying the thermal compound. For more information, please refer to this guide.

결론

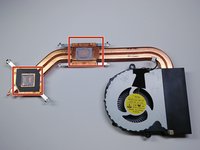
You can follow the steps in reverse to reassemble your device, but you should not re-seat the heat sink and fan without cleaning and re-applying the thermal compound.

다른 한 분이 해당 안내서를 완성하였습니다.

Tasier Hagler

회원 가입일: 10/18/17

428 평판

안내서 4개 작성하였습니다

UW Tacoma, Team S3-G5, Liner Fall 2017 UW Tacoma, Team S3-G5, Liner Fall 2017 회원

UWT-LINER-F17S3G5

4 회원들

안내서 18개 작성하였습니다

댓글 0개

댓글 쓰기

조회 통계:

24 시간 전: 3

7일 전: 8

30일 전: 14

전체 시간: 1,566