소개
This guide will walk you through the replacement process for the woofer found within your Amazon Echo Show 10 3rd Gen device. The woofer is responsible for the output of lower frequency sounds and may need replacement if not functioning properly. The malfunctioning of this component can be seen through distorted audio or the complete absence of sound.
Make sure other solutions found within the Amazon Echo Show 10 3rd Gen troubleshooting page (such as unmuting your Echo or toggling 'Do Not Disturb' off) have been attempted before committing to disassembly and replacement.
This replacement guide requires the user to solder components within the device. For more information on how to solder and desolder connections, please refer to the guide linked here.
필요한 것
-
-
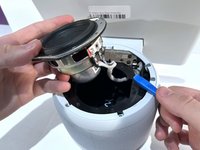
With the echo device standing upright, firmly grip the base and use the blue opening tool to gently pry the lid from the mesh speaker base.
-
Remove the lid and set it aside.
-
-


To reassemble your device, follow these instructions in reverse order.
팀

Western Carolina University, Team 1-4, Virtue Fall 2023 Western Carolina University, Team 1-4, Virtue Fall 2023 회원
WCU-VIRTUE-F23S1G4
4 회원들
안내서 6개를 작성함