주요 콘텐츠로 건너뛰기

Amazon Fire HD 10 Battery Replacement

필요한 것

  1. Amazon Fire HD 10 Battery Replacement, Screen: 1 단계, 이미지 1/3 Amazon Fire HD 10 Battery Replacement, Screen: 1 단계, 이미지 2/3 Amazon Fire HD 10 Battery Replacement, Screen: 1 단계, 이미지 3/3
    • Avoid prying near bottom right hand side due to LCD Connector

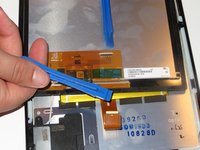
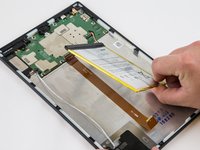
    • Use a plastic opening tool to pry the screen up in the right hand corner.

  2. Amazon Fire HD 10 Battery Replacement: 2 단계, 이미지 1/1
    • Do not completely remove the screen yet as there is a ZIF connector connected.

    • Lift the screen and digitizer from the case.

    • You may need to use some force due to the glue.

  3. Amazon Fire HD 10 Battery Replacement: 3 단계, 이미지 1/2 Amazon Fire HD 10 Battery Replacement: 3 단계, 이미지 2/2
    • Be mindful of the ZIF connector.

    • Disconnect the ribbon connector from the digitizer side using your hands or the plastic opening tool.

  4. Amazon Fire HD 10 Battery Replacement: 4 단계, 이미지 1/1
    • Remove the screen and digitizer from the case completely.

  5. Amazon Fire HD 10 Battery Replacement, Battery: 5 단계, 이미지 1/3 Amazon Fire HD 10 Battery Replacement, Battery: 5 단계, 이미지 2/3 Amazon Fire HD 10 Battery Replacement, Battery: 5 단계, 이미지 3/3
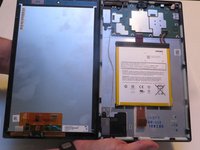
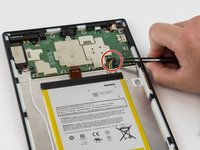
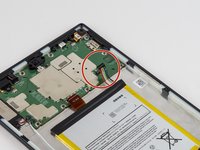
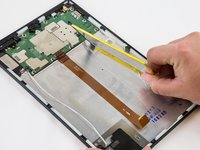
    • Locate the power cable that links the battery to the motherboard.

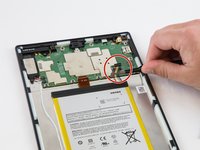
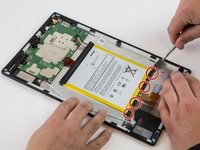
    • Carefully unplug the battery power cable to disconnect the battery from the motherboard.

    • The third image shows what it should look like with the battery power cable is disconnected.

  6. Amazon Fire HD 10 Battery Replacement: 6 단계, 이미지 1/3 Amazon Fire HD 10 Battery Replacement: 6 단계, 이미지 2/3 Amazon Fire HD 10 Battery Replacement: 6 단계, 이미지 3/3
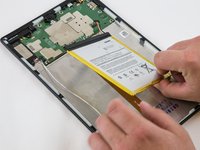
    • Begin by locating the double sided pull tape locations.

    • Do not lift on the battery when doing the following step. You will bend it. It is very pliable.

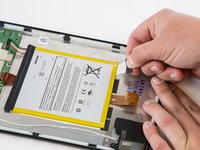
    • Pull the black soft tabs to release the tape's adhesion.

    • Make sure you pull the tabs slowly and continuously away from the case until the adhesive is completely out.

    • Do this to all 4 tabs until the battery is completely free of adhesion to the device's backing.

  7. Amazon Fire HD 10 Battery Replacement: 7 단계, 이미지 1/3 Amazon Fire HD 10 Battery Replacement: 7 단계, 이미지 2/3 Amazon Fire HD 10 Battery Replacement: 7 단계, 이미지 3/3
    • Make sure all the adhesive is removed before trying to lift the battery from the case.

    • After the battery is totally free of any adhesion, simply lift the battery from the case.

  8. Amazon Fire HD 10 Battery Replacement: 8 단계, 이미지 1/3 Amazon Fire HD 10 Battery Replacement: 8 단계, 이미지 2/3 Amazon Fire HD 10 Battery Replacement: 8 단계, 이미지 3/3
    • Inspect battery for any leakage.

    • Please follow all U.S. regulations and laws when disposing or recycling the battery.

결론

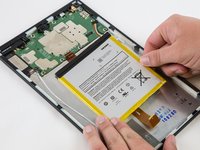
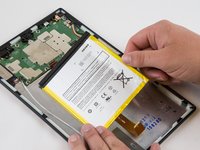
To reassemble your device, follow these instructions in reverse order.

다른 11명이 해당 안내서를 완성하였습니다.

Jaie Hillery

회원 가입일: 10/07/14

1,718 평판

안내서 10개 작성하였습니다

USF Tampa, Team 16-6, Blackwell Winter 2016 USF Tampa, Team 16-6, Blackwell Winter 2016 회원

USFT-BLACKWELL-W16S16G6

3 회원들

안내서 22개 작성하였습니다

댓글 8개

why is there so much empty space next to the battery?

echow2001 - 답글

Big screen, little processor. The screen dictates the space, that’s why the battery has to be secured with adhesive.

ctgblue -

I’m confused. If it’s a battery replacement issue, why is the battery not listed on the parts list? Is that not necessary once you take the old one out? Where do I get a new battery to replace the one this is teaching me to remove? O.o

tyger.night - 답글

You’ll have to google one. Amazon does not offer one. They want to sell you a new Kindle instead.

I am buying one with the plastic tools (ebay), even if they suck, they should get through this process once.

ctgblue -

How do you know if ita battery or charging port? Mine dont do anything whe. Its

Tech Reviews - 답글

댓글 쓰기

조회 통계:

24 시간 전: 17

7일 전: 120

30일 전: 532

전체 시간: 41,784