소개
This guide explains how to replace the camera for the Apex Tablet 7. Use this guide if your tablet has a damaged or malfunctioning camera. You should have a replacement camera and be prepared to remove your old camera.
필요한 것
-
-
Unscrew the two 2.70 mm Phillips #00 screws on the side of the tablet that has the buttons and the headphone jack (bottom side when holding upright).
 FixBot에 문의하기
-
-
-
Slide a plastic opening tool in between the edge of the back panel and the the top edge of the device.
-
Run the plastic opening tool along the sides of the tablet while keeping it in the crack between the tablet and the back panel to create an opening.
-
-
-
-
Apply pressure using your hand to pop the back panel off slowly, taking extra care around the speaker connection.
-
-
-
The back panel should now be disconnected from the device. This provides access to the components of the device for repairing and replacing parts of the tablet.
-
-
-
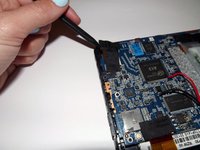
Gently remove the black tape covering the camera and circuit board. The tape will be connected to a foamy block on the back of the actual camera component.
-
-
-
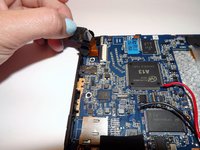
Flip the black latch over the gold cable to the upright position in order to release the cable.
-
-
-
Pull out the camera. There should not be any more connections holding it in place.
-
Reconnect the replacement camera.
-


To place the new part and reassemble your device, follow these instructions in reverse order.
다른 한 분이 해당 안내서를 완성하였습니다.
팀

Baylor, Team 2-2, Grigsby Spring 2015 Baylor, Team 2-2, Grigsby Spring 2015 회원
BU-GRIGSBY-S15S2G2
4 회원들
안내서 10개를 작성함