주요 콘텐츠로 건너뛰기
수리 커뮤니티 가입 - 계정 만들기

Asus X200MA Fan Replacement

필요한 것

  1. Asus X200MA Fan Replacement, Back Panel: 1 단계, 이미지 1개 중 1개
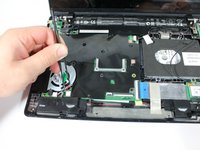
    • Remove the following six screws:

    • Six 4 mm screws using a Phillips #0 screwdriver.

    • Remove the following one screw:

    • One 14 mm screw using a Phillips #0 screwdriver.

    • The 14mm screw goes in the center.

  2. Asus X200MA Fan Replacement: 2 단계, 이미지 1개 중 1개
    • Take two rubber caps off the back side of the laptop.

    • Use a Phillips #0 screwdriver to remove the two 14 mm screws under the rubber caps.

  3. Asus X200MA Fan Replacement: 3 단계, 이미지 1개 중 1개
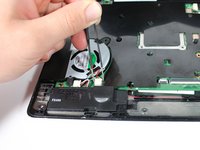
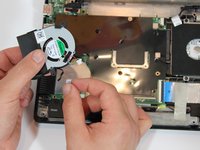
    • Use a plastic or metal spudger to separate the keyboard from the back panel and lift the keyboard out of place.

  4. Asus X200MA Fan Replacement, Battery: 4 단계, 이미지 1개 중 1개
    • Take two rubber caps off the back side of the laptop.

  5. Asus X200MA Fan Replacement: 5 단계, 이미지 1개 중 1개
    • Remove the following two screws under the rubber caps.

    • Two 14 mm screws using the Phillips #0 screw driver.

  6. Asus X200MA Fan Replacement: 6 단계, 이미지 1개 중 1개
    • Flip up the following:

    • The two latches holding the two cables shown(white and black)

    • Pull the cables free from the latches

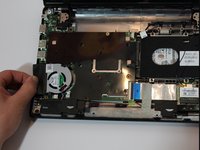
    • Lift the keyboard from the computer

  7. Asus X200MA Fan Replacement: 7 단계, 이미지 1개 중 1개
    • Remove the following screws from the inside of the laptop:

    • Two 4 mm screws using the Phillips #0 phillips screwdriver.

    • One 5 mm screw using the Phillips #0 Phillips screwdriver located in the center a little below the battery.

  8. Asus X200MA Fan Replacement: 8 단계, 이미지 1개 중 1개
    • Slide the battery up and out.

  9. Asus X200MA Fan Replacement, Fan: 9 단계, 이미지 1개 중 1개
    • Remove the Two 4 mm screws using Phillips #0 phillips screwdriver.

  10. Asus X200MA Fan Replacement: 10 단계, 이미지 2개 중 1개 Asus X200MA Fan Replacement: 10 단계, 이미지 2개 중 2개
    • Unplug the set of wires located at bottom corner on fan.

  11. Asus X200MA Fan Replacement: 11 단계, 이미지 2개 중 1개 Asus X200MA Fan Replacement: 11 단계, 이미지 2개 중 2개
    • Lift up and out to completely the remove fan component.

결론

To reassemble your device, follow these instructions in reverse order.

다른 3명이 해당 안내서를 완성하였습니다.

작성자

5다른 기여자 명과 함께

Vanessa Garcia

회원 가입일: 01/22/15

1,796 평판

안내서 6개를 작성함

Cal Poly, Team 21-24, Maness Winter 2015 Cal Poly, Team 21-24, Maness Winter 2015 회원

CPSU-MANESS-W15S21G24

4 회원들

안내서 8개를 작성함

0가이드 댓글

댓글 쓰기

조회 통계:

지난 24시간: 0

지난 7일: 1

지난 30일: 6

전체 시간: 2,529