소개
This guide will walk you through the process of replacing a broken or faulty keyboard on the Asus X751L.
필요한 것
-
-
With the screen closed, place your laptop upside-down with the front facing you.
-
Remove the six 14.6mm Phillips #00 screws.
-
Remove the four 6.6mm Phillips #00 screws.
 FixBot에 문의하기
-
-
-
-
Flip the laptop over and open the lid.
-
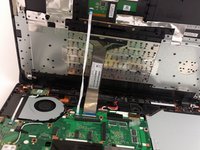
Pry around the edges of the laptop base using the plastic opening tool.
-
-
-
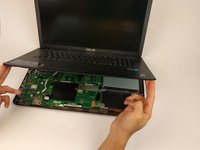
Carefully lift the keyboard up.
-
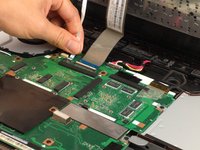
Disconnect the two ZIF connectors from the motherboard using your fingernail to lift the cream-colored tab.
-


To reassemble your device, follow these instructions in reverse order.
다른 3명이 해당 안내서를 완성하였습니다.
팀

USF Tampa, Team 17-2, Blackwell Spring 2017 USF Tampa, Team 17-2, Blackwell Spring 2017 회원
USFT-BLACKWELL-S17S17G2
4 회원들
안내서 5개를 작성함
1가이드 댓글
Looks easy enough, I have a Polish version qwertz keyboard , a 752L model-17" anyone know a compatible UK qwerty keyboard as a replacement? - or or a k. board shared with another model that will fit ? Asus service centre are less than helpful .!
phil.kath4 - 답글 공유