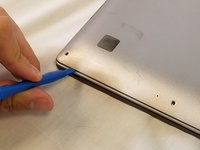
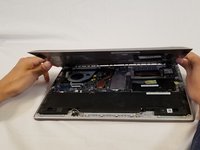
주요 콘텐츠로 건너뛰기
수리 커뮤니티 가입 - 계정 만들기

Asus ZenBook UX303U Back Panel Replacement

필요한 것

  1. Asus ZenBook UX303U Back Panel Replacement, Back Panel: 1 단계, 이미지 1개 중 1개
    • Remove the two round rubber feet at the hinge-edge of the laptop.

    댓글 쓰기

  2. Asus ZenBook UX303U Back Panel Replacement: 2 단계, 이미지 1개 중 1개
    • Remove the eleven 4 mm Phillips #00 screws from the back panel.

    댓글 쓰기

  3. Asus ZenBook UX303U Back Panel Replacement: 3 단계, 이미지 2개 중 1개 Asus ZenBook UX303U Back Panel Replacement: 3 단계, 이미지 2개 중 2개
    • Using a plastic opening tool pry the back panel off of the laptop.

    댓글 쓰기

결론

To reassemble your device, follow these instructions in reverse order.

취소: 해당 안내서를 완성하지 않았습니다.

다른 3명이 해당 안내서를 완성하였습니다.

작성자

6다른 기여자 명과 함께

Luis Perez

회원 가입일: 02/14/18

658 평판

안내서 2개를 작성함

USF Tampa, Team S3-G5, Nance Spring 2018 USF Tampa, Team S3-G5, Nance Spring 2018 회원

USFT-NANCE-S18S3G5

3 회원들

안내서 9개를 작성함

1가이드 댓글

Some models may utilize Phillips #00 screws, but mine (and many others based on what I’ve now read) utilize Torx T5 screws around the edges of the panel.

Nick Brennan - 답글 공유

댓글 쓰기

조회 통계:

지난 24시간: 2

지난 7일: 15

지난 30일: 45

전체 시간: 6,003