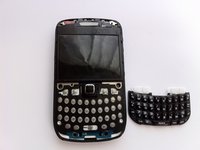
주요 콘텐츠로 건너뛰기
수리 커뮤니티 가입 - 계정 만들기

BlackBerry Curve 8520 Keyboard Cover Replacement

필요한 것

  1. BlackBerry Curve 8520 Keyboard Cover Replacement, Back Panel: 1 단계, 이미지 2개 중 1개 BlackBerry Curve 8520 Keyboard Cover Replacement, Back Panel: 1 단계, 이미지 2개 중 2개
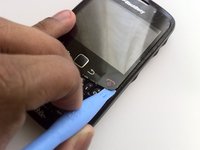
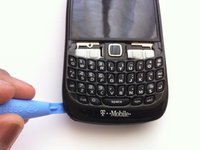
    • Insert a plastic opening tool into the small notch on the rear cover of the phone.

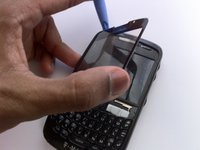
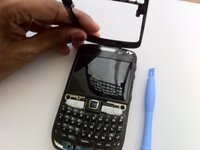
    • Pry the rear cover up from the phone.

  2. BlackBerry Curve 8520 Keyboard Cover Replacement, Battery: 2 단계, 이미지 2개 중 1개 BlackBerry Curve 8520 Keyboard Cover Replacement, Battery: 2 단계, 이미지 2개 중 2개
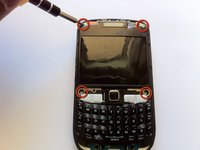
    • Locate the slit between the top of the battery and the casing.

    • Gently apply pressure on the top of the battery to trigger the spring release.

  3. BlackBerry Curve 8520 Keyboard Cover Replacement, Keyboard Cover: 3 단계, 이미지 2개 중 1개 BlackBerry Curve 8520 Keyboard Cover Replacement, Keyboard Cover: 3 단계, 이미지 2개 중 2개
    • Remove the two Torx T6 screws to the left and right of the battery.

  4. BlackBerry Curve 8520 Keyboard Cover Replacement: 4 단계, 이미지 2개 중 1개 BlackBerry Curve 8520 Keyboard Cover Replacement: 4 단계, 이미지 2개 중 2개
    • Using hairdryer or heat gun, warm the front panel to soften the adhesive beneath.

    • Starting from one side, use a plastic opening tool to pry up the screen cover.

    • Work carefully to avoid bending the screen cover.

    • Once one side is loose, gently peel up the entire cover.

  5. BlackBerry Curve 8520 Keyboard Cover Replacement: 5 단계, 이미지 3개 중 1개 BlackBerry Curve 8520 Keyboard Cover Replacement: 5 단계, 이미지 3개 중 2개 BlackBerry Curve 8520 Keyboard Cover Replacement: 5 단계, 이미지 3개 중 3개
    • Insert the plastic opening tool in the seam along the side of the device.

    • Slide the tool along the length of the seam, applying moderate force with the plastic opening tool.

    • Carefully remove the faceplate.

  6. BlackBerry Curve 8520 Keyboard Cover Replacement: 6 단계, 이미지 3개 중 1개 BlackBerry Curve 8520 Keyboard Cover Replacement: 6 단계, 이미지 3개 중 2개 BlackBerry Curve 8520 Keyboard Cover Replacement: 6 단계, 이미지 3개 중 3개
    이 단계에 사용된 도구:
    Tweezers
    $4.99
    • Remove four T6 Torx screws from the front of the phone.

    • Using tweezers, remove the keyboard buttons from the phone.

결론

To reassemble your device, follow these instructions in reverse order.

다른 28명이 해당 안내서를 완성하였습니다.

작성자

7다른 기여자 명과 함께

Matt

회원 가입일: 04/07/11

1,770 평판

안내서 5개를 작성함

Cal Poly, Team 9-62, Walters Spring 2011 Cal Poly, Team 9-62, Walters Spring 2011 회원

CPSU-WALTERS-S11S9G62

5 회원들

안내서 5개를 작성함

0가이드 댓글

댓글 쓰기

조회 통계:

지난 24시간: 0

지난 7일: 12

지난 30일: 73

전체 시간: 35,593