주요 콘텐츠로 건너뛰기

Canon PowerShot SD1200 IS Flash Assembly Replacement

필요한 것

  1. Canon PowerShot SD1200 IS Flash Assembly Replacement, Front and Rear Covers: 1 단계, 이미지 1/1
    • Remove the battery.

  2. Canon PowerShot SD1200 IS Flash Assembly Replacement: 2 단계, 이미지 1/3 Canon PowerShot SD1200 IS Flash Assembly Replacement: 2 단계, 이미지 2/3 Canon PowerShot SD1200 IS Flash Assembly Replacement: 2 단계, 이미지 3/3
    • Remove the two screws from the side of the camera casing with the strap. (4mm Phillips 00)

    • Remove the two screws from the bottom of the camera. (4mm Phillips 00)

    • Remove the two screws from the right side of the camera opposite the strap. (2mm Phillips 00)

  3. Canon PowerShot SD1200 IS Flash Assembly Replacement: 3 단계, 이미지 1/2 Canon PowerShot SD1200 IS Flash Assembly Replacement: 3 단계, 이미지 2/2
    • Pull off the front cover.

    • If the top of the cover sticks, use gentle downward pressure on the retention clips above the lens to release.

    • Remove the back cover.

  4. Canon PowerShot SD1200 IS Flash Assembly Replacement, LCD: 4 단계, 이미지 1/3 Canon PowerShot SD1200 IS Flash Assembly Replacement, LCD: 4 단계, 이미지 2/3 Canon PowerShot SD1200 IS Flash Assembly Replacement, LCD: 4 단계, 이미지 3/3
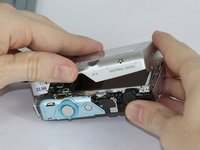
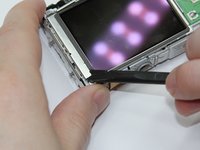
    • Use the spudger to lift the retaining flap on the Zero Insertion Force (ZIF) tab securing the thick ribbon cable.

    • Slide out the ribbon cable using fingers or tweezers.

    • Be sure you are prying up on the hinged retaining flap, not the connector.

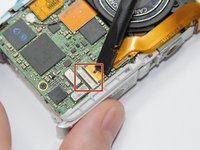
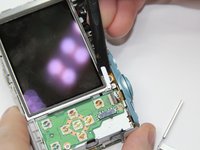
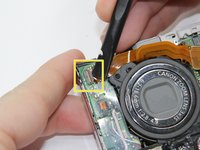
    • Using tweezers, disconnect the small ribbon cable below the flash assembly from the No Fuss Connector by simply pulling the ribbon cable straight out.

  5. Canon PowerShot SD1200 IS Flash Assembly Replacement: 5 단계, 이미지 1/3 Canon PowerShot SD1200 IS Flash Assembly Replacement: 5 단계, 이미지 2/3 Canon PowerShot SD1200 IS Flash Assembly Replacement: 5 단계, 이미지 3/3
    • Remove the L shaped brackets from the left and right side of the LCD screen with the spudger tool.

    • The Brackets have tabs that need to be pried up.

    • Remove the screw below the shutter button. (2.5mm Phillips 00)

    • Holding the sides of the LCD screen, lift the screen up and away to remove.

  6. Canon PowerShot SD1200 IS Flash Assembly Replacement, Flash Assembly: 6 단계, 이미지 1/3 Canon PowerShot SD1200 IS Flash Assembly Replacement, Flash Assembly: 6 단계, 이미지 2/3 Canon PowerShot SD1200 IS Flash Assembly Replacement, Flash Assembly: 6 단계, 이미지 3/3
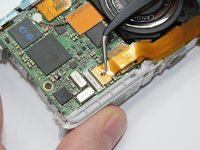
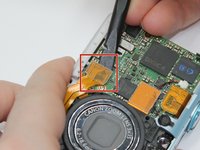
    • Use the spudger to pry up each side of the lens assembly Flat-Topped Connector at the bottom of the motherboard.

    • Holding back the lens assembly ribbon cable, use the spudger to lift the Zero Insertion Force (ZIF) connector tab . Slide out the ribbon cable.

    • Be sure you are prying up on the hinged retaining flap, not the connector itself.

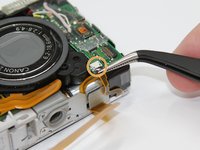
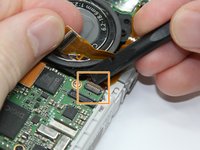
    • Use the spudger to lift the Zero Insertion Force (ZIF) connector tab located on the flash unit. Remove the ribbon cable.

  7. Canon PowerShot SD1200 IS Flash Assembly Replacement: 7 단계, 이미지 1/1
    • Remove the two screws (2 mm Phillips 00) along the back edge of the camera frame directly behind the flash assembly.

  8. Canon PowerShot SD1200 IS Flash Assembly Replacement: 8 단계, 이미지 1/1
    • Lift out the flash assembly.

결론

To reassemble your device, follow these instructions in reverse order.

Jeff Casper

회원 가입일: 09/15/16

848 평판

안내서 7개 작성하였습니다

USF Tampa, Team 17-5, Blackwell Fall 2016 USF Tampa, Team 17-5, Blackwell Fall 2016 회원

USFT-BLACKWELL-F16S17G5

3 회원들

안내서 7개 작성하였습니다

댓글 0개

댓글 쓰기

조회 통계:

24 시간 전: 0

7일 전: 0

30일 전: 7

전체 시간: 306