주요 콘텐츠로 건너뛰기

Canon PowerShot SD30 Control Panel Replacement

필요한 것

  1. Canon PowerShot SD30 Control Panel Replacement, Front Cover: 1 단계, 이미지 2개 중 1개 Canon PowerShot SD30 Control Panel Replacement, Front Cover: 1 단계, 이미지 2개 중 2개
    • Be sure to remove the wrist strap and battery before removing the cover.

    • Remove the two 2mm black screws that are located on the underside of the camera.

    • Remove the two 3mm silver screws from the right side of camera.

  2. Canon PowerShot SD30 Control Panel Replacement: 2 단계, 이미지 1개 중 1개
    • Gently remove the front cover.

  3. Canon PowerShot SD30 Control Panel Replacement, Back Cover: 3 단계, 이미지 3개 중 1개 Canon PowerShot SD30 Control Panel Replacement, Back Cover: 3 단계, 이미지 3개 중 2개 Canon PowerShot SD30 Control Panel Replacement, Back Cover: 3 단계, 이미지 3개 중 3개
    • Remove the wrist strap and battery before removing the back cover.

    • Remove the 2mm screw from the back of the camera.

    • Remove two 2mm screws from the bottom of the camera.

    • Remove two 2mm screws the left side of camera.
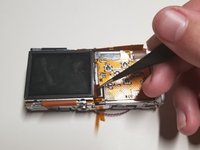
  4. Canon PowerShot SD30 Control Panel Replacement: 4 단계, 이미지 1개 중 1개
    • Gently remove the back cover.

  5. Canon PowerShot SD30 Control Panel Replacement, Control Panel: 5 단계, 이미지 3개 중 1개 Canon PowerShot SD30 Control Panel Replacement, Control Panel: 5 단계, 이미지 3개 중 2개 Canon PowerShot SD30 Control Panel Replacement, Control Panel: 5 단계, 이미지 3개 중 3개
    이 단계에 사용된 도구:
    Tweezers
    $4.99
    • Use the tweezers to pull up on the piece of black plastic connected to the ribbon to unhook and remove the ribbon connected to the screen.

    • You also have to pull up on the top part of the control panel because it is connected to the metal by a sticky pad.

  6. Canon PowerShot SD30 Control Panel Replacement: 6 단계, 이미지 3개 중 1개 Canon PowerShot SD30 Control Panel Replacement: 6 단계, 이미지 3개 중 2개 Canon PowerShot SD30 Control Panel Replacement: 6 단계, 이미지 3개 중 3개
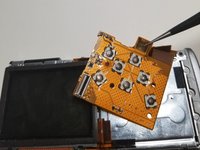
    • Turn the camera over to the side with the lens and remove the ribbon on the left side.

    • After removing the ribbon there will be a second ribbon to remove that was hiding underneath the first ribbon.

  7. Canon PowerShot SD30 Control Panel Replacement: 7 단계, 이미지 1개 중 1개
    • Lift up the button that connects to the power button of the camera so you can remove the control panel.

  8. Canon PowerShot SD30 Control Panel Replacement: 8 단계, 이미지 1개 중 1개
    • Remove the control panel from the camera.

결론

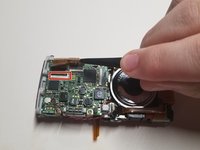
To reassemble your device, follow these instructions in reverse order.

다른 2명이 해당 안내서를 완성하였습니다.

작성자

2다른 기여자 명과 함께

Diego Hughes

회원 가입일: 09/21/18

139 평판

안내서 1개를 작성함

댓글 0개

댓글 쓰기

조회 통계:

지난 24시간: 1

지난 7일: 4

지난 30일: 5

전체 시간: 257