소개
If you crack the lens of your camera or if it is not functioning properly, this guide may be for you. This guide will help you remove and replace the lens.
필요한 것
-
-
Using your fingers, slide the battery compartment door to the right until it unlocks.
 FixBot에 문의하기
-
-
-
Rotate the door along hinges to open.
-
Take out the battery with your fingers.
-
-
-
Remove 2-3.4 mm screws that secure the back panel using a Phillips #000 screwdriver.
-
Remove 4-4 mm screws on the left and right sides of the camera using a Phillips #000 screwdriver.
-
-
-
Remove 2-4 mm screws that secure the bottom of the camera using a Phillips #000 screwdriver.
-
-
-
-
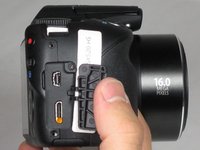
Pull back the rubber facing to access the A/V and HDMI output compartment.
-
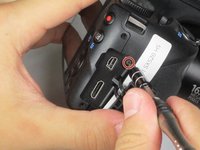
Remove 1-3.4mm screw inside the compartment using a Phillips #000 screwdriver.
-
-
-
Remove 3-4.4 mm screws that secure the small metal plate using a Phillips #000 screwdriver.
-
-
-
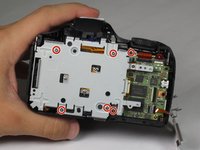
Remove 6-4.4 mm screws that secure the metal cover using a Phillips #000 screwdriver.
-
Remove 2-2.5 mm screws that secure the back panel using a Phillips #000 screwdriver.
-
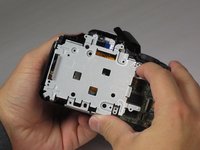
After all 8 screws are removed, pull the metal plate out with your fingers.
-
-
-
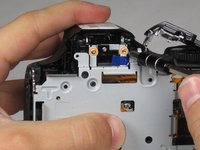
Unlcip the large cable by pulling up on the metal part with your finger.
-
Slide out the 2 smaller cables with your fingers.
-


To reassemble your device, follow these instructions in reverse order.
다른 6명이 해당 안내서를 완성하였습니다.
팀

Baylor, Team 4-4, Williams Fall 2015 Baylor, Team 4-4, Williams Fall 2015 회원
BU-WILLIAMS-F15S4G4
4 회원들
안내서 6개를 작성함
1가이드 댓글
guide is unfinished; dropping to the point of lens group extraction without going on further. I found it, useless.