주요 콘텐츠로 건너뛰기

Canon Powershot A720 IS Shutter Button Replacement

필요한 것

  1. Canon Powershot A720 IS Shutter Button Replacement, Shutter Button: 1 단계, 이미지 1/1
    • Carefully insert the tip of the tweezers in the space between the shutter button and the zoom dial. Gently insert the tip under the button and slowly lift.

    • If this step does not dislodge the shutter button, move on to step 2.

    • Do not force the tip of the tweezer or insert the tweezer too deep in between the shutter button and zoom dial. It will cause permanent cosmetic and button damage to the camera.

  2. Canon Powershot A720 IS Shutter Button Replacement: 2 단계, 이미지 1/2 Canon Powershot A720 IS Shutter Button Replacement: 2 단계, 이미지 2/2
    • On the bottom of the camera, open the battery compartment by pushing the lock up. The door will then spring open allowing you to slide the batteries out.

    • If an SD card is also inserted, push on it to easily remove it from the camera.

  3. Canon Powershot A720 IS Shutter Button Replacement: 3 단계, 이미지 1/3 Canon Powershot A720 IS Shutter Button Replacement: 3 단계, 이미지 2/3 Canon Powershot A720 IS Shutter Button Replacement: 3 단계, 이미지 3/3
    • On the left side of the camera remove the two visible 4mm Phillips head screws.

    • On the right side of the camera remove the two visible 4mm Phillips head screws.

    • On the bottom of the camera remove the two visible 4mm Phillips head screws.

  4. Canon Powershot A720 IS Shutter Button Replacement: 4 단계, 이미지 1/3 Canon Powershot A720 IS Shutter Button Replacement: 4 단계, 이미지 2/3 Canon Powershot A720 IS Shutter Button Replacement: 4 단계, 이미지 3/3
    • Slowly and gently pry open the back case panel from the rest of the camera.

    • The gray rubber cover labeled DC IN DIGITAL A/V OUT may fall out.

  5. Canon Powershot A720 IS Shutter Button Replacement: 5 단계, 이미지 1/1
    • Remove the two 3 mm screws below the LCD screen using a Phillips #00 screwdriver.

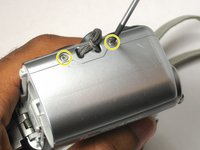
    • Unscrew the top 4 mm Phillips head screw.

  6. Canon Powershot A720 IS Shutter Button Replacement: 6 단계, 이미지 1/2 Canon Powershot A720 IS Shutter Button Replacement: 6 단계, 이미지 2/2
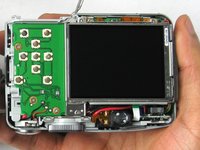
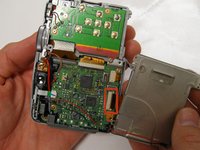
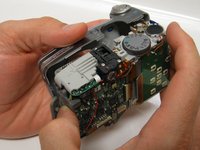
    • Gently turnover the LCD screen so that the motherboard is exposed.

    • Carefully pull the ribbon cable straight out using your thumb and index finger.

    • The ribbon cable is fragile and will break if bent too much.

  7. Canon Powershot A720 IS Shutter Button Replacement: 7 단계, 이미지 1/2 Canon Powershot A720 IS Shutter Button Replacement: 7 단계, 이미지 2/2
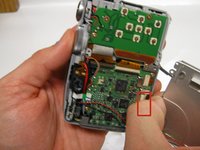
    • Remove the 3mm Phillips head screw between the circuit boards.

    • Remove the three 3.5mm Phillips head screws on the circuit board.

  8. Canon Powershot A720 IS Shutter Button Replacement: 8 단계, 이미지 1/3 Canon Powershot A720 IS Shutter Button Replacement: 8 단계, 이미지 2/3 Canon Powershot A720 IS Shutter Button Replacement: 8 단계, 이미지 3/3
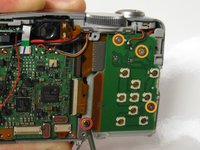
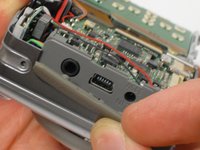
    • Remove the gray rubber cover labeled DC IN DIGITAL A/V OUT if it hasn't fallen out yet on its own.

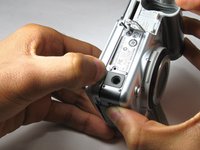
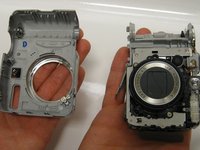
    • Carefully pull the front panel away from the rest of the camera.

  9. Canon Powershot A720 IS Shutter Button Replacement: 9 단계, 이미지 1/2 Canon Powershot A720 IS Shutter Button Replacement: 9 단계, 이미지 2/2
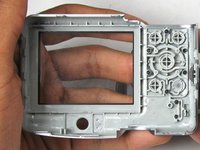
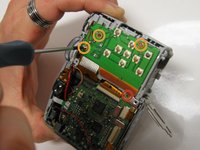
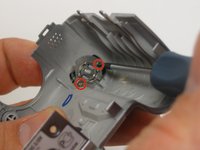
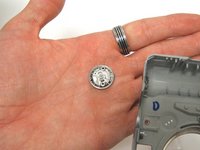
    • In the front panel remove the two 2.5mm Phillips head screws attached to the shutter button.

    • The shutter button and other components will fall out.

결론

To reassemble your device, follow these instructions in reverse order.

Ismael R

회원 가입일: 01/19/15

251 평판

안내서 2개 작성하였습니다

USF Tampa, Team 17-4, Watkins Winter 2015 USF Tampa, Team 17-4, Watkins Winter 2015 회원

USFT-WATKINS-W15S17G4

3 회원들

안내서 8개 작성하였습니다

댓글 0개

댓글 쓰기

조회 통계:

24 시간 전: 0

7일 전: 2

30일 전: 6

전체 시간: 885