주요 콘텐츠로 건너뛰기

DJI Mini 2 Drone Arms Replacement

필요한 것

  1. DJI Mini 2 Drone Arms Replacement, Battery: 1 단계, 이미지 1/2 DJI Mini 2 Drone Arms Replacement, Battery: 1 단계, 이미지 2/2
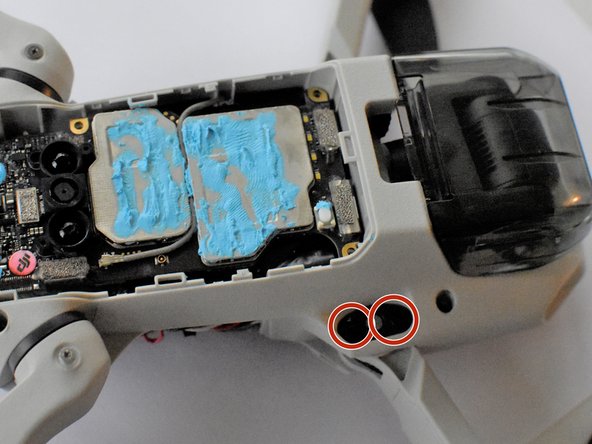
    • Face the DJI Mini 2 away from you so that you are looking at the charging ports.

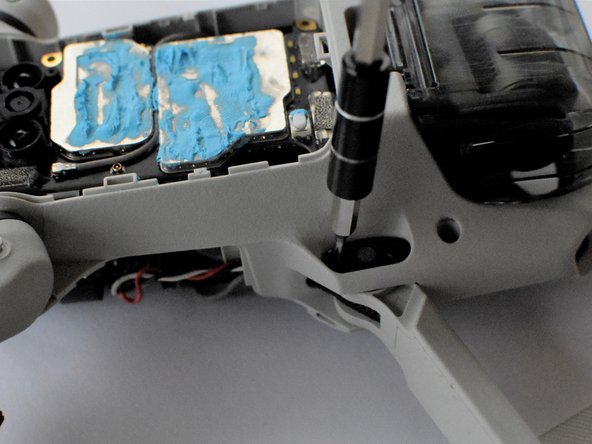
    • Use your finger to open up the back panel.

  2. DJI Mini 2 Drone Arms Replacement: 2 단계, 이미지 1/2 DJI Mini 2 Drone Arms Replacement: 2 단계, 이미지 2/2
    • Pinch the locking mechanism on the battery to release the lock.

    • Pull the battery straight out of the compartment.

  3. DJI Mini 2 Drone Arms Replacement, Drone Body: 3 단계, 이미지 1/2 DJI Mini 2 Drone Arms Replacement, Drone Body: 3 단계, 이미지 2/2
    • Unfold the wings of the drone.

    • Place the drone upside down on a flat surface.

    • There should be stickers on the device telling you how to unfold the propeller arms.

  4. DJI Mini 2 Drone Arms Replacement: 4 단계, 이미지 1/2 DJI Mini 2 Drone Arms Replacement: 4 단계, 이미지 2/2
    • Remove the four 5 mm J000 screws near each propeller arm.

  5. DJI Mini 2 Drone Arms Replacement: 5 단계, 이미지 1/3 DJI Mini 2 Drone Arms Replacement: 5 단계, 이미지 2/3 DJI Mini 2 Drone Arms Replacement: 5 단계, 이미지 3/3
    • Flip the drone back over.

    • Use a combination of the opening tool and your fingers to pry open the top panel of the drone along the seams.

  6. DJI Mini 2 Drone Arms Replacement: 6 단계, 이미지 1/2 DJI Mini 2 Drone Arms Replacement: 6 단계, 이미지 2/2
    • Remove the two 5 mm J000 screws located in the battery hatch and near the ports on the back of the drone.

  7. DJI Mini 2 Drone Arms Replacement: 7 단계, 이미지 1/2 DJI Mini 2 Drone Arms Replacement: 7 단계, 이미지 2/2
    • Flip the drone over again.

    • Pry off the bottom panel of the drone using the opening tools and your fingers.

  8. DJI Mini 2 Drone Arms Replacement, Drone Arms: 8 단계, 이미지 1/3 DJI Mini 2 Drone Arms Replacement, Drone Arms: 8 단계, 이미지 2/3 DJI Mini 2 Drone Arms Replacement, Drone Arms: 8 단계, 이미지 3/3
    • Remove the three 3 mm J000 screws on the black plate.

  9. DJI Mini 2 Drone Arms Replacement: 9 단계, 이미지 1/2 DJI Mini 2 Drone Arms Replacement: 9 단계, 이미지 2/2
    • Use your fingers to pull the black plate off to reveal the main board under it.

  10. DJI Mini 2 Drone Arms Replacement: 10 단계, 이미지 1/2 DJI Mini 2 Drone Arms Replacement: 10 단계, 이미지 2/2
    이 단계에 사용된 도구:
    Tweezers
    $4.99
    구매
    • Try to avoid disturbing the blue thermal paste covering two of the large board components. If the paste is disturbed or splotchy in places it may need to be removed and reapplied. For more information refer to the How to Apply Thermal Paste guide.

    • Using ESD Safe Tweezers Blunt Nose, remove the two gray coaxial cables attached to the main board.

  11. DJI Mini 2 Drone Arms Replacement: 11 단계, 이미지 1/1
    • Using the ESD Safe Blunt Nose Tweezers, pull the two gray wires through the drone chassis to the other side.

  12. DJI Mini 2 Drone Arms Replacement: 12 단계, 이미지 1/1
    • Flip the drone over so that it is right-side up. Then, use a soldering kit to remove the black, red, and white cables from the motherboard.

    • Trace the black, red, and white wires to make sure they are the wires connected to the drone arm you are replacing.

    • If new to soldering, a helpful guide can be found at Soldering Skills.

  13. DJI Mini 2 Drone Arms Replacement: 13 단계, 이미지 1/2 DJI Mini 2 Drone Arms Replacement: 13 단계, 이미지 2/2
    • Turn the drone back over so that it is right-side up.

    • Remove the two 3.5mm J000 screws from the drone arm being replaced.

  14. DJI Mini 2 Drone Arms Replacement: 14 단계, 이미지 1/2 DJI Mini 2 Drone Arms Replacement: 14 단계, 이미지 2/2
    • Flip the drone back over and use the tweezers to apply pressure to the pin of the drone arm.

    • Turn the drone back over again and use the tweezers to pull out the drone arm pin.

  15. DJI Mini 2 Drone Arms Replacement: 15 단계, 이미지 1/1
    • With a firm grip pull out the drone arm from the drone.

결론

To reassemble your device, follow these instructions in reverse order.

다른 5명이 해당 안내서를 완성하였습니다.

Jacob Matos

회원 가입일: 03/25/22

1,065 평판

안내서 4개 작성하였습니다

UMass Dartmouth, Team F-1, Gurgel Spring 2022 UMass Dartmouth, Team F-1, Gurgel Spring 2022 회원

UMASSD-GURGEL-S22SFG1

2 회원들

안내서 10개 작성하였습니다

댓글 한 개

complete and comprehensive guide, Easy to follow.

Only two small points of critique,

On step 5 It says "Use a combination of the opening tool and your fingers to pry open the top panel of the drone along the seams."

This seemed almost impossible to do withcout damaging the plastic.

I then found a youtube video that showcased that you can unclip a few lips inside the drone, this made the cover come off much easyer.

The video also showed an easyer whay to put the pint removed in step 14 back in.

Apart form these two tips, the guide is practically perfect

The video is by: J T

https://youtu.be/PD678snE44w

Kobe wauters - 답글

댓글 쓰기

조회 통계:

24 시간 전: 6

7일 전: 73

30일 전: 280

전체 시간: 7,196