주요 콘텐츠로 건너뛰기
Dell Inspiron 3520 Optical Drive Replacement

Dell Inspiron 3520 Optical Drive Replacement

Ian

Ian다른 한 명의 기여자

최종 수정일 June 11, 2015

15 분
쉬움

This repair process includes the removal of small pieces from the computer, therefore you should have a place to store all the small removable screws. This will make the repair process quicker and easier.

필요한 것

부품

도구

  • Spudger
    Spudger
  • Phillips #00 Screwdriver
    Phillips #00 Screwdriver

더보기...

iFixit은 귀하가 이 링크를 통해 구매할 때 커미션을 받습니다.
  1. Dell Inspiron 3520 Optical Drive Replacement, Battery: 1 단계, 이미지 2개 중 1개 Dell Inspiron 3520 Optical Drive Replacement, Battery: 1 단계, 이미지 2개 중 2개
    • Turn off notebook

    • Set the notebook upside down with the battery facing away from you.

    • Locate the unlock and release sliding tabs on the bottom right and left hand corners of the battery respectively.

  2. Dell Inspiron 3520 Optical Drive Replacement: 2 단계, 이미지 3개 중 1개 Dell Inspiron 3520 Optical Drive Replacement: 2 단계, 이미지 3개 중 2개 Dell Inspiron 3520 Optical Drive Replacement: 2 단계, 이미지 3개 중 3개
    • Slide the right tab to the right to unlock the battery.

    • Slide and hold the the left tab to the left to release the battery from the unit.

    • Finally, remove the battery by sliding it away from the unit and yourself.

  3. Dell Inspiron 3520 Optical Drive Replacement, Keyboard: 3 단계, 이미지 2개 중 1개 Dell Inspiron 3520 Optical Drive Replacement, Keyboard: 3 단계, 이미지 2개 중 2개
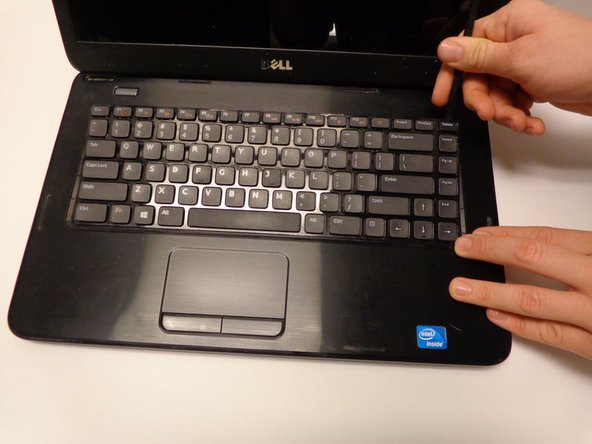
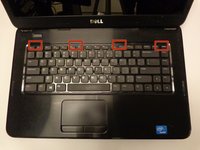
    • Locate the four tabs along the top edge of the keyboard.

    • Using the spudger, push the tabs away from the keyboard and pull the keyboard up away from the laptop.

  4. Dell Inspiron 3520 Optical Drive Replacement: 4 단계, 이미지 1개 중 1개
    • Slide the keyboard forward towards the screen to release the bottom tabs.

  5. Dell Inspiron 3520 Optical Drive Replacement: 5 단계, 이미지 2개 중 1개 Dell Inspiron 3520 Optical Drive Replacement: 5 단계, 이미지 2개 중 2개
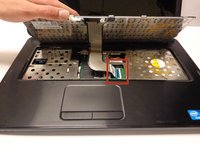
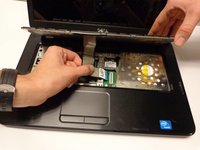
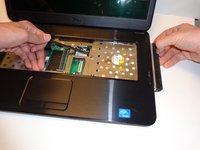
    • Carefully lift the board up and locate the connecting cable.

    • Gently pull the end of the cable free from the port on the laptop.

  6. Dell Inspiron 3520 Optical Drive Replacement, Optical Drive: 6 단계, 이미지 2개 중 1개 Dell Inspiron 3520 Optical Drive Replacement, Optical Drive: 6 단계, 이미지 2개 중 2개
    • Locate and remove the 4mm Phillips #00 mounting screw.

  7. Dell Inspiron 3520 Optical Drive Replacement: 7 단계, 이미지 2개 중 1개 Dell Inspiron 3520 Optical Drive Replacement: 7 단계, 이미지 2개 중 2개
    • Push the optical drive from the inside a little bit to dislodge it.

    • Grab the drive with your hand from the outside and slide it free.

결론

To reassemble your device, follow these instructions in reverse order.

다른 5명이 해당 안내서를 완성하였습니다.

작성자

1다른 기여자 명과 함께

Ian

회원 가입일: 01/30/15

1,557 평판

안내서 5개를 작성함

USF Tampa, Team 16-2, Watkins Winter 2015 USF Tampa, Team 16-2, Watkins Winter 2015 회원

USFT-WATKINS-W15S16G2

3 회원들

안내서 5개를 작성함

댓글 한 개

...screaming.....i love my dell 3520 it is awesome, it is still holding up.."hooray!!!!

Madeline Jones - 답글

댓글 쓰기

조회 통계:

지난 24시간: 0

지난 7일: 7

지난 30일: 24

전체 시간: 2,691