주요 콘텐츠로 건너뛰기

Dell Inspiron 9100 Optical Drive/Accessory Device Replacement

필요한 것

  1. Dell Inspiron 9100 Optical Drive/Accessory Device Replacement, Battery: 1 단계, 이미지 1/3 Dell Inspiron 9100 Optical Drive/Accessory Device Replacement, Battery: 1 단계, 이미지 2/3 Dell Inspiron 9100 Optical Drive/Accessory Device Replacement, Battery: 1 단계, 이미지 3/3
    • Unplug the laptop from the power adapter and turn the power off.

    • Failure to unplug laptop before proceeding could result in risk of electric shock!

  2. Dell Inspiron 9100 Optical Drive/Accessory Device Replacement: 2 단계, 이미지 1/3 Dell Inspiron 9100 Optical Drive/Accessory Device Replacement: 2 단계, 이미지 2/3 Dell Inspiron 9100 Optical Drive/Accessory Device Replacement: 2 단계, 이미지 3/3
    • Slide the battery-lock tab and hold.

    • Flip the battery away from the chassis to remove it.

  3. Dell Inspiron 9100 Optical Drive/Accessory Device Replacement, Optical Drive/Accessory Device: 3 단계, 이미지 1/3 Dell Inspiron 9100 Optical Drive/Accessory Device Replacement, Optical Drive/Accessory Device: 3 단계, 이미지 2/3 Dell Inspiron 9100 Optical Drive/Accessory Device Replacement, Optical Drive/Accessory Device: 3 단계, 이미지 3/3
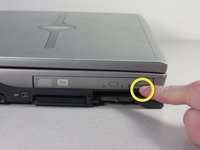
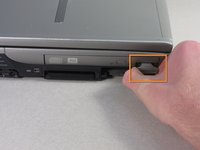
    • Press the tab on the outside face of the optical drive to release a handle.

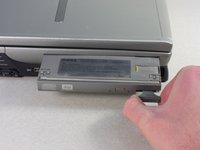
    • Pull the handle to eject the optical drive unit from the slot, and slide it out.

결론

To reassemble your device, follow these instructions in reverse order.

charlierefvem

회원 가입일: 01/11/11

854 평판

안내서 7개 작성하였습니다

Cal Poly, Team 13-2, Forte Winter 2011 Cal Poly, Team 13-2, Forte Winter 2011 회원

CPSU-FORTE-W11S13G2

5 회원들

안내서 8개 작성하였습니다

댓글 0개

댓글 쓰기

조회 통계:

24 시간 전: 0

7일 전: 0

30일 전: 1

전체 시간: 2,208