주요 콘텐츠로 건너뛰기
수리 커뮤니티 가입 - 계정 만들기

Dell Latitude D620 Display Replacement

필요한 것

  1. Dell Latitude D620 Display Replacement, Keyboard: 1 단계, 이미지 1개 중 1개
    • Power down the laptop and remove the battery.

    • Open the laptop cover all of the way.

  2. Dell Latitude D620 Display Replacement: 2 단계, 이미지 3개 중 1개 Dell Latitude D620 Display Replacement: 2 단계, 이미지 3개 중 2개 Dell Latitude D620 Display Replacement: 2 단계, 이미지 3개 중 3개
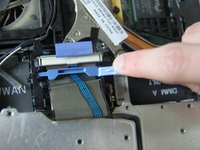
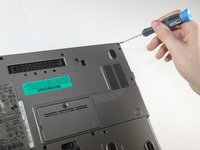
    • Locate the notch under the cover at the top of the keyboard

    • Using the spudger as a lever, lift the plastic covering

    • Carefully remove the rest of the covering from right to left

  3. Dell Latitude D620 Display Replacement: 3 단계, 이미지 1개 중 1개
    • Unscrew the top portion of the keyboard using a #00 screwdriver

  4. Dell Latitude D620 Display Replacement: 4 단계, 이미지 1개 중 1개
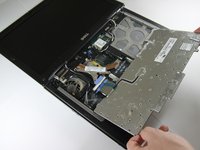
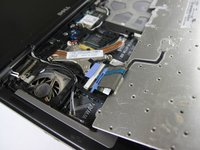
    • Hold keyboard from the top and gently pull towards the LCD screen to remove the keyboard from the case

    • Don't pull on the keyboard too forcefully because it is attached to the motherboard with a short, thin ribbon cable

  5. Dell Latitude D620 Display Replacement: 5 단계, 이미지 2개 중 1개 Dell Latitude D620 Display Replacement: 5 단계, 이미지 2개 중 2개
    • Once keyboard is out of the case, lay it face-down on the track pad

  6. Dell Latitude D620 Display Replacement: 6 단계, 이미지 2개 중 1개 Dell Latitude D620 Display Replacement: 6 단계, 이미지 2개 중 2개
    • Using a small spudger, pull back on the black bar to release the blue lever

  7. Dell Latitude D620 Display Replacement: 7 단계, 이미지 1개 중 1개
    • Pull up on the metal bar connected to the socket to detach the ribbon cable

  8. Dell Latitude D620 Display Replacement, Display: 8 단계, 이미지 1개 중 1개
    • Detach cables that connect the display to the body of the laptop

  9. Dell Latitude D620 Display Replacement: 9 단계, 이미지 1개 중 1개
    • Disconnect the black cable attached to the motherboard

  10. Dell Latitude D620 Display Replacement: 10 단계, 이미지 2개 중 1개 Dell Latitude D620 Display Replacement: 10 단계, 이미지 2개 중 2개
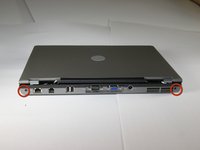
    • Close the laptop lid

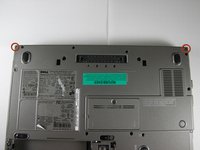
    • Turn the laptop over onto its backside

    • Unscrew the two screws shown in the picture using a #00 screwdriver

  11. Dell Latitude D620 Display Replacement: 11 단계, 이미지 2개 중 1개 Dell Latitude D620 Display Replacement: 11 단계, 이미지 2개 중 2개
    • Face the laptop's back ports towards you

    • Unscrew the two screws labeled in the picture using a #00 screwdriver

  12. Dell Latitude D620 Display Replacement: 12 단계, 이미지 1개 중 1개
    • Turn the laptop over again so it's right-side up

    • Open the display, and pull the display up and out of the laptop's body

  13. Dell Latitude D620 Display Replacement: 13 단계, 이미지 1개 중 1개
    • Remove the circular rubber pads as outlined in the picture using a spudger

  14. Dell Latitude D620 Display Replacement: 14 단계, 이미지 1개 중 1개
    • Unscrew the screws that were under the rubber circles using the #00 screwdriver

  15. Dell Latitude D620 Display Replacement: 15 단계, 이미지 1개 중 1개
    • Carefully use a spudger to work around the edge of the screen to lift off the plastic cover

    • Be very careful while doing this as the plastic snaps easily

  16. Dell Latitude D620 Display Replacement: 16 단계, 이미지 1개 중 1개
    • Remove the screws outlined in the picture

  17. Dell Latitude D620 Display Replacement: 17 단계, 이미지 1개 중 1개
    • Carefully lift the LCD screen out of its casing

결론

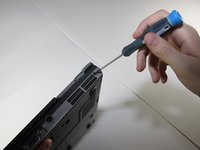
To reassemble your device, follow these instructions in reverse order.

다른 19명이 해당 안내서를 완성하였습니다.

작성자

9다른 기여자 명과 함께

Miguel Wong

회원 가입일: 04/15/10

562 평판

안내서 3개를 작성함

Cal Poly, Team 24-35, Regan Spring 2010 Cal Poly, Team 24-35, Regan Spring 2010 회원

CPSU-REGAN-S10S24G35

4 회원들

안내서 4개를 작성함

1가이드 댓글

Check out this replacement screen at a great price on bcdelectrostore.com

http://www.bcdelectrostore.com/magento/l...

bob harris - 답글 공유

댓글 쓰기

조회 통계:

지난 24시간: 5

지난 7일: 20

지난 30일: 72

전체 시간: 33,774