주요 콘텐츠로 건너뛰기

Dell XPS M1730 Keyboard Replacement

필요한 것

  1. Dell XPS M1730 Keyboard Replacement, Battery: 1 단계, 이미지 1/1
    • Push the sliding button near the battery compartment.

  2. Dell XPS M1730 Keyboard Replacement: 2 단계, 이미지 1/1
    • Slide the button next to the battery and lift up on the lip of the battery edge.

  3. Dell XPS M1730 Keyboard Replacement: 3 단계, 이미지 1/2 Dell XPS M1730 Keyboard Replacement: 3 단계, 이미지 2/2
    • Lift and remove the battery.

  4. Dell XPS M1730 Keyboard Replacement, Keyboard: 4 단계, 이미지 1/3 Dell XPS M1730 Keyboard Replacement, Keyboard: 4 단계, 이미지 2/3 Dell XPS M1730 Keyboard Replacement, Keyboard: 4 단계, 이미지 3/3
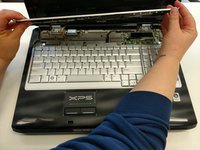
    • Remove the plastic trim at the base of the screen screen. Start from the tab on the right side and work to the left side.

  5. Dell XPS M1730 Keyboard Replacement: 5 단계, 이미지 1/2 Dell XPS M1730 Keyboard Replacement: 5 단계, 이미지 2/2
    • Remove the four screws from the top of the keyboard bracket.

  6. Dell XPS M1730 Keyboard Replacement: 6 단계, 이미지 1/3 Dell XPS M1730 Keyboard Replacement: 6 단계, 이미지 2/3 Dell XPS M1730 Keyboard Replacement: 6 단계, 이미지 3/3
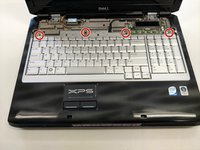
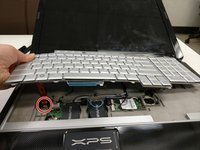
    • Remove the keyboard by sliding it forward, off of the clips, and then lifting up.

  7. Dell XPS M1730 Keyboard Replacement: 7 단계, 이미지 1/3 Dell XPS M1730 Keyboard Replacement: 7 단계, 이미지 2/3 Dell XPS M1730 Keyboard Replacement: 7 단계, 이미지 3/3
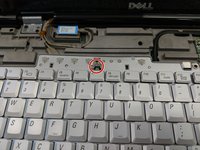
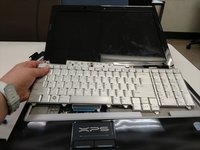
    • Lift the keyboard about 2 inches up from the laptop platform.

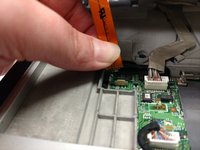
    • From this angle the keyboard ribbon connector can be seen and disconnected.

결론

To reassemble your device, follow these instructions in reverse order.

Nikki Meyer

회원 가입일: 02/08/18

113 평판

안내서 1개 작성함

댓글 0개

댓글 쓰기

조회 통계:

24 시간 전: 1

7일 전: 6

30일 전: 10

전체 시간: 753