주요 콘텐츠로 건너뛰기
수리 커뮤니티 가입 - 계정 만들기

EVGA x17 Clicker Replacement

필요한 것

    1. EVGA x17 Clicker Replacement, Clicker: 1 단계, 이미지 1개 중 1개
      • Remove the mouse skates to reveal 5 screws.

      댓글 쓰기

    2. EVGA x17 Clicker Replacement: 2 단계, 이미지 1개 중 1개
      • Use a Phillips head screwdriver to remove the 5 screws that secure the bottom panel.

      댓글 쓰기

    3. EVGA x17 Clicker Replacement: 3 단계, 이미지 1개 중 1개
      • Remove the weight chamber cover.

      댓글 쓰기

    4. EVGA x17 Clicker Replacement: 4 단계, 이미지 1개 중 1개
      • Slowly slide a spudger into and around the bottom of the panel, prying until a "popping" sound is heard.

      댓글 쓰기

    5. EVGA x17 Clicker Replacement: 5 단계, 이미지 2개 중 1개 EVGA x17 Clicker Replacement: 5 단계, 이미지 2개 중 2개
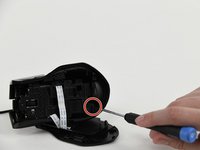
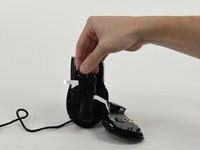
      • Remove the 13 screws on the interior.

      • There are 2 Phillips truss-head tapping screws, large circular heads, and the 11 Phillips screws from the interior.

      댓글 쓰기

    6. EVGA x17 Clicker Replacement: 6 단계, 이미지 1개 중 1개
      • Carefully slide the middle section out.

      댓글 쓰기

    7. EVGA x17 Clicker Replacement: 7 단계, 이미지 1개 중 1개
      • Remove the two screws from each clicker.

      댓글 쓰기

    8. EVGA x17 Clicker Replacement: 8 단계, 이미지 1개 중 1개
      • Pop and slide out each clicker that needs to be replaced.

      • Clickers may need to be tugged forward in their slots to slide out.

      • Be extra careful removing clickers because the attachments are fragile.

      댓글 쓰기

결론

To reassemble your device, follow these instructions in reverse order.

취소: 해당 안내서를 완성하지 않았습니다.

작성자

4다른 기여자 명과 함께

Sydney Puett

회원 가입일: 09/13/23

604 평판

안내서 3개를 작성함

1가이드 댓글

Tengo un Evga x17 y cuando quitó los sliders, encuentro unas pequeñas capas de plástico que tapan el acceso a los tornillos, ¿qué puedo hacer en ese caso?

Dennis Lopez - 답글 공유

댓글 쓰기

조회 통계:

지난 24시간: 1

지난 7일: 7

지난 30일: 24

전체 시간: 574