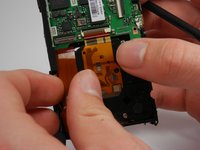
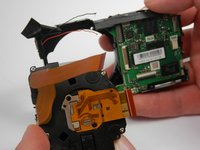
주요 콘텐츠로 건너뛰기

Fujifilm FinePix T500 Lens Replacement

필요한 것

  1. Fujifilm FinePix T500 Lens Replacement, LCD Screen: 1 단계, 이미지 1/3 Fujifilm FinePix T500 Lens Replacement, LCD Screen: 1 단계, 이미지 2/3 Fujifilm FinePix T500 Lens Replacement, LCD Screen: 1 단계, 이미지 3/3
    • Unscrew the six 3.5mm Philips head from the outer casing.

  2. Fujifilm FinePix T500 Lens Replacement: 2 단계, 이미지 1/3 Fujifilm FinePix T500 Lens Replacement: 2 단계, 이미지 2/3 Fujifilm FinePix T500 Lens Replacement: 2 단계, 이미지 3/3
    • Open the battery chamber and remove the battery.

    • Pry the front half of the casing from the camera.

    • Be careful that the sensor cover—the small piece of translucent plastic—doesn't fall out of place. Return it to its original location if it does.

  3. Fujifilm FinePix T500 Lens Replacement: 3 단계, 이미지 1/2 Fujifilm FinePix T500 Lens Replacement: 3 단계, 이미지 2/2
    • Pry the back half of the casing from the camera.

    • Be careful when maneuvering the camera without the casing on as the LCD screen is not fastened to anything.

  4. Fujifilm FinePix T500 Lens Replacement: 4 단계, 이미지 1/3 Fujifilm FinePix T500 Lens Replacement: 4 단계, 이미지 2/3 Fujifilm FinePix T500 Lens Replacement: 4 단계, 이미지 3/3
    • Lift the LCD screen out of the camera.

    • There is a tab that keeps in place the ribbon that attaches the screen and motherboard. Lift this up using the spudger and disconnect the screen from the motherboard.

  5. Fujifilm FinePix T500 Lens Replacement, Lens: 5 단계, 이미지 1/1
    • Unscrew the 3.5 mm Phillips head screw from the corner of the camera.

  6. Fujifilm FinePix T500 Lens Replacement: 6 단계, 이미지 1/3 Fujifilm FinePix T500 Lens Replacement: 6 단계, 이미지 2/3 Fujifilm FinePix T500 Lens Replacement: 6 단계, 이미지 3/3
    • Pry the center casing off the camera. This is best done by separating the top and side sections individually.

  7. Fujifilm FinePix T500 Lens Replacement: 7 단계, 이미지 1/3 Fujifilm FinePix T500 Lens Replacement: 7 단계, 이미지 2/3 Fujifilm FinePix T500 Lens Replacement: 7 단계, 이미지 3/3
    • Unscrew the two 3.5 mm Phillips head screws in the metal plate.

  8. Fujifilm FinePix T500 Lens Replacement: 8 단계, 이미지 1/2 Fujifilm FinePix T500 Lens Replacement: 8 단계, 이미지 2/2
    • Pry the metal plate out using the spudger.

  9. Fujifilm FinePix T500 Lens Replacement: 9 단계, 이미지 1/3 Fujifilm FinePix T500 Lens Replacement: 9 단계, 이미지 2/3 Fujifilm FinePix T500 Lens Replacement: 9 단계, 이미지 3/3
    • Peel back the strip of black tape to reveal a red and black wire.

    • Detach the orange ribbon by gently pulling on it.

    • Detach the golden ribbon by gently lifting it with the spudger.

  10. Fujifilm FinePix T500 Lens Replacement: 10 단계, 이미지 1/2 Fujifilm FinePix T500 Lens Replacement: 10 단계, 이미지 2/2
    • The lens should now be free to simply be pushed out of its socket.

    • The black and red wires that were exposed previously may be in the way of removing the lens and may break. If they do, you will need to solder these wires back into place upon reassembly.

결론

To reassemble your device, follow these instructions in reverse order.

Brian Lasher

회원 가입일: 01/16/15

313 평판

안내서 3개 작성하였습니다

USF Tampa, Team 19-3, Blackwell Winter 2015 USF Tampa, Team 19-3, Blackwell Winter 2015 회원

USFT-BLACKWELL-W15S19G3

4 회원들

안내서 10개 작성하였습니다

댓글 0개

댓글 쓰기

조회 통계:

24 시간 전: 0

7일 전: 0

30일 전: 2

전체 시간: 1,048