주요 콘텐츠로 건너뛰기

GoPro Hero3+ Silver Edition Camera Lens Replacement

필요한 것

  1. GoPro Hero3+ Silver Edition Camera Lens Replacement, Battery: 1 단계, 이미지 2개 중 1개 GoPro Hero3+ Silver Edition Camera Lens Replacement, Battery: 1 단계, 이미지 2개 중 2개
    • Push the tab on the back of the device left to remove the plate covering the battery.

  2. GoPro Hero3+ Silver Edition Camera Lens Replacement: 2 단계, 이미지 1개 중 1개
    • Use the strip of tape on the battery to remove the battery from the housing.

  3. GoPro Hero3+ Silver Edition Camera Lens Replacement, Front Panel: 3 단계, 이미지 1개 중 1개
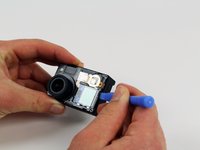
    • Insert a plastic opening tool in between the front face plate and the black housing.

    • Make sure you insert the plastic opening tool next to the microSD card slot. There is a small gap that will help separate the face plate.

  4. GoPro Hero3+ Silver Edition Camera Lens Replacement: 4 단계, 이미지 1개 중 1개
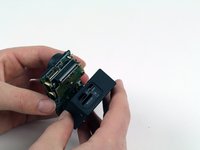
    • Continue to use the plastic opening tool and separate the front face plate from the rest of the device.

    • There is adhesive that helps attach the front face plate. Some extra prying may be required to separate the face plate, but do not use excessive force.

  5. GoPro Hero3+ Silver Edition Camera Lens Replacement, Image Sensor: 5 단계, 이미지 3개 중 1개 GoPro Hero3+ Silver Edition Camera Lens Replacement, Image Sensor: 5 단계, 이미지 3개 중 2개 GoPro Hero3+ Silver Edition Camera Lens Replacement, Image Sensor: 5 단계, 이미지 3개 중 3개
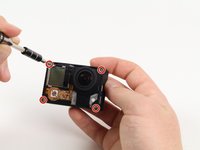
    • Locate the four 8.1mm PH00 screws on the corners of the GoPro and unscrew them using the phillips screwdriver.

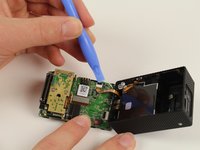
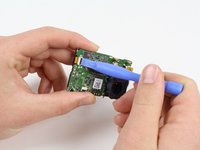
    • Gently remove the motherboard by using a plastic opening tool to pry it out of the housing.

    • Be careful not to damage the ribbon cable connected to the GoPro housing and motherboard.

  6. GoPro Hero3+ Silver Edition Camera Lens Replacement: 6 단계, 이미지 2개 중 1개 GoPro Hero3+ Silver Edition Camera Lens Replacement: 6 단계, 이미지 2개 중 2개
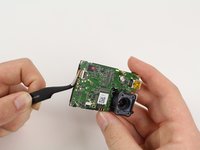
    • Remove the ribbon cable by carefully flipping the black clip up with the plastic opening tool and pulling the cable out.

  7. GoPro Hero3+ Silver Edition Camera Lens Replacement: 7 단계, 이미지 1개 중 1개
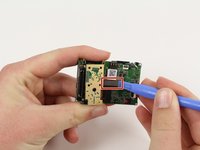
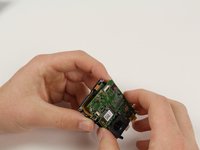
    • Remove the four 4mm PH00 screws attaching the image sensor to the motherboard with your screwdriver.

  8. GoPro Hero3+ Silver Edition Camera Lens Replacement: 8 단계, 이미지 2개 중 1개 GoPro Hero3+ Silver Edition Camera Lens Replacement: 8 단계, 이미지 2개 중 2개
    • Pry off the last ribbon cable with a plastic opening tool.

    • Remove the image sensor from the motherboard.

  9. GoPro Hero3+ Silver Edition Camera Lens Replacement, microSD/Expansion Port Assembly: 9 단계, 이미지 1개 중 1개
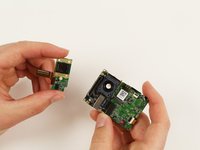
    • Using your screwdriver, unscrew three 4mm PH00 screws that will free the metal plate.

    • A small plate will become separated when the rightmost screw is removed. Just place it to the side.

  10. GoPro Hero3+ Silver Edition Camera Lens Replacement: 10 단계, 이미지 2개 중 1개 GoPro Hero3+ Silver Edition Camera Lens Replacement: 10 단계, 이미지 2개 중 2개
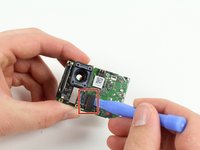
    • Use the plastic opening tool to pry off the referenced ribbon cable from the motherboard.

    • The microSD and Accessory Board is now ready for removal.

  11. GoPro Hero3+ Silver Edition Camera Lens Replacement, Motherboard: 11 단계, 이미지 1개 중 1개
    • Remove the single 3.2mm PH00 screw with your screwdriver to detach the motherboard from the mid frame.

  12. GoPro Hero3+ Silver Edition Camera Lens Replacement: 12 단계, 이미지 3개 중 1개 GoPro Hero3+ Silver Edition Camera Lens Replacement: 12 단계, 이미지 3개 중 2개 GoPro Hero3+ Silver Edition Camera Lens Replacement: 12 단계, 이미지 3개 중 3개
    이 단계에 사용된 도구:
    Tweezers
    $4.99
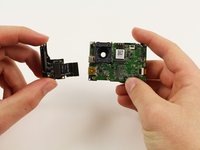
    • Use a plastic opening tool to gently separate the LCD ribbon cable from the motherboard.

    • Gently remove the motherboard from the midframe using tweezers.

    • Remove motherboard by lifting from the edges. This will reduce the chance of damaging components on the motherboard.

  13. GoPro Hero3+ Silver Edition Camera Lens Replacement, Camera Lens: 13 단계, 이미지 1개 중 1개
    • Use your PH00 screwdriver to remove the last three screws from the mid frame. This will release the lens housing from the mid frame.

  14. GoPro Hero3+ Silver Edition Camera Lens Replacement: 14 단계, 이미지 1개 중 1개
    • Carefully remove the lens from the font housing.

결론

To reassemble your device, follow these instructions in reverse order.

다른 9명이 해당 안내서를 완성하였습니다.

작성자

5다른 기여자 명과 함께

Patrick Cook

회원 가입일: 10/01/15

699 평판

안내서 3개를 작성함

Cal Poly, Team 5-8, Maness Fall 2015 Cal Poly, Team 5-8, Maness Fall 2015 회원

CPSU-MANESS-F15S5G8

4 회원들

안내서 12개를 작성함

0가이드 댓글

댓글 쓰기

조회 통계:

지난 24시간: 1

지난 7일: 1

지난 30일: 8

전체 시간: 2,300