주요 콘텐츠로 건너뛰기

HP 7 1800 Front Facing Camera Replacement

필요한 것

  1. HP 7 1800 Front Facing Camera Replacement, Remove the back panel: 1 단계, 이미지 1/2 HP 7 1800 Front Facing Camera Replacement, Remove the back panel: 1 단계, 이미지 2/2
    • Carefully insert a Spudger into one of the corners of the tablet.

    • Slide the Spudger along the edge popping the tabs out along the way.

    • Be careful not to break the tabs.

  2. HP 7 1800 Front Facing Camera Replacement, Remove the battery: 2 단계, 이미지 1/3 HP 7 1800 Front Facing Camera Replacement, Remove the battery: 2 단계, 이미지 2/3 HP 7 1800 Front Facing Camera Replacement, Remove the battery: 2 단계, 이미지 3/3
    • Slide the Spudger under the battery to lift it off the adhesive.

    • Gently pull the cable connection from the motherboard using tweezers.

  3. HP 7 1800 Front Facing Camera Replacement, Remove the large ribbon cable: 3 단계, 이미지 1/2 HP 7 1800 Front Facing Camera Replacement, Remove the large ribbon cable: 3 단계, 이미지 2/2
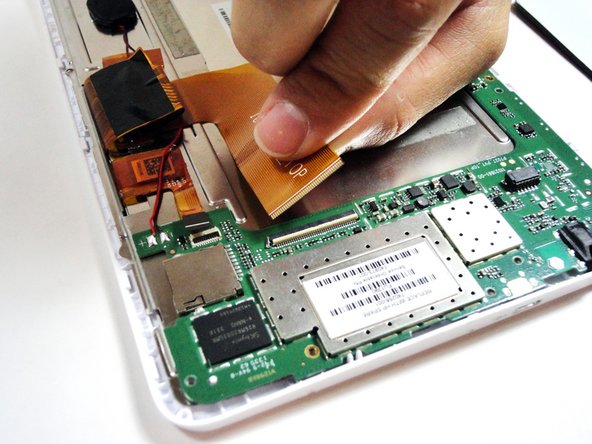
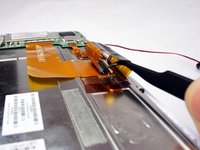
    • Remove the larger ribbon cable by gently flipping the beige latch and pulling it out with tweezers.

  4. HP 7 1800 Front Facing Camera Replacement, Remove the smaller ribbon cable: 4 단계, 이미지 1/2 HP 7 1800 Front Facing Camera Replacement, Remove the smaller ribbon cable: 4 단계, 이미지 2/2
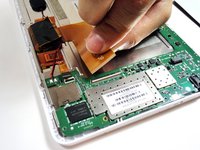
    • Remove the smaller ribbon cable by gently flipping the black latch and pulling it out with tweezers.

  5. HP 7 1800 Front Facing Camera Replacement, Unscrew the 7 silver screws from the logic board: 5 단계, 이미지 1/1
    • Remove the following 7 screws:

    • Six 4.17mm Phillips #00 around the motherboard.

    • One 2.67mm Phillips #00 next to the front facing camera.

    • The 2.67mm screw circled in yellow is notably shorter than the other 6 screws circled in red.

  6. HP 7 1800 Front Facing Camera Replacement, Unplug the front facing camera from the logic board: 6 단계, 이미지 1/1
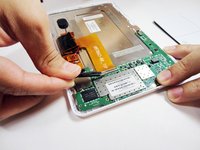
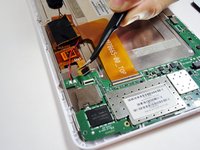
    • Gently pry the front facing camera plug up and off of the motherboard.

  7. HP 7 1800 Front Facing Camera Replacement, Remove the logic board: 7 단계, 이미지 1/1
    • Carefully lift the motherboard directly up.

  8. HP 7 1800 Front Facing Camera Replacement, Remove the ribbon cable attached to the metal plate: 8 단계, 이미지 1/2 HP 7 1800 Front Facing Camera Replacement, Remove the ribbon cable attached to the metal plate: 8 단계, 이미지 2/2
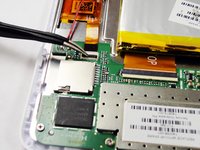
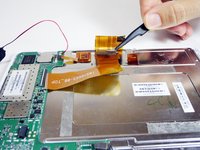
    • On the metal plate inside of the device, there is a ribbon cable in a loop. Flip the white tab and pull the cable out.

  9. HP 7 1800 Front Facing Camera Replacement, Unscrew the 7 black screws on the metal plate: 9 단계, 이미지 1/1
    • Unscrew the following black screws:

    • Seven 2.82mm Phillips #00 around the metal casing.

  10. HP 7 1800 Front Facing Camera Replacement, Remove the metal plate: 10 단계, 이미지 1/1
    • Gently lift the metal plate directly up.

  11. HP 7 1800 Front Facing Camera Replacement, Remove the camera: 11 단계, 이미지 1/1
    • Gently remove the camera from the device with tweezers by lifting it up and out of its square hole.

결론

To reassemble your device, follow these instructions in reverse order.

Trevor Shumate

회원 가입일: 01/21/15

225 평판

안내서 2개 작성하였습니다

USF Tampa, Team 4-1, Brown Winter 2015 USF Tampa, Team 4-1, Brown Winter 2015 회원

USFT-BROWN-W15S4G1

4 회원들

안내서 14개 작성하였습니다

댓글 0개

댓글 쓰기

조회 통계:

24 시간 전: 0

7일 전: 0

30일 전: 0

전체 시간: 229