주요 콘텐츠로 건너뛰기

HP Chromebook 14 LCD Screen Replacement

필요한 것

  1. HP Chromebook 14 LCD Screen Replacement, Nylon Covers: 1 단계, 이미지 1/3 HP Chromebook 14 LCD Screen Replacement, Nylon Covers: 1 단계, 이미지 2/3 HP Chromebook 14 LCD Screen Replacement, Nylon Covers: 1 단계, 이미지 3/3
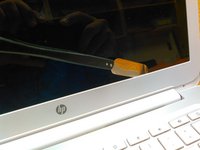
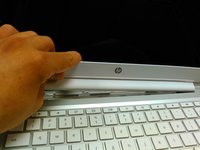
    • Pry up the nylon covers at the lower left and right of the display to reveal two Phillips head screws.

  2. HP Chromebook 14 LCD Screen Replacement, Remove The Screws. That we Just Exposed.: 2 단계, 이미지 1/2 HP Chromebook 14 LCD Screen Replacement, Remove The Screws. That we Just Exposed.: 2 단계, 이미지 2/2
    • Remove the two screws.

  3. HP Chromebook 14 LCD Screen Replacement, Pry & Remove Sceen: 3 단계, 이미지 1/3 HP Chromebook 14 LCD Screen Replacement, Pry & Remove Sceen: 3 단계, 이미지 2/3 HP Chromebook 14 LCD Screen Replacement, Pry & Remove Sceen: 3 단계, 이미지 3/3
    • Be careful when prying not to damage the bezel.

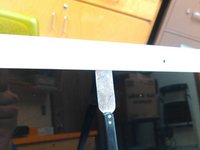
    • Use a spudger or other pry tool to pry up the bezel from all sides.

    • Once all the clips are free, pull the bezel from the bottom.

  4. HP Chromebook 14 LCD Screen Replacement, Remove Four Phillips Screws Holding LCD Panel: 4 단계, 이미지 1/1
    • Remove the four screws securing the display panel.

  5. HP Chromebook 14 LCD Screen Replacement, Disconnect Connector/Ribbon From LCD Panel: 5 단계, 이미지 1/1
    • Let the display panel rest on the keyboard.

    • The highlighted area is taped to the back of the display panel. Pry up to free it.

    • Be careful not to damage the connector—pull it back gently to disconnect.

결론

To reassemble your device, follow these instructions in reverse order.

다른 23명이 해당 안내서를 완성하였습니다.

Mario

회원 가입일: 03/24/14

652 평판

안내서 1개 작성함

TechTucson WeFixThat TechTucson WeFixThat 회원

Community

2 회원들

안내서 4개 작성하였습니다

댓글 8개

Nylon covers are hard to see, they cover the entire area and peel off like a sticker, I didn't think mine had any and I pulled the screw socket out, not disastrous but I would have liked to have not done this.

madornetto - 답글

Any idea where I can buy some replacement ones?

mcaddie7 -

I was able to complete it successfully though right now I can't get the bezel quite flush down on the bottom left. One clip doesn't seem to want to go in so I'm not sure if the display cable is in the way or not. Will have to give it another look here after work but otherwise easy enough!

Aysha Springston - 답글

So what's the screen model used in this video?, I have the same laptop

seunoresegun - 답글

Where could I find a replacement part for the 2 nylon screw covers?

mcaddie7 - 답글

댓글 쓰기

조회 통계:

24 시간 전: 2

7일 전: 10

30일 전: 38

전체 시간: 16,070