소개
This guide will show the user how to remove the optical drive.
필요한 것
-
-
Turn the device over to expose the bottom of the device.
-
Slide the battery release all the way to the left.
-
There will be a click and the battery will be released from its compartment.
 FixBot에 문의하기
-
-
-
-
Locate two Phillips head retaining screws which secure the hard drive compartment.
-
Use a Phillips #0 screwdriver to loosen the retaining screws.
-
Remove the panel covering the compartment.
-
-
-
Locate the 6 mm Phillips head screw to the left of the hard drive.
-
Use a Phillips #0 screwdriver to remove the screw.
-
-
-
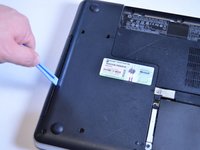
Once the screw is removed, use a plastic opening tool and place it between the body of the computer and the optical drive.
-
Apply enough pressure to loosen the optical drive.
-
The optical drive can then be removed by hand.
-


To reassemble your device, follow these instructions in reverse order.
팀

USF Tampa, Team 1-4, Sullivan Winter 2015 USF Tampa, Team 1-4, Sullivan Winter 2015 회원
USFT-SULLIVAN-W15S1G4
4 회원들
안내서 5개를 작성함