주요 콘텐츠로 건너뛰기

HP Notebook 15-ba018ds Fan Replacement

필요한 것

  1. HP Notebook 15-ba018ds Fan Replacement, Battery: 1 단계, 이미지 1/1
    • Before beginning, make sure the laptop is completely turned off by pressing the off button and waiting for the screen to turn black.

    • Flip the laptop over so the battery is exposed which will be next to the hinges on the top left and right.

  2. HP Notebook 15-ba018ds Fan Replacement: 2 단계, 이미지 1/3 HP Notebook 15-ba018ds Fan Replacement: 2 단계, 이미지 2/3 HP Notebook 15-ba018ds Fan Replacement: 2 단계, 이미지 3/3
    • Place your thumbs on the slide locks that are next to the hinges and simultaneously push them toward each other to unlock the battery.

    • While still holding onto the slide locks, push the battery away from the laptop with your index fingers.

  3. HP Notebook 15-ba018ds Fan Replacement, Fan: 3 단계, 이미지 1/2 HP Notebook 15-ba018ds Fan Replacement, Fan: 3 단계, 이미지 2/2
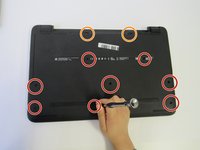
    • Unscrew the 8 screws on the back cover.

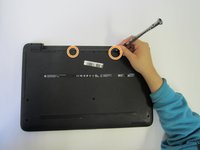
    • There are also two screws in the battery area that need to be removed.

  4. HP Notebook 15-ba018ds Fan Replacement: 4 단계, 이미지 1/1
    • Use an opening tool to help remove the back cover.

    • If you look at the side of the laptop, you can see where it can be separated into two parts.

  5. HP Notebook 15-ba018ds Fan Replacement: 5 단계, 이미지 1/2 HP Notebook 15-ba018ds Fan Replacement: 5 단계, 이미지 2/2
    • Remove the three Phillips head screws attached to the fan.

  6. HP Notebook 15-ba018ds Fan Replacement: 6 단계, 이미지 1/2 HP Notebook 15-ba018ds Fan Replacement: 6 단계, 이미지 2/2
    • Remove old fan and replace with a new fan.

결론

To reassemble your device, follow these instructions in reverse order.

다른 한 분이 해당 안내서를 완성하였습니다.

Terrell Bradford

회원 가입일: 09/18/18

443 평판

안내서 3개 작성하였습니다

University of North Texas, Team S3-G2, Raign Fall 2018 University of North Texas, Team S3-G2, Raign Fall 2018 회원

UNT-RAIGN-F18S3G2

4 회원들

안내서 4개 작성하였습니다

댓글 0개

댓글 쓰기

조회 통계:

24 시간 전: 1

7일 전: 1

30일 전: 6

전체 시간: 1,291