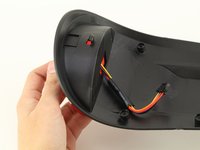
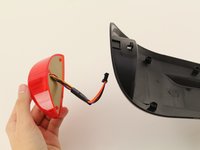
주요 콘텐츠로 건너뛰기

Hover-1 XLS Back Seat Light Replacement

필요한 것

  1. Hover-1 XLS Back Seat Light Replacement, Back Seat Light: 1 단계, 이미지 1/2 Hover-1 XLS Back Seat Light Replacement, Back Seat Light: 1 단계, 이미지 2/2
    • Remove the seat by removing the six 16mm screws with a Phillips #2 screwdriver.

    • Remember that the seat is still connected by the wiring once you unscrew it. Pulling too hard can damage the connector.

  2. Hover-1 XLS Back Seat Light Replacement: 2 단계, 이미지 1/3 Hover-1 XLS Back Seat Light Replacement: 2 단계, 이미지 2/3 Hover-1 XLS Back Seat Light Replacement: 2 단계, 이미지 3/3
    • Disconnect the wires by pushing the levers on either side of the connector and on top.

    • Remove the seat from the bike.

  3. Hover-1 XLS Back Seat Light Replacement: 3 단계, 이미지 1/1
    • Use a Phillips #2 screwdriver to remove the four 10mm screws on the bottom of the back seat.

  4. Hover-1 XLS Back Seat Light Replacement: 4 단계, 이미지 1/2 Hover-1 XLS Back Seat Light Replacement: 4 단계, 이미지 2/2
    • Pull the light from behind the bottom of the seat frame. Pull the wiring all the way through.

결론

To reassemble your device, follow these instructions in reverse order.

다른 한 분이 해당 안내서를 완성하였습니다.

Christian Roberts

회원 가입일: 01/24/19

248 평판

안내서 1개 작성함

Cal Poly, Team S1-G2, White Winter 2019 Cal Poly, Team S1-G2, White Winter 2019 회원

CPSU-WHITE-W19S1G2

3 회원들

안내서 6개 작성하였습니다

댓글 0개

댓글 쓰기

조회 통계:

24 시간 전: 0

7일 전: 1

30일 전: 5

전체 시간: 338