소개
Do you have a keyboard with keys that do not work? Use this guide to replace your keys and return your keyboard to proper working condition.
필요한 것
-
-
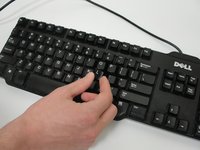
Loosen the key by prying all four corners gently with your spudger.
 FixBot에 문의하기
-
-
-
Wedge the tip of the spudger under the bottom of the key and carefully lift up until the key pops loose.
-
-
-
이 단계에 사용된 도구:Tweezers$4.99
-
Use tweezers to remove any contaminants that were preventing the key from being pressed down from the now open hole on your keyboard.
-
-
-
Push in the clean keys until you hear a popping sound.
-
The keys should click in easily, so if you are having trouble try realigning the key with its hole.
-


Congratulations! You now have a keyboard with fully functional keys!
다른 7명이 해당 안내서를 완성하였습니다.

팀

Cal Poly, Team 24-6, Green Winter 2015 Cal Poly, Team 24-6, Green Winter 2015 회원
CPSU-GREEN-W15S24G6
4 회원들
안내서 27개를 작성함
2가이드 댓글
This is How to CLEAN keys, not replace them. Duh.
Mike Miller - 답글 공유
I came looking for how to replace the problematic ones like + on numpad :<