주요 콘텐츠로 건너뛰기

Huawei P9 Back Cover

필요한 것

  1. Huawei P9 Back Cover, Back Cover: 1 단계, 이미지 1/3 Huawei P9 Back Cover, Back Cover: 1 단계, 이미지 2/3 Huawei P9 Back Cover, Back Cover: 1 단계, 이미지 3/3
    • First switch off your phone and remove the SIM card tray.

    • Unscrew the two Pentalobe P2 screws located at the bottom next to the device's USB C port.

    • If the screen is cracked you might want to use some tape to protect your eyes from glass shreds and get a better grip to open the phone.

  2. Huawei P9 Back Cover: 2 단계, 이미지 1/2 Huawei P9 Back Cover: 2 단계, 이미지 2/2
    • Avoid to lift only the display instead of the whole phone assembly as doing so may cause damage to the screen.

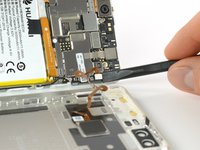
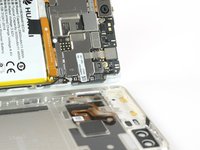
    • Use an iSclack or a suction handle to separate the phone assembly from the rear panel.

    • In case you can‘t manage to lift the phone assembly out of the rear panel you can insert the pointed end of a spudger in the headphone jack opening and press the phone assembly upwards until you create a gap between assembly and rear panel. Then use the spudger to lever the phone assembly out of the panel.

    • Don't remove the rear panel completely yet. There is a cable connected to it! It is running from the finger print sensor to the display unit.

  3. Huawei P9 Back Cover, Fingerprint sensor: 3 단계, 이미지 1/2 Huawei P9 Back Cover, Fingerprint sensor: 3 단계, 이미지 2/2
    • Disconnect the fingerprint sensor using a spudger.

결론

To reassemble your device, follow these instructions in reverse order.

다른 7명이 해당 안내서를 완성하였습니다.

Tobias Isakeit

회원 가입일: 03/31/14

116,767 평판

안내서 188개 작성하였습니다

Master Techs Master Techs 회원

Community

322 회원들

안내서 2,506개 작성하였습니다

댓글 0개

댓글 쓰기

조회 통계:

24 시간 전: 0

7일 전: 2

30일 전: 16

전체 시간: 8,927