주요 콘텐츠로 건너뛰기

이 버전에는 잘못된 편집 사항이 있을 수 있습니다. 최신 확인된 스냅샷으로 전환하십시오.

필요한 것

  1. 이 단계는 번역되지 않았습니다. 번역을 도와주십시오

    : 1 단계, 이미지 1/2 : 1 단계, 이미지 2/2
    • Use an opening pick to unclip the rear cover, starting from the bottom corner.

    • Work your way around counterclockwise and carefully pry the plastic tabs open one by one.

  2. 이 단계는 번역되지 않았습니다. 번역을 도와주십시오

    : 2 단계, 이미지 1/1
    • There is adhesive underneath the back cover that holds it to the battery and the metal plate at the top.

    • Be careful with the flex cable at the right hand side.

    • Twist the opening pick to lever the back cover away and loosen it from the adhesive.

  3. 이 단계는 번역되지 않았습니다. 번역을 도와주십시오

    : 3 단계, 이미지 1/1
    • When the back cover is freed from the adhesive you can pop it off by hand completely.

  4. 이 단계는 번역되지 않았습니다. 번역을 도와주십시오

    : 4 단계, 이미지 1/1
    • Remove the nine Phillips #00 screws that secure the metal shield plate.

    • Some screws may be covered with tamper proof stickers. Remove them to ensure a proper seating for your driver.

  5. 이 단계는 번역되지 않았습니다. 번역을 도와주십시오

    : 5 단계, 이미지 1/2 : 5 단계, 이미지 2/2
    • Do not remove the shield plate yet, it is attached by a connector and an adhered cable.

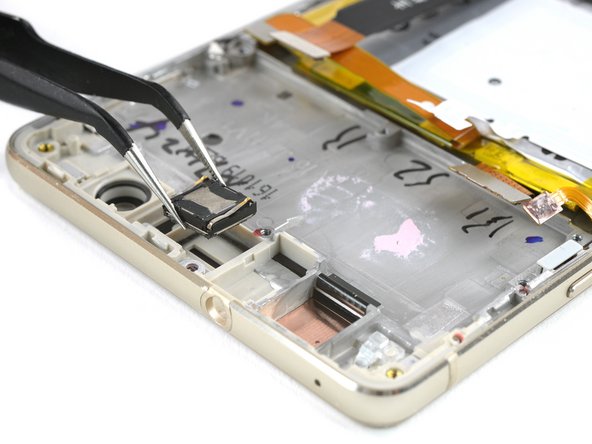
    • Use a spudger to disconnect the fingerprint sensor from the motherboard.

    • Peel the NFC antenna cable off of the metal plate.

  6. 이 단계는 번역되지 않았습니다. 번역을 도와주십시오

    : 6 단계, 이미지 1/2 : 6 단계, 이미지 2/2
    • Remove the SIM card tray.

  7. 이 단계는 번역되지 않았습니다. 번역을 도와주십시오

    : 7 단계, 이미지 1/3 : 7 단계, 이미지 2/3 : 7 단계, 이미지 3/3
    • Disconnect the motherboard flex, the battery flex and the antenna cable.

  8. 이 단계는 번역되지 않았습니다. 번역을 도와주십시오

    : 8 단계, 이미지 1/2 : 8 단계, 이미지 2/2
    • Disconnect the display flex and the power and volume button cable.

  9. 이 단계는 번역되지 않았습니다. 번역을 도와주십시오

    : 9 단계, 이미지 1/2 : 9 단계, 이미지 2/2
    • Unplug the rear camera and the headphone jack.

  10. 이 단계는 번역되지 않았습니다. 번역을 도와주십시오

    : 10 단계, 이미지 1/2 : 10 단계, 이미지 2/2
    • Take the camera and the headphone jack out of their recesses.

  11. 이 단계는 번역되지 않았습니다. 번역을 도와주십시오

    : 11 단계, 이미지 1/3 : 11 단계, 이미지 2/3 : 11 단계, 이미지 3/3
    • Use a spudger to lift the motherboard carefully.

    • Remove the motherboard assembly.

    • On the back of the motherboard there is a thermal pad (pink rubber-like gob) for heat dissipation. If you are about to replace the display assembly, and the thermal pad broke or is too dried out, you might want to replace it with a new one.

  12. 이 단계는 번역되지 않았습니다. 번역을 도와주십시오

    : 12 단계, 이미지 1/2 : 12 단계, 이미지 2/2
    • Remove the rubber microphone cover and the earpiece speaker.

  13. 이 단계는 번역되지 않았습니다. 번역을 도와주십시오

    : 13 단계, 이미지 1/1
    • Remove the seven loudspeaker screws:

    • Three silver 2.9 mm Phillips #00

    • Four black 3.8 mm Phillips #00

  14. 이 단계는 번역되지 않았습니다. 번역을 도와주십시오

    : 14 단계, 이미지 1/1
    • Remove the loudspeaker.

  15. 이 단계는 번역되지 않았습니다. 번역을 도와주십시오

    : 15 단계, 이미지 1/2 : 15 단계, 이미지 2/2
    • Unplug the motherboard flex cable and disconnect the antenna cable.

    • Put both cables aside.

  16. 이 단계는 번역되지 않았습니다. 번역을 도와주십시오

    : 16 단계, 이미지 1/3 : 16 단계, 이미지 2/3 : 16 단계, 이미지 3/3
    • Now remove the daughter board.

    • Carefully peel off the contact of the vibration motor and take it out.

    • Also remove the lower microphone housing.

  17. 이 단계는 번역되지 않았습니다. 번역을 도와주십시오

    : 17 단계, 이미지 1/3 : 17 단계, 이미지 2/3 : 17 단계, 이미지 3/3
    • Only pry along the SIM tray edge of the battery to protect the display flex cable that runs under the center of the battery.

    • Insert a spudger or thin prying tool at a shallow angle to avoid bending the battery and pry it up from its adhesive.

    • Compare the new and the old part for any small components that need to be transferred like buttons or gaskets.

    • Never reinstall a battery that has been bent or damaged during removal.

결승점

다른 39명이 해당 안내서를 완성하였습니다.

Tobias Isakeit

회원 가입일: 03/31/14

117,756 평판

안내서 188개 작성하였습니다

Master Techs Master Techs 회원

Community

322 회원들

안내서 2,544개 작성하였습니다

댓글 7개

I finished to replace the display yesterday and everything is perfect , thanks ifixit

husam faraj - 답글

i replaced the display but the touchscreen doesn’t work

Michele Rappazzo - 답글

You can try to reopen the phone and check if the flex cable is plugged in correctly or if any cable is ripped. If you can’t find any damage and all cables are plugged in correctly it’s possibly an issue with the replacement part.

Dominik Schnabelrauch -

Hi, could you show how to replace the power button flex cable for a P9 Lite 2017? I would be greatful.

szaszisti - 답글

my powerbutton connection is also missing…

lorenz_untersulzner -

댓글 쓰기

조회 통계:

24 시간 전: 2

7일 전: 11

30일 전: 38

전체 시간: 25,149