주요 콘텐츠로 건너뛰기

KitchenAid Professional 600 Power Cord Replacement

필요한 것

  1. KitchenAid Professional 600 Power Cord Replacement, Top Cover: 1 단계, 이미지 1/1
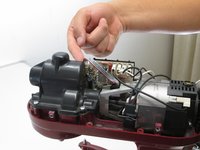
    • Take out the screw which holds on the silver band using a Phillips #2 screwdriver.

    • Remove the silver band.

  2. KitchenAid Professional 600 Power Cord Replacement: 2 단계, 이미지 1/1
    • Remove the four Phillips #2 screws located around the mixer where the band was removed.

    • This picture only shows two of the screw that you need to remove. The other two are on the exact opposite side of the mixer.

  3. KitchenAid Professional 600 Power Cord Replacement: 3 단계, 이미지 1/1
    • Remove the top of the mixer to reveal the inner parts.

    • The top should lift off, but may not if it is stuck. A sharp strike from the back with the hand may unstick it. It will slide forward about a 3/8 of an inch. Push it back again from the front and it should be free enough to lift.

  4. KitchenAid Professional 600 Power Cord Replacement, Speed Selector: 4 단계, 이미지 1/1
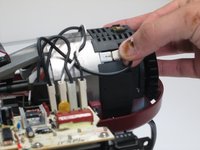
    • Locate the selector switch.

    • Remove the two Phillips #2 screws holding the selector switch in place.

  5. KitchenAid Professional 600 Power Cord Replacement: 5 단계, 이미지 1/3 KitchenAid Professional 600 Power Cord Replacement: 5 단계, 이미지 2/3 KitchenAid Professional 600 Power Cord Replacement: 5 단계, 이미지 3/3
    • Unplug the cords attached the drive motor to the switch.

    • We suggest numbering them left from right so they are reattached to the replacement part in the right order.

  6. KitchenAid Professional 600 Power Cord Replacement: 6 단계, 이미지 1/1
    • Pull out the Selector Switch.

  7. KitchenAid Professional 600 Power Cord Replacement, Drive Motor: 7 단계, 이미지 1/1
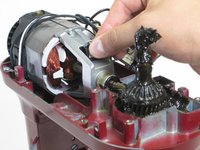
    • Remove the two Phillips #2 screws holding the motor in place, located near the fan at the back of the motor.

    • The picture only shows one of the screws. The other screw is located on the exact opposite side of the motor.

  8. KitchenAid Professional 600 Power Cord Replacement: 8 단계, 이미지 1/1
    • Pull upward to remove the motor.

  9. KitchenAid Professional 600 Power Cord Replacement, Power Cord: 9 단계, 이미지 1/1
    • Remove the Phillips #2 screw attaching the green grounding wire to the frame of the mixer.

  10. KitchenAid Professional 600 Power Cord Replacement: 10 단계, 이미지 1/1
    • Remove the three Phillips #2 screws that connect the top portion of the mixer to the "neck" of the mixer.

  11. KitchenAid Professional 600 Power Cord Replacement: 11 단계, 이미지 1/1
    • Remove the top portion of the mixer from the "neck" of the mixer.

    • This will make removing the power cord much easier.

  12. KitchenAid Professional 600 Power Cord Replacement: 12 단계, 이미지 1/1
    • You can now remove the power cord from the mixer.

결론

To reassemble your device, follow these instructions in reverse order.

다른 한 분이 해당 안내서를 완성하였습니다.

Luke

회원 가입일: 04/11/16

1,353 평판

안내서 5개 작성하였습니다

Cal Poly, Team 25-4, Maness Spring 2016 Cal Poly, Team 25-4, Maness Spring 2016 회원

CPSU-MANESS-S16S25G4

4 회원들

안내서 18개 작성하였습니다

댓글 2개

So helpful thank you. I've got my mixer cord changer and the mixer is working now. Unfortunately there's always only one speed, high. Any suggestions?

Britter C - 답글

Any idea where I can buy the power cord itself?

Jaeger Amzallag - 답글

댓글 쓰기

조회 통계:

24 시간 전: 5

7일 전: 17

30일 전: 69

전체 시간: 5,629