주요 콘텐츠로 건너뛰기
수리 커뮤니티 가입 - 계정 만들기

LG 1010 LCD Screen Replacement

필요한 것

  1. LG 1010 LCD Screen Replacement, Battery: 1 단계, 이미지 1개 중 1개
    • Turn off the cell phone and place face down on a flat surface.

  2. LG 1010 LCD Screen Replacement: 2 단계, 이미지 2개 중 1개 LG 1010 LCD Screen Replacement: 2 단계, 이미지 2개 중 2개
    • While sliding the gray tab up, lift battery up and away from the cell phone.

  3. LG 1010 LCD Screen Replacement: 3 단계, 이미지 3개 중 1개 LG 1010 LCD Screen Replacement: 3 단계, 이미지 3개 중 2개 LG 1010 LCD Screen Replacement: 3 단계, 이미지 3개 중 3개
    • Remove battery and set aside.

  4. LG 1010 LCD Screen Replacement, Front  Cover: 4 단계, 이미지 2개 중 1개 LG 1010 LCD Screen Replacement, Front  Cover: 4 단계, 이미지 2개 중 2개
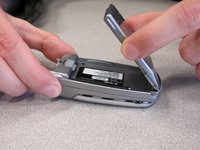
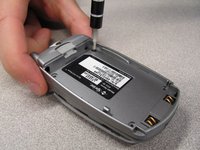
    • Use a Spudger to remove the two front plastic covers to reveal screws.

  5. LG 1010 LCD Screen Replacement: 5 단계, 이미지 1개 중 1개
    • Remove two screws using a Torx T6 screwdriver.

  6. LG 1010 LCD Screen Replacement: 6 단계, 이미지 2개 중 1개 LG 1010 LCD Screen Replacement: 6 단계, 이미지 2개 중 2개
    • Pry off the screen front cover with a small flathead screwdriver.

  7. LG 1010 LCD Screen Replacement: 7 단계, 이미지 1개 중 1개
    • Insert a small flathead screwdriver into the hinge and separate hinge connection.

  8. LG 1010 LCD Screen Replacement: 8 단계, 이미지 1개 중 1개
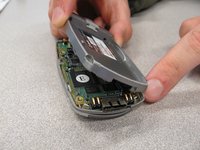
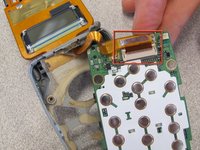
    • Pry off the speaker which is glued on to the front cover using a small flathead screwdriver.

  9. LG 1010 LCD Screen Replacement: 9 단계, 이미지 1개 중 1개
    • Remove remaining portion of the front case from the flexible circuit board.

    • Do not attempt to remove the LCD board at this time, as it is attached to the rear panel assembly.

  10. LG 1010 LCD Screen Replacement, Back Cover: 10 단계, 이미지 2개 중 1개 LG 1010 LCD Screen Replacement, Back Cover: 10 단계, 이미지 2개 중 2개
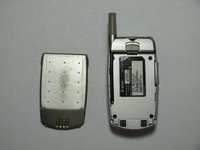
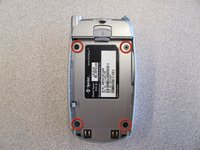
    • Unscrew the four screws on the back case using a T6 Torx Screwdriver.

  11. LG 1010 LCD Screen Replacement: 11 단계, 이미지 2개 중 1개 LG 1010 LCD Screen Replacement: 11 단계, 이미지 2개 중 2개
    • Pull the back cover straight off the phone using your thumb and forefinger.

  12. LG 1010 LCD Screen Replacement, Keypad: 12 단계, 이미지 1개 중 1개
    • Pry off circuit board with a flathead screwdriver.

  13. LG 1010 LCD Screen Replacement: 13 단계, 이미지 1개 중 1개
    • Pull out flexible keypad.

  14. LG 1010 LCD Screen Replacement, LCD Screen: 14 단계, 이미지 1개 중 1개
    • The phone should now look like the picture to the left.

  15. LG 1010 LCD Screen Replacement: 15 단계, 이미지 2개 중 1개 LG 1010 LCD Screen Replacement: 15 단계, 이미지 2개 중 2개
    • Locate and detach the ribbon cable from circuit board.

  16. LG 1010 LCD Screen Replacement: 16 단계, 이미지 2개 중 1개 LG 1010 LCD Screen Replacement: 16 단계, 이미지 2개 중 2개
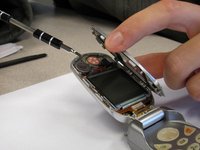
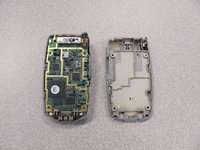
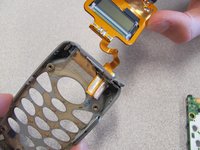
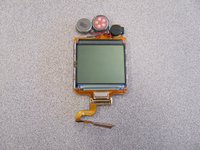
    • Remove the LCD Screen from the phone case and replace with a new LCD screen.

결론

To reassemble your device, follow these instructions in reverse order.

다른 2명이 해당 안내서를 완성하였습니다.

작성자

5다른 기여자 명과 함께

Nicholas Schmidt

회원 가입일: 10/09/10

97 평판

안내서 7개를 작성함

Cal Poly, Team 3-25, Regan Fall 2010 Cal Poly, Team 3-25, Regan Fall 2010 회원

CPSU-REGAN-F10S3G25

4 회원들

안내서 14개를 작성함

0가이드 댓글

댓글 쓰기

조회 통계:

지난 24시간: 0

지난 7일: 12

지난 30일: 27

전체 시간: 1,114