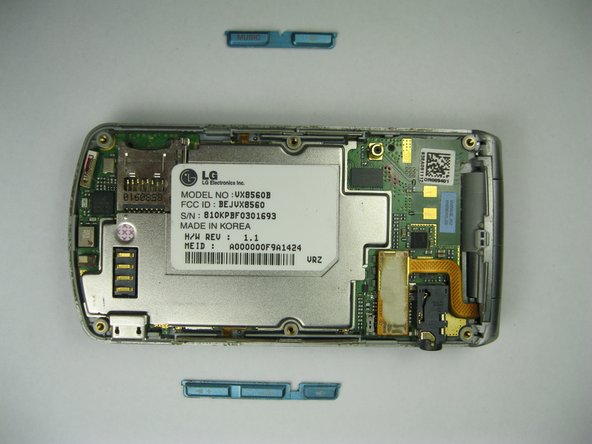
주요 콘텐츠로 건너뛰기
수리 커뮤니티 가입 - 계정 만들기

LG Chocolate 3 Motherboard Replacement

필요한 것

  1. LG Chocolate 3 Motherboard Replacement, Battery: 1 단계, 이미지 1개 중 1개
    • Turn the phone off before starting the replacement process.

    • Place the phone face down.

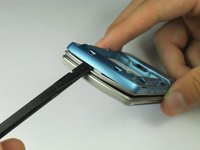
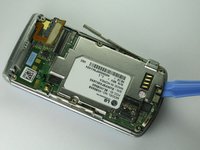
    • Press your finger down on the indentation and slide the back plate off.

  2. LG Chocolate 3 Motherboard Replacement: 2 단계, 이미지 3개 중 1개 LG Chocolate 3 Motherboard Replacement: 2 단계, 이미지 3개 중 2개 LG Chocolate 3 Motherboard Replacement: 2 단계, 이미지 3개 중 3개
    • Using your index finger lift and remove the battery from the phone.

  3. LG Chocolate 3 Motherboard Replacement, Rear Case: 3 단계, 이미지 1개 중 1개
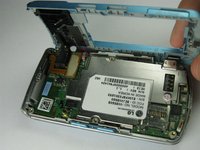
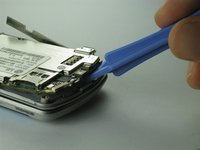
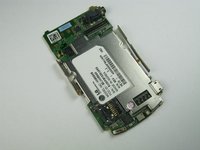
    • Use the pointed end of the spudger to pull out the plastic inserts that are located on the left and right-hand corners.
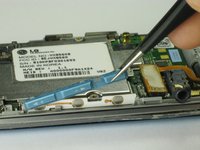
    • If needed, use the tip of a push pin instead of the spudger to remove the plastic inserts.

  4. LG Chocolate 3 Motherboard Replacement: 4 단계, 이미지 1개 중 1개
    이 단계에 사용된 도구:
    Tweezers
    $4.99
    • Using a Phillips #00 screwdriver, remove the six 3mm long screws found along the edges of the phone.

    • If needed, use tweezers to remove loose screws from the recessed holes.

    • Screws are small, therefore, they should be placed in a secure location to prevent misplacement.

  5. LG Chocolate 3 Motherboard Replacement: 5 단계, 이미지 2개 중 1개 LG Chocolate 3 Motherboard Replacement: 5 단계, 이미지 2개 중 2개
    • Pull the rear case up using the spudger.

    • The rear case is connected to the right side of the phone via red and blue cables, be careful not to pull these cables out.

    • The volume control buttons on the side might fall out of their sockets. Carefully replace them with a pair of tweezers before you reassemble the rear case.

  6. LG Chocolate 3 Motherboard Replacement: 6 단계, 이미지 1개 중 1개
    • Use tweezers to pull the clear end of the red and blue speaker cables away from motherboard.

  7. LG Chocolate 3 Motherboard Replacement: 7 단계, 이미지 2개 중 1개 LG Chocolate 3 Motherboard Replacement: 7 단계, 이미지 2개 중 2개
    • Carefully remove the rear case from the phone.

  8. LG Chocolate 3 Motherboard Replacement, Side Buttons: 8 단계, 이미지 1개 중 1개
    이 단계에 사용된 도구:
    Tweezers
    $4.99
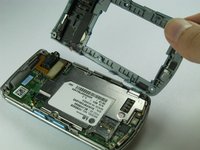
    • Use tweezers to remove the music button found on the side of the phone.

  9. LG Chocolate 3 Motherboard Replacement: 9 단계, 이미지 2개 중 1개 LG Chocolate 3 Motherboard Replacement: 9 단계, 이미지 2개 중 2개
    • Use tweezers to remove the volume control buttons on the opposite side of the phone.

  10. LG Chocolate 3 Motherboard Replacement, Motherboard: 10 단계, 이미지 1개 중 1개
    • Use the flat end of the spudger to lift the orange display data cable.

  11. LG Chocolate 3 Motherboard Replacement: 11 단계, 이미지 2개 중 1개 LG Chocolate 3 Motherboard Replacement: 11 단계, 이미지 2개 중 2개
    • Carefully insert the plastic opening tool between the motherboard and the back of the phone.

  12. LG Chocolate 3 Motherboard Replacement: 12 단계, 이미지 2개 중 1개 LG Chocolate 3 Motherboard Replacement: 12 단계, 이미지 2개 중 2개
    • Use your thumb and index finger to carefully lift and separate the motherboard from the back of the phone.

    • Be cautious of the orange display data cable, it may stick to the motherboard.

    • To avoid this, lift the data cable away from the motherboard before removal.

결론

To reassemble your device, follow these instructions in reverse order.

작성자

14다른 기여자 명과 함께

Brenna Yagade

회원 가입일: 04/15/13

40 평판

안내서 6개를 작성함

Cal Poly, Team 12-35, Amido Spring 2013 Cal Poly, Team 12-35, Amido Spring 2013 회원

CPSU-AMIDO-S13S12G35

5 회원들

안내서 12개를 작성함

0가이드 댓글

댓글 쓰기

조회 통계:

지난 24시간: 0

지난 7일: 4

지난 30일: 27

전체 시간: 669