주요 콘텐츠로 건너뛰기

LG G6 Charge Port Replacement

필요한 것

  1. LG G6 Charge Port Replacement, iOpener Heating: 1 단계, 이미지 1/2 LG G6 Charge Port Replacement, iOpener Heating: 1 단계, 이미지 2/2
    • We recommend that you clean your microwave before proceeding, as any nasty gunk on the bottom may end up stuck to the iOpener.

    • Place the iOpener in the center of the microwave.

    • For carousel microwaves: Make sure the plate spins freely. If your iOpener gets stuck, it may overheat and burn.

  2. LG G6 Charge Port Replacement: 2 단계, 이미지 1/1
    • Heat the iOpener for thirty seconds.

    • Throughout the repair procedure, as the iOpener cools, reheat it in the microwave for an additional thirty seconds at a time.

    • Be careful not to overheat the iOpener during the repair. Overheating may cause the iOpener to burst. Do not attempt to heat over 100˚C (212˚F).

    • Never touch the iOpener if it appears swollen.

    • If the iOpener is still too hot in the middle to touch, continue using it while waiting for it to cool down some more before reheating. A properly heated iOpener should stay warm for up to 10 minutes.

  3. LG G6 Charge Port Replacement: 3 단계, 이미지 1/1
    • Remove the iOpener from the microwave, holding it by one of the two flat ends to avoid the hot center.

    • The iOpener will be very hot, so be careful when handling it. Use an oven mitt if necessary.

  4. LG G6 Charge Port Replacement, Alternate iOpener heating method: 4 단계, 이미지 1/2 LG G6 Charge Port Replacement, Alternate iOpener heating method: 4 단계, 이미지 2/2
    • If you don't have a microwave, follow this step to heat your iOpener in boiling water.

    • Fill a pot or pan with enough water to fully submerge an iOpener.

    • Heat the water to a boil. Turn off the heat.

    • Place an iOpener into the hot water for 2-3 minutes. Make sure the iOpener is fully submerged in the water.

    • Use tongs to extract the heated iOpener from the hot water.

    • Thoroughly dry the iOpener with a towel.

    • The iOpener will be very hot, so be careful to hold it only by the end tabs.

    • Your iOpener is ready for use! If you need to reheat the iOpener, heat the water to a boil, turn off the heat, and place the iOpener in the water for 2-3 minutes.

  5. LG G6 Charge Port Replacement, Fingerprint Sensor: 5 단계, 이미지 1/1
    • Apply a heated iOpener to a long edge of the phone for about 2 minutes.

    • You may need to reheat and reapply the iOpener several times to get the phone warm enough. Follow the iOpener instructions to avoid overheating.

  6. LG G6 Charge Port Replacement: 6 단계, 이미지 1/2 LG G6 Charge Port Replacement: 6 단계, 이미지 2/2
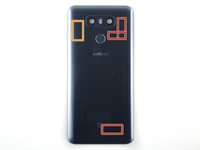
    • In the following steps you will be cutting through the adhesive on the rear glass panel.

    • Take note of the following areas:

    • In addition to cutting around the edge, there is extra adhesive here that should be cut.

    • Avoid sticking the spudger blade in too far here, to avoid damaging the rear button ribbon cable and chip.

  7. LG G6 Charge Port Replacement: 7 단계, 이미지 1/1
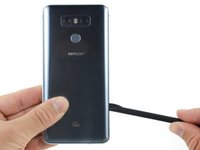
    • Once the back panel is warm to the touch, apply a suction cup as close to the heated edge of the phone as you can.

    • The suction cup will not make a good seal on the curved portion of the glass, so avoid putting it on the very edge.

    • Lift on the suction cup, and insert a halberd spudger or opening pick under the rear glass.

  8. LG G6 Charge Port Replacement: 8 단계, 이미지 1/1
    • Once you have the tool firmly inserted into the glass, reheat and reapply the iOpener to soften the adhesive.

  9. LG G6 Charge Port Replacement: 9 단계, 이미지 1/2 LG G6 Charge Port Replacement: 9 단계, 이미지 2/2
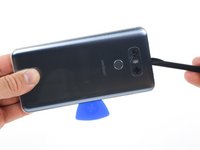
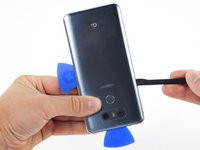
    • Slide the blade of a Halberd spudger along the side of the phone, separating the adhesive.

  10. LG G6 Charge Port Replacement: 10 단계, 이미지 1/3 LG G6 Charge Port Replacement: 10 단계, 이미지 2/3 LG G6 Charge Port Replacement: 10 단계, 이미지 3/3
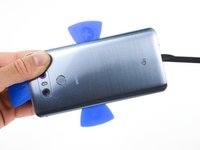
    • Repeat the previous heating and cutting procedure for the remaining three sides of the phone.

    • Leave an opening pick on each side as you continue to the next to prevent the adhesive from resealing.

  11. LG G6 Charge Port Replacement: 11 단계, 이미지 1/2 LG G6 Charge Port Replacement: 11 단계, 이미지 2/2
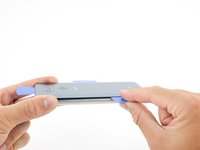
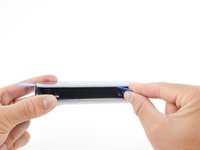
    • Use the opening picks to slice through any remaining adhesive and open the phone.

    • Remove the glass from the phone.

    • During reassembly, apply new adhesive or high-bond tape if your replacement rear glass does not come with any.

  12. LG G6 Charge Port Replacement: 12 단계, 이미지 1/3 LG G6 Charge Port Replacement: 12 단계, 이미지 2/3 LG G6 Charge Port Replacement: 12 단계, 이미지 3/3
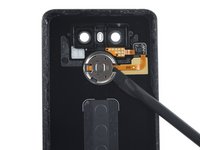
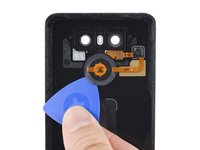
    • Slide the blade of a halberd spudger into the opening on the edge of the rear button bracket.

    • Careful not to push directly against the rear button ribbon cable, to avoid damaging it.

    • Do not push the spudger in too far, to avoid damaging the rear button.

    • Continue sliding the spudger blade around the bracket to cut all the adhesive holding the bracket to the rear case.

    • Remove the bracket.

  13. LG G6 Charge Port Replacement: 13 단계, 이미지 1/3 LG G6 Charge Port Replacement: 13 단계, 이미지 2/3 LG G6 Charge Port Replacement: 13 단계, 이미지 3/3
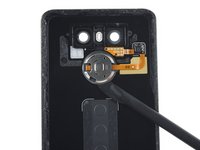
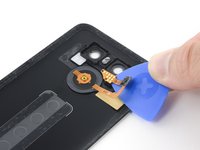
    • Slide an opening pick between the rear button membrane and the rear case.

    • Slide the pick around the edge of the membrane to separate it from the rear case.

    • This might take some force, as the adhesive holding the membrane to the case is tenacious. Pry slowly, to avoid puncturing or stretching the membrane.

  14. LG G6 Charge Port Replacement: 14 단계, 이미지 1/1
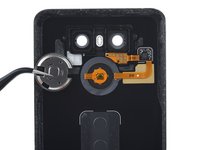
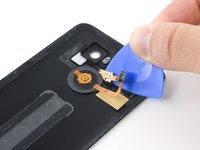
    • Use the blade of a halberd spudger to pry the rear button chip off of the rear case.

  15. LG G6 Charge Port Replacement: 15 단계, 이미지 1/3 LG G6 Charge Port Replacement: 15 단계, 이미지 2/3 LG G6 Charge Port Replacement: 15 단계, 이미지 3/3
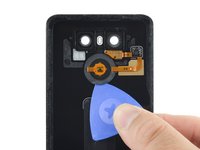
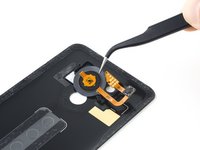
    • Use an opening pick to pry the contact pad off of the rear case.

    • Remove the rear button assembly.

  16. LG G6 Charge Port Replacement, Charging Coil and Loudspeaker Assembly: 16 단계, 이미지 1/3 LG G6 Charge Port Replacement, Charging Coil and Loudspeaker Assembly: 16 단계, 이미지 2/3 LG G6 Charge Port Replacement, Charging Coil and Loudspeaker Assembly: 16 단계, 이미지 3/3
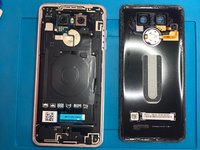
    • Separate the rear glass from the phone,

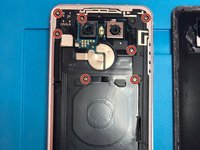
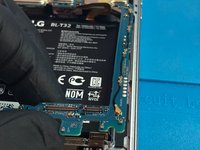
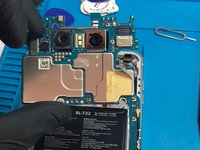
    • Remove eleven Philips #00 screws.

  17. LG G6 Charge Port Replacement, Remove Charging Coil: 17 단계, 이미지 1/2 LG G6 Charge Port Replacement, Remove Charging Coil: 17 단계, 이미지 2/2
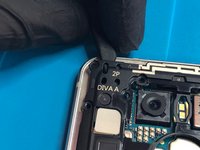
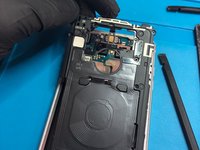
    • Use a spudger to remove the charging coil from the top left corner,

  18. LG G6 Charge Port Replacement, Remove Loudspeaker Assembly: 18 단계, 이미지 1/1
    • Remove loudspeaker assembly.

  19. LG G6 Charge Port Replacement, Battery: 19 단계, 이미지 1/1
    • Use the flat end of a spudger to disconnect the battery connector.

  20. LG G6 Charge Port Replacement, Motherboard: 20 단계, 이미지 1/1
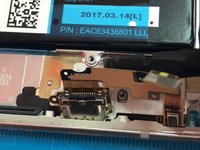
    • Use the flat end of a spudger to disconnect the LCD/Digitizer flex cable.

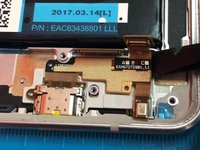
    • Use the flat end of a spudger to disconnect the charge port flex cable.

  21. LG G6 Charge Port Replacement: 21 단계, 이미지 1/1
    • Use the flat end of a spudger to disconnect the front camera.

  22. LG G6 Charge Port Replacement, SIM Card Tray: 22 단계, 이미지 1/1
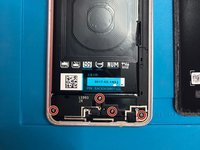
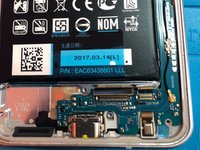
    • Insert a SIM card opening tool into the small hole on the left side of the phone and remove the SIM card tray.

  23. LG G6 Charge Port Replacement: 23 단계, 이미지 1/3 LG G6 Charge Port Replacement: 23 단계, 이미지 2/3 LG G6 Charge Port Replacement: 23 단계, 이미지 3/3
    • Lift the motherboard out of the phone.

    • Be careful not to snag any of the connectors on the board.

  24. LG G6 Charge Port Replacement, Charge Port: 24 단계, 이미지 1/3 LG G6 Charge Port Replacement, Charge Port: 24 단계, 이미지 2/3 LG G6 Charge Port Replacement, Charge Port: 24 단계, 이미지 3/3
    • Use the flat end of a spudger to remove the adhesive securing the USB-C charge port to the frame.

결론

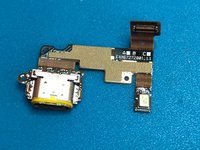
To reassemble your device, follow these instructions in reverse order.

다른 12명이 해당 안내서를 완성하였습니다.

Kevin Stuckey

회원 가입일: 01/11/15

1,160 평판

안내서 2개 작성하였습니다

Anchor Technology Solutions Anchor Technology Solutions 회원

Business

1 회원

안내서 2개 작성하였습니다

댓글 4개

Excellent AAAAAAAAA ++++

Jose G Ramirez - 답글

Awesome tutorial, I skipped the from step 11 to 15. No need to remove the button assembly. Just skipped that and reused the back glass panel with no problems. Thank you!

Ben Fischer - 답글

I can’t get the back off. I’ve tried so hard but it wont come off. I pulled so &&^&^$^ hard i cracked the back but couldnt get the &&^&^$^ back off wtf

Pengo The Penguino - 답글

Hi , I have replaced the port but usb comm still not working. QC3 not working because it also works with working usb comm. I have tried many original cords and chargers.

malikzee111 - 답글

댓글 쓰기

조회 통계:

24 시간 전: 0

7일 전: 14

30일 전: 46

전체 시간: 15,318