주요 콘텐츠로 건너뛰기

LeapFrog LeapPad Ultra XDi USB Charge Port Replacement

필요한 것

  1. LeapFrog LeapPad Ultra XDi USB Charge Port Replacement, Battery: 1 단계, 이미지 1/2 LeapFrog LeapPad Ultra XDi USB Charge Port Replacement, Battery: 1 단계, 이미지 2/2
    • Orient the tablet so it’s laying screen down and the barcode sticker is facing up.

    • Remove the barcode sticker to expose the two screws.

  2. LeapFrog LeapPad Ultra XDi USB Charge Port Replacement: 2 단계, 이미지 1/2 LeapFrog LeapPad Ultra XDi USB Charge Port Replacement: 2 단계, 이미지 2/2
    • Remove the two 5.0mm Phillips #0 screws.

  3. LeapFrog LeapPad Ultra XDi USB Charge Port Replacement: 3 단계, 이미지 1/3 LeapFrog LeapPad Ultra XDi USB Charge Port Replacement: 3 단계, 이미지 2/3 LeapFrog LeapPad Ultra XDi USB Charge Port Replacement: 3 단계, 이미지 3/3
    • Using the iFixit opening tool, pry off the purple and white child-proof casing to expose the twelve screws.

  4. LeapFrog LeapPad Ultra XDi USB Charge Port Replacement: 4 단계, 이미지 1/2 LeapFrog LeapPad Ultra XDi USB Charge Port Replacement: 4 단계, 이미지 2/2
    • Remove all twelve 7mm Phillips #1 screws located along the edges of the device.

  5. LeapFrog LeapPad Ultra XDi USB Charge Port Replacement: 5 단계, 이미지 1/2 LeapFrog LeapPad Ultra XDi USB Charge Port Replacement: 5 단계, 이미지 2/2
    • Remove the purple case, exposing the motherboard and battery.

  6. LeapFrog LeapPad Ultra XDi USB Charge Port Replacement: 6 단계, 이미지 1/3 LeapFrog LeapPad Ultra XDi USB Charge Port Replacement: 6 단계, 이미지 2/3 LeapFrog LeapPad Ultra XDi USB Charge Port Replacement: 6 단계, 이미지 3/3
    • Use the Spudger to remove the glued down battery.

    • Using your fingers, grab the battery wires and carefully unplug them from the motherboard.

    • Replace the battery with a new one.

  7. LeapFrog LeapPad Ultra XDi USB Charge Port Replacement, Charging Port: 7 단계, 이미지 1/3 LeapFrog LeapPad Ultra XDi USB Charge Port Replacement, Charging Port: 7 단계, 이미지 2/3 LeapFrog LeapPad Ultra XDi USB Charge Port Replacement, Charging Port: 7 단계, 이미지 3/3
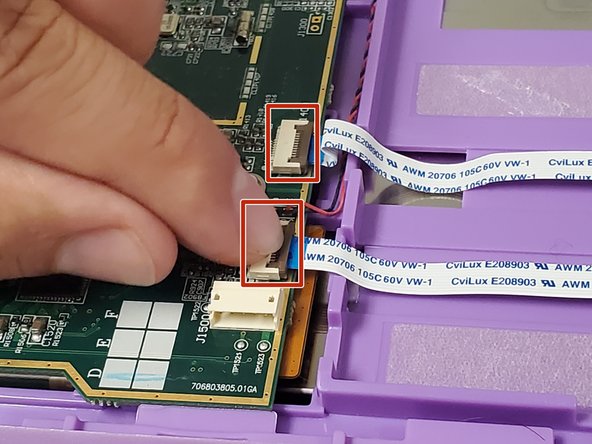
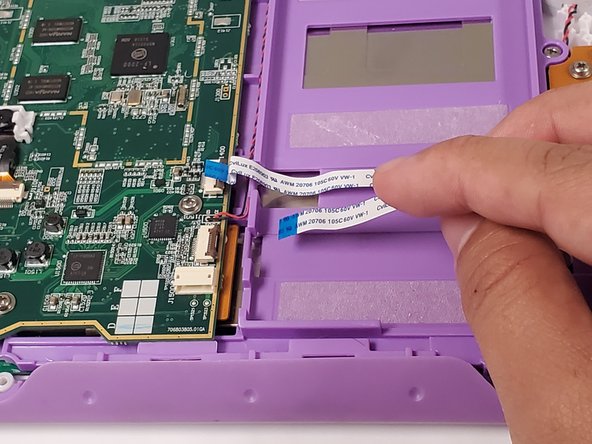
    • Locate the three ribbon cables on top of the motherboard.

    • Flip up the locking clip on the ribbon cable connector to release the cable.

    • Disconnect the cables from their connectors.

  8. LeapFrog LeapPad Ultra XDi USB Charge Port Replacement: 8 단계, 이미지 1/3 LeapFrog LeapPad Ultra XDi USB Charge Port Replacement: 8 단계, 이미지 2/3 LeapFrog LeapPad Ultra XDi USB Charge Port Replacement: 8 단계, 이미지 3/3
    • Unscrew the four 5.0 mm Phillips #0 screws securing the motherboard.

  9. LeapFrog LeapPad Ultra XDi USB Charge Port Replacement: 9 단계, 이미지 1/2 LeapFrog LeapPad Ultra XDi USB Charge Port Replacement: 9 단계, 이미지 2/2
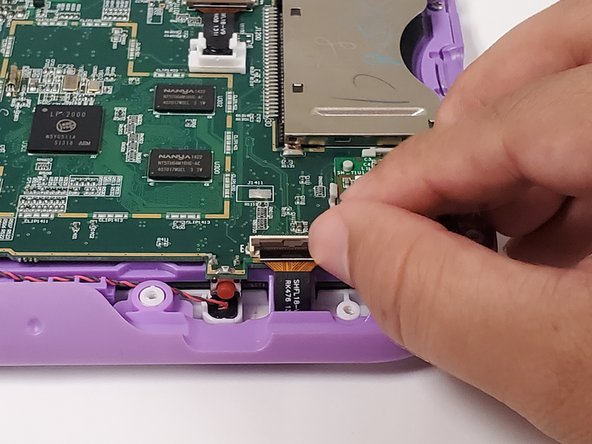
    • Lift the motherboard up to expose the fourth ribbon cable underneath.

    • Flip up the locking clip to release the cable, and disconnect the cable from the connector.

  10. LeapFrog LeapPad Ultra XDi USB Charge Port Replacement: 10 단계, 이미지 1/1
    • Locate the charging port on the side of the motherboard.

    • Use a soldering iron to desolder the five metal connections to the motherboard. Replace the USB charge port.

결론

To reassemble your device, follow these instructions in reverse order.

Rachel Baker

회원 가입일: 09/01/19

109 평판

안내서 1개 작성함

댓글 0개

댓글 쓰기

조회 통계:

24 시간 전: 3

7일 전: 6

30일 전: 17

전체 시간: 1,196