주요 콘텐츠로 건너뛰기

Lenovo ThinkPad P1 Gen 7 LPCAMM2 Memory Replacement

필요한 것

  1. Lenovo ThinkPad P1 Gen 7 LPCAMM2 Memory Replacement, Turn off your laptop: 1 단계, 이미지 1/3 Lenovo ThinkPad P1 Gen 7 LPCAMM2 Memory Replacement, Turn off your laptop: 1 단계, 이미지 2/3 Lenovo ThinkPad P1 Gen 7 LPCAMM2 Memory Replacement, Turn off your laptop: 1 단계, 이미지 3/3
    • Shut down your laptop (don't just put it in sleep mode) and disconnect all cables.

    • Flip the laptop upside-down, and rotate it so the screen hinge faces towards you.

  2. Lenovo ThinkPad P1 Gen 7 LPCAMM2 Memory Replacement, Loosen the base cover screws: 2 단계, 이미지 1/1
    • Use a Phillips screwdriver to loosen the six captive screws securing the base cover.

  3. Lenovo ThinkPad P1 Gen 7 LPCAMM2 Memory Replacement, Loosen the base cover's left side: 3 단계, 이미지 1/3 Lenovo ThinkPad P1 Gen 7 LPCAMM2 Memory Replacement, Loosen the base cover's left side: 3 단계, 이미지 2/3 Lenovo ThinkPad P1 Gen 7 LPCAMM2 Memory Replacement, Loosen the base cover's left side: 3 단계, 이미지 3/3
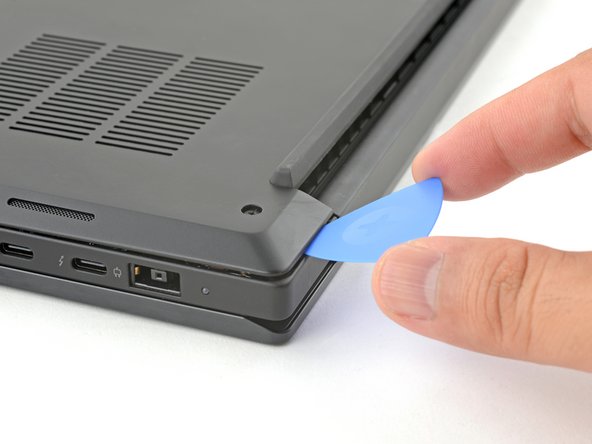
    • Press the tip of an opening pick into the seam between the base cover and the bottom-left corner of the frame (near the screen hinge).

    • It can be tricky to get the pick into the seam for the first time. Angle the pick vertically and press down with firm pressure.

    • Pivot the pick down and slide it around the corner to release the clips.

  4. Lenovo ThinkPad P1 Gen 7 LPCAMM2 Memory Replacement: 4 단계, 이미지 1/3 Lenovo ThinkPad P1 Gen 7 LPCAMM2 Memory Replacement: 4 단계, 이미지 2/3 Lenovo ThinkPad P1 Gen 7 LPCAMM2 Memory Replacement: 4 단계, 이미지 3/3
    • Slide the opening pick along the left edge to release the clips securing the cover.

  5. Lenovo ThinkPad P1 Gen 7 LPCAMM2 Memory Replacement, Loosen the base cover's right side: 5 단계, 이미지 1/3 Lenovo ThinkPad P1 Gen 7 LPCAMM2 Memory Replacement, Loosen the base cover's right side: 5 단계, 이미지 2/3 Lenovo ThinkPad P1 Gen 7 LPCAMM2 Memory Replacement, Loosen the base cover's right side: 5 단계, 이미지 3/3
    • Press the tip of an opening pick into the seam between the base cover and the bottom-right corner of the frame (near the screen hinge).

    • Pivot the pick down and slide it around the corner to release the clips.

  6. Lenovo ThinkPad P1 Gen 7 LPCAMM2 Memory Replacement: 6 단계, 이미지 1/2 Lenovo ThinkPad P1 Gen 7 LPCAMM2 Memory Replacement: 6 단계, 이미지 2/2
    • Slide the opening pick along the right edge to release the clips securing the cover.

  7. Lenovo ThinkPad P1 Gen 7 LPCAMM2 Memory Replacement, Remove the base cover: 7 단계, 이미지 1/2 Lenovo ThinkPad P1 Gen 7 LPCAMM2 Memory Replacement, Remove the base cover: 7 단계, 이미지 2/2
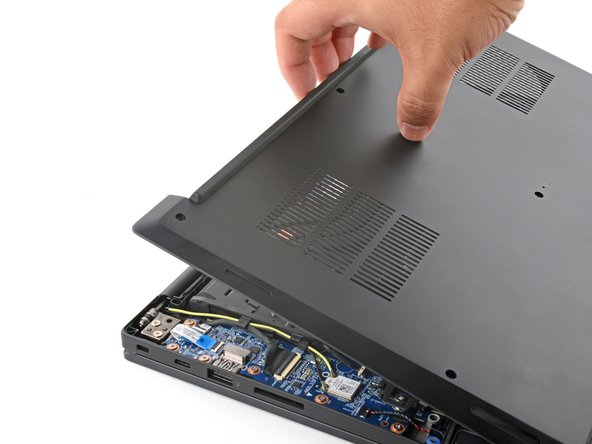
    • Grasp the base cover along the screen hinge edge and pull up to loosen the cover.

  8. Lenovo ThinkPad P1 Gen 7 LPCAMM2 Memory Replacement: 8 단계, 이미지 1/2 Lenovo ThinkPad P1 Gen 7 LPCAMM2 Memory Replacement: 8 단계, 이미지 2/2
    • Lift and remove the base cover.

  9. Lenovo ThinkPad P1 Gen 7 LPCAMM2 Memory Replacement, Loosen the battery screws: 9 단계, 이미지 1/1
    • Because of the battery connector's design, the only way to disconnect the battery is by physically removing it.

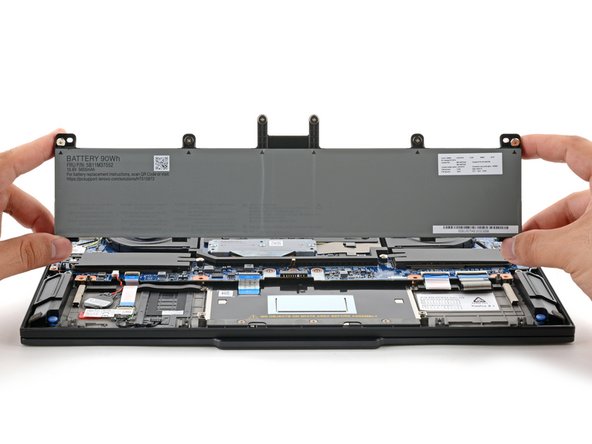
    • Use a Phillips screwdriver to loosen the six captive screws securing the battery.

  10. Lenovo ThinkPad P1 Gen 7 LPCAMM2 Memory Replacement, Remove the battery: 10 단계, 이미지 1/2 Lenovo ThinkPad P1 Gen 7 LPCAMM2 Memory Replacement, Remove the battery: 10 단계, 이미지 2/2
    • Grasp the top edge of the battery and lift to disconnect it.

    • You may feel a little resistance from the battery connector as it disconnects—that's normal.

  11. Lenovo ThinkPad P1 Gen 7 LPCAMM2 Memory Replacement: 11 단계, 이미지 1/2 Lenovo ThinkPad P1 Gen 7 LPCAMM2 Memory Replacement: 11 단계, 이미지 2/2
    • Lift and remove the battery.

  12. Lenovo ThinkPad P1 Gen 7 LPCAMM2 Memory Replacement, Loosen the LPCAMM2 screws: 12 단계, 이미지 1/1
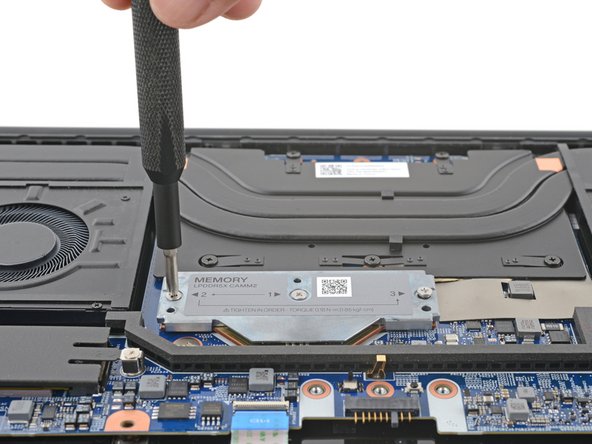
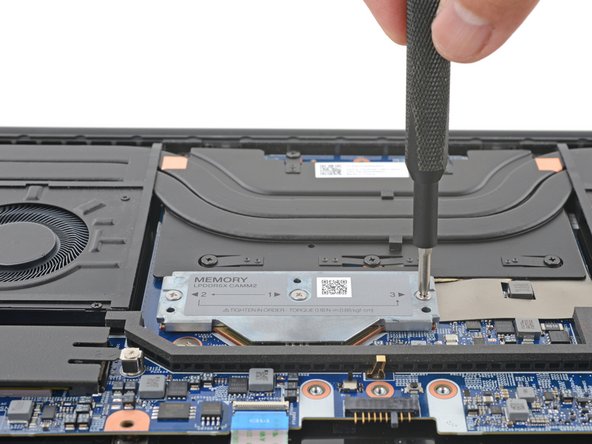
    • Use a Phillips screwdriver to loosen the three captive screws securing the LPCAMM2 bracket.

    • The loosening order doesn't matter.

  13. Lenovo ThinkPad P1 Gen 7 LPCAMM2 Memory Replacement, Remove the LPCAMM2 bracket: 13 단계, 이미지 1/2 Lenovo ThinkPad P1 Gen 7 LPCAMM2 Memory Replacement, Remove the LPCAMM2 bracket: 13 단계, 이미지 2/2
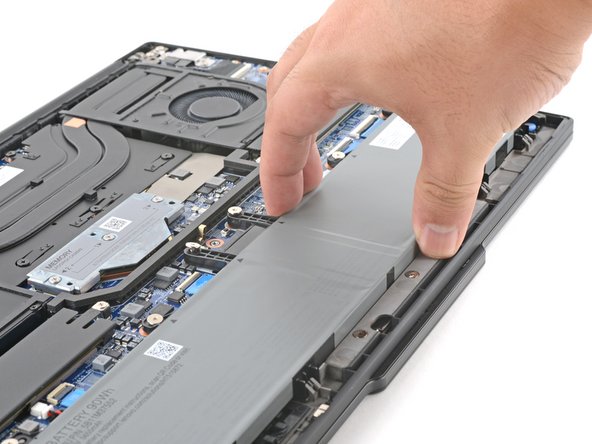
    • Grab the edges of the LPCAMM2 bracket and lift straight up to remove it.

    • If your LPCAMM2 module came up with the bracket, use your fingers to gently separate it from the bracket.

    • Avoid touching the gold underside of the module—your skin oils can interfere with the electrical contacts. If you touch it by accident and plan to re-use it, clean it with high-concentration isopropyl alcohol (>90%) and a lint-free cloth before reinstalling it.

  14. Lenovo ThinkPad P1 Gen 7 LPCAMM2 Memory Replacement, Remove the LPCAMM2: 14 단계, 이미지 1/2 Lenovo ThinkPad P1 Gen 7 LPCAMM2 Memory Replacement, Remove the LPCAMM2: 14 단계, 이미지 2/2
    • Grab the edges of the LPCAMM2 and lift straight up to remove it.

  15. Lenovo ThinkPad P1 Gen 7 LPCAMM2 Memory Replacement, Check the compression connector: 15 단계, 이미지 1/2 Lenovo ThinkPad P1 Gen 7 LPCAMM2 Memory Replacement, Check the compression connector: 15 단계, 이미지 2/2
    • Follow this step if you've accidentally dislodged the compression connector or if you need to replace a damaged one.

    • Don't grab the compression connector by its delicate spring contacts. If they bend, the connector won't work properly.

    • Grasp the compression connector by the edges and lift straight up to remove it.

    • Avoid touching the exposed LPCAMM2 contact surface on the motherboard.

    • The compression connector is keyed to fit in only one direction. If it doesn't sit flush during reassembly, you may need to flip or rotate it to align the pegs with the holes in the board.

  16. Lenovo ThinkPad P1 Gen 7 LPCAMM2 Memory Replacement, Reassembly: install the LPCAMM2: 16 단계, 이미지 1/2 Lenovo ThinkPad P1 Gen 7 LPCAMM2 Memory Replacement, Reassembly: install the LPCAMM2: 16 단계, 이미지 2/2
    • The remaining steps show how to reassemble the device.

    • Grip the LPCAMM2 by its edges, and lay it on top of the compression connector.

    • Make sure the LPCAMM2 aligns with the pegs.

  17. Lenovo ThinkPad P1 Gen 7 LPCAMM2 Memory Replacement, Install the bracket: 17 단계, 이미지 1/2 Lenovo ThinkPad P1 Gen 7 LPCAMM2 Memory Replacement, Install the bracket: 17 단계, 이미지 2/2
    • Lay the bracket on top of the LPCAMM2 and align it using the screw holes.

  18. Lenovo ThinkPad P1 Gen 7 LPCAMM2 Memory Replacement, Secure the LPCAMM2: 18 단계, 이미지 1/3 Lenovo ThinkPad P1 Gen 7 LPCAMM2 Memory Replacement, Secure the LPCAMM2: 18 단계, 이미지 2/3 Lenovo ThinkPad P1 Gen 7 LPCAMM2 Memory Replacement, Secure the LPCAMM2: 18 단계, 이미지 3/3
    • Tighten the three LPCAMM2 screws in the order depicted on the module.

    • In this case, tighten the screws centerleftright.

    • Tighten the screws until they're snug. Don't over-tighten them, or you could damage the module.

  19. Lenovo ThinkPad P1 Gen 7 LPCAMM2 Memory Replacement, Reinstall the battery: 19 단계, 이미지 1/2 Lenovo ThinkPad P1 Gen 7 LPCAMM2 Memory Replacement, Reinstall the battery: 19 단계, 이미지 2/2
    • Align the bottom edge of the battery to its recess.

    • Lay the battery into its recess and press down gently.

  20. Lenovo ThinkPad P1 Gen 7 LPCAMM2 Memory Replacement, Secure the battery: 20 단계, 이미지 1/1
    • Use a Phillips screwdriver to tighten the six captive screws to re-secure the battery.

  21. Lenovo ThinkPad P1 Gen 7 LPCAMM2 Memory Replacement, Secure the base cover: 21 단계, 이미지 1/3 Lenovo ThinkPad P1 Gen 7 LPCAMM2 Memory Replacement, Secure the base cover: 21 단계, 이미지 2/3 Lenovo ThinkPad P1 Gen 7 LPCAMM2 Memory Replacement, Secure the base cover: 21 단계, 이미지 3/3
    • Align the base cover to the chassis and lay it in place.

    • Press firmly along the sides and corners of the base cover to reengage the clips.

  22. Lenovo ThinkPad P1 Gen 7 LPCAMM2 Memory Replacement, Secure the base cover: 22 단계, 이미지 1/1
    • Use a Phillips screwdriver to tighten the six captive screws to re-secure the base cover.

결론

Take your e-waste to an R2 or e-Stewards certified recycler.

Repair didn’t go as planned? Try some basic troubleshooting, or ask our Answers community for help.

다른 5명이 해당 안내서를 완성하였습니다.

Arthur Shi

회원 가입일: 01/03/18

257,462 평판

안내서 529개 작성하였습니다

iFixit iFixit 회원

Staff

141 회원들

안내서 17,895개 작성하였습니다

댓글 한 개

Thank you, iFixit, for the detailed, easy-to-understand repair guide on the new, revolutionary LPCAMM2 memory on the ThinkPad P1 Gen 7.

Rijul Razdan - 답글

댓글 쓰기

조회 통계:

24 시간 전: 195

7일 전: 1,185

30일 전: 6,644

전체 시간: 19,295