소개
If the pedals on your G27 aren't pressing down correctly, or if they just don't feel comfortable under your feet, you will want to replace the springs in the pedals. This isn't a hard replacement to do, all you need is a screwdriver.
필요한 것
-
-
Remove two screws from each pedal with a 2.5mm allen wrench.
-
Once these screws are off, take off the front faces on each pedal, they should be very easy to remove.
 FixBot에 문의하기
-
-
-
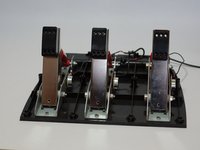
Flip over the device. Now remove fourteen 15.8 mm screws from the underside of the pedal assembly with a Phillips #1 screwdriver.
-
When finished, flip over the device again so that it's in its original position.
-
-
-
-
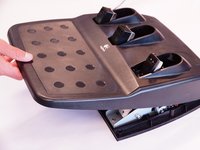
Lift the top cover of the device from the front, don't completely remove it yet though, because there are still wires connecting both halves. (NEED PICTURE)
-
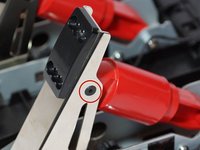
Behind the left-most pedal, there are two 7.4mm screws attaching a wire to the top cover. Remove these with a Phillips #1 screwdriver and release the wires.
-
Once the wires are no longer connected to the top cover, remove the cover completely.
-
-
-
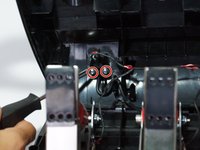
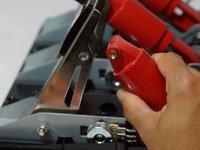
Simultaneously remove the 10mm screws connecting the pedal to the red piston behind it.
-
Once removed, the piston can rotate free of the pedal.
-
-
-
Flip the piston away from the pedal and remove the top half of it. The spring should now be visible. (NEED PICTURE)
-
Take out the spring, and replace it with a new one.
-
Repeat steps four and five for each pedal that needs a spring replaced.
-


To reassemble your device, follow these instructions in reverse order.
다른 10명이 해당 안내서를 완성하였습니다.
팀

Cal Poly, Team 15-4, Amido Spring 2015 Cal Poly, Team 15-4, Amido Spring 2015 회원
CPSU-AMIDO-S15S15G4
4 회원들
안내서 25개를 작성함
6가이드 댓글
Is it possible to replace / renew the potentiometers used for gas / brake?
Dave Pawson - 답글 공유
I replaced the springs and reassembled in reverse order. However, my wheel will no longer power on. Any idea where I would have lost power? Thank you.
What size is the cluch spring
6cm length
2cm diameter
hermimaier - 답글 공유