주요 콘텐츠로 건너뛰기

Logitech Mouse MX1000 Disassembly

필요한 것

  1. Logitech Mouse MX1000 Disassembly, Open the housing: 1 단계, 이미지 2개 중 1개 Logitech Mouse MX1000 Disassembly, Open the housing: 1 단계, 이미지 2개 중 2개
    • There are four screws hidden on the bottom part of the mouse. Two are below the sticker, the last two are below the bottom pads.

  2. Logitech Mouse MX1000 Disassembly, Disconnect the cables: 2 단계, 이미지 3개 중 1개 Logitech Mouse MX1000 Disassembly, Disconnect the cables: 2 단계, 이미지 3개 중 2개 Logitech Mouse MX1000 Disassembly, Disconnect the cables: 2 단계, 이미지 3개 중 3개
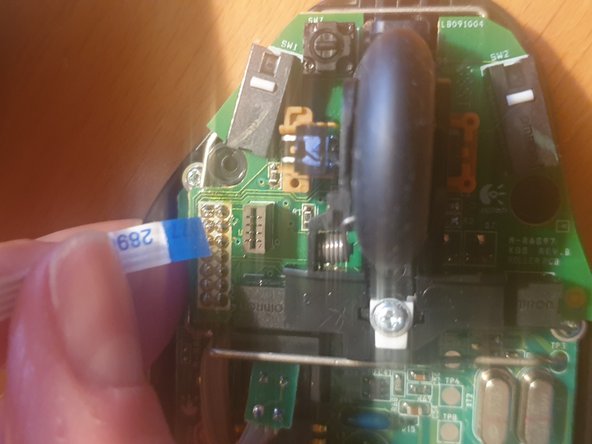
    • Once the scews removed, carefully open the housing. Some cables hold both pieces together

    • First remove the tricolor battery cable

    • Then carefully remove the ribbon cable

  3. Logitech Mouse MX1000 Disassembly, Remove the battery: 3 단계, 이미지 1개 중 1개
    • To remove the battery cover, two more screws need to be removed.

    • The battery is then held in place with a sticker within the housing.

  4. Logitech Mouse MX1000 Disassembly, Remove the board from the housing: 4 단계, 이미지 3개 중 1개 Logitech Mouse MX1000 Disassembly, Remove the board from the housing: 4 단계, 이미지 3개 중 2개 Logitech Mouse MX1000 Disassembly, Remove the board from the housing: 4 단계, 이미지 3개 중 3개
    • Remove the three screws (red circles) holding the board in place

    • Remove the wheel and the white piece of plastic holding it down

    • A clip (yellow circle) further holds it down

    • Finally you need to unsolder the charging pads (orange circles)

  5. Logitech Mouse MX1000 Disassembly, You are done: 5 단계, 이미지 1개 중 1개
    • Congrats, you now fully dissassembled your logitech mouse!

결론

To reassemble your device, follow these instructions in reverse order.

작성자

2다른 기여자 명과 함께

lija31415

회원 가입일: 12/17/20

313 평판

안내서 1개를 작성함

0가이드 댓글

댓글 쓰기

조회 통계:

지난 24시간: 2

지난 7일: 11

지난 30일: 41

전체 시간: 1,336