주요 콘텐츠로 건너뛰기
수리 커뮤니티 가입 - 계정 만들기

MSI GP60 2PE Leopard Fan Replacement

필요한 것

  1. MSI GP60 2PE Leopard Fan Replacement, Back Panel: 1 단계, 이미지 1개 중 1개
    • Flip the device over so the back is facing up.

  2. MSI GP60 2PE Leopard Fan Replacement: 2 단계, 이미지 2개 중 1개 MSI GP60 2PE Leopard Fan Replacement: 2 단계, 이미지 2개 중 2개
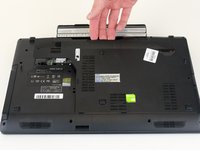
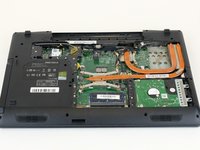
    • Remove the four 5mm screws from the back of the device using a Phillips #00 screwdriver.

    • There is a screw located under the battery; lift the battery up to access it.

  3. MSI GP60 2PE Leopard Fan Replacement: 3 단계, 이미지 2개 중 1개 MSI GP60 2PE Leopard Fan Replacement: 3 단계, 이미지 2개 중 2개
    • Once all four screws are removed, lift the back off.

  4. MSI GP60 2PE Leopard Fan Replacement, Fan: 4 단계, 이미지 2개 중 1개 MSI GP60 2PE Leopard Fan Replacement, Fan: 4 단계, 이미지 2개 중 2개
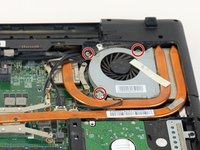
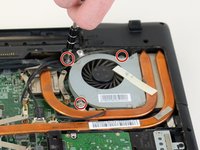
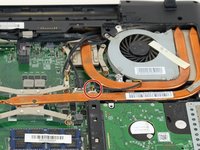
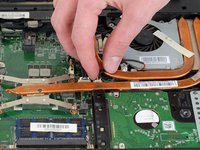
    • Remove the three 5 mm screws from the fan with a Phillips #00 screwdriver.

  5. MSI GP60 2PE Leopard Fan Replacement: 5 단계, 이미지 3개 중 1개 MSI GP60 2PE Leopard Fan Replacement: 5 단계, 이미지 3개 중 2개 MSI GP60 2PE Leopard Fan Replacement: 5 단계, 이미지 3개 중 3개
    • Pull the wire on the bottom left of the fan out of the socket.

    • Pull the wire gently; pulling too hard could damage the wire.

  6. MSI GP60 2PE Leopard Fan Replacement: 6 단계, 이미지 2개 중 1개 MSI GP60 2PE Leopard Fan Replacement: 6 단계, 이미지 2개 중 2개
    • Remove the fan.

결론

To reassemble your device, follow these instructions in reverse order.

다른 2명이 해당 안내서를 완성하였습니다.

작성자

2다른 기여자 명과 함께

Zoey Calcagno

회원 가입일: 10/04/18

672 평판

안내서 5개를 작성함

0가이드 댓글

댓글 쓰기

조회 통계:

지난 24시간: 1

지난 7일: 8

지난 30일: 37

전체 시간: 1,944