주요 콘텐츠로 건너뛰기

MSI MS-1782 Cooling Assembly Replacement

필요한 것

  1. MSI MS-1782 Cooling Assembly Replacement, Back Cover: 1 단계, 이미지 1개 중 1개
    • Remove five 6.6 mm screws from the edges of the bottom cover using a JIS #1 screwdriver.

    • Remove one 5.6 mm screw from the center of the bottom cover using a JIS #1 screwdriver.

  2. MSI MS-1782 Cooling Assembly Replacement: 2 단계, 이미지 3개 중 1개 MSI MS-1782 Cooling Assembly Replacement: 2 단계, 이미지 3개 중 2개 MSI MS-1782 Cooling Assembly Replacement: 2 단계, 이미지 3개 중 3개
    • Use an iFixit opening pick to unclip the bottom cover.

    • It is ok to run the picks along the edges since there is nothing connected to the bottom cover. It is easier to start from the sides and then work your way forward.

    • After unclipping the bottom case, pull from the back of the laptop upwards using the lip of the bottom case as a handle.

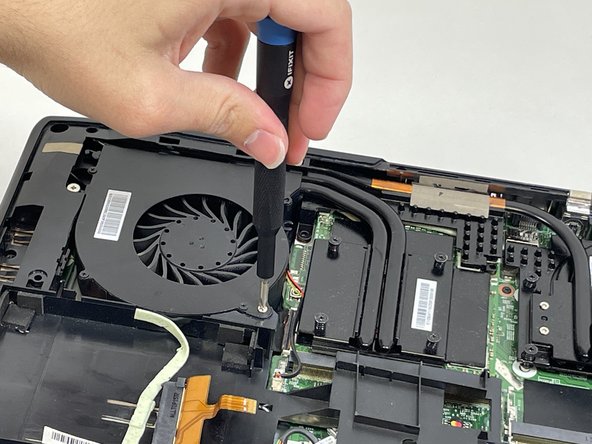
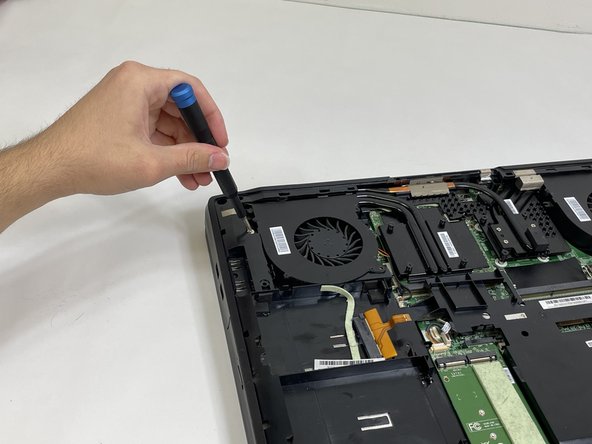
  3. MSI MS-1782 Cooling Assembly Replacement, Cooling Assembly: 3 단계, 이미지 3개 중 1개 MSI MS-1782 Cooling Assembly Replacement, Cooling Assembly: 3 단계, 이미지 3개 중 2개 MSI MS-1782 Cooling Assembly Replacement, Cooling Assembly: 3 단계, 이미지 3개 중 3개
    • Loosen the captive screw on the left side of the left fan using a JIS #2 screwdriver.

    • Remove the 5.1 mm screw on the right side of the left fan using a JIS #2 screwdriver.

  4. MSI MS-1782 Cooling Assembly Replacement: 4 단계, 이미지 3개 중 1개 MSI MS-1782 Cooling Assembly Replacement: 4 단계, 이미지 3개 중 2개 MSI MS-1782 Cooling Assembly Replacement: 4 단계, 이미지 3개 중 3개
    • Gently detach the fan connector.

    • Remove the fan by lifting it out of its housing.

    • Be sure to handle the wire delicately; if not it will break.

  5. MSI MS-1782 Cooling Assembly Replacement: 5 단계, 이미지 3개 중 1개 MSI MS-1782 Cooling Assembly Replacement: 5 단계, 이미지 3개 중 2개 MSI MS-1782 Cooling Assembly Replacement: 5 단계, 이미지 3개 중 3개
    • Loosen the captive screw on the top of the right fan using a JIS #2 screwdriver.

    • Remove the 3.6 mm screw on the bottom of the right fan using a JIS #2 screwdriver.

  6. MSI MS-1782 Cooling Assembly Replacement: 6 단계, 이미지 3개 중 1개 MSI MS-1782 Cooling Assembly Replacement: 6 단계, 이미지 3개 중 2개 MSI MS-1782 Cooling Assembly Replacement: 6 단계, 이미지 3개 중 3개
    • Gently detach the fan connector.

    • Remove the fan by lifting it out of its housing.

    • Be sure to handle the wire delicately; if not it will break.

  7. MSI MS-1782 Cooling Assembly Replacement: 7 단계, 이미지 3개 중 1개 MSI MS-1782 Cooling Assembly Replacement: 7 단계, 이미지 3개 중 2개 MSI MS-1782 Cooling Assembly Replacement: 7 단계, 이미지 3개 중 3개
    • Loosen the eight captive screws holding the heat sink in place using a JIS #2 screwdriver.

    • Be sure to follow the numbers that are next to the screws on the heatsink. This evenly removes pressure on the components when removing the heatsink.

  8. MSI MS-1782 Cooling Assembly Replacement: 8 단계, 이미지 3개 중 1개 MSI MS-1782 Cooling Assembly Replacement: 8 단계, 이미지 3개 중 2개 MSI MS-1782 Cooling Assembly Replacement: 8 단계, 이미지 3개 중 3개
    • Gently lift the heat sink and then pull forwards towards you.

결론

To reassemble your device, follow these instructions in reverse order.

작성자

3다른 기여자 명과 함께

Joshua Pizzo

회원 가입일: 03/08/23

438 평판

안내서 3개를 작성함

0가이드 댓글

댓글 쓰기

조회 통계:

지난 24시간: 0

지난 7일: 2

지난 30일: 8

전체 시간: 337