주요 콘텐츠로 건너뛰기

MacBook Air 13" Early 2014 Trackpad Replacement

필요한 것

  1. MacBook Air 13" Early 2014 Trackpad Replacement, Lower Case: 1 단계, 이미지 1/1
    이 단계에 사용된 도구:
    P5 Pentalobe Screwdriver Retina MacBook Pro and Air
    $5.99
    구매
    • Before proceeding, power down your MacBook. Close the display and lay it on a soft surface, top-side down.

    • Use a P5 Pentalobe driver to remove ten screws securing the lower case, of the following lengths:

    • Two 9 mm screws

    • Eight 2.6 mm screws

  2. MacBook Air 13" Early 2014 Trackpad Replacement: 2 단계, 이미지 1/1
    • Wedge your fingers between the display and the lower case and pull upward to pop the lower case off the Air.

    • Remove the lower case and set it aside.

  3. MacBook Air 13" Early 2014 Trackpad Replacement, Battery: 3 단계, 이미지 1/1
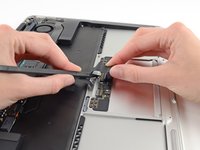
    • Grab the clear plastic pull tab attached to the battery connector and pull it toward the front edge of the Air to disconnect the battery from the logic board.

    • Do not lift upward on the connector as you disconnect it.

  4. MacBook Air 13" Early 2014 Trackpad Replacement: 4 단계, 이미지 1/1
    • Remove the following five screws securing the battery to the upper case:

    • Three 6.3 mm T5 Torx screws

    • Two 2.4 mm T5 Torx screws

  5. MacBook Air 13" Early 2014 Trackpad Replacement: 5 단계, 이미지 1/1
    • When handling the battery, avoid squeezing or touching the four exposed lithium polymer cells.

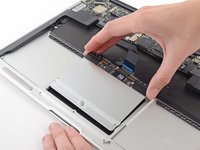
    • Lift the battery from its edge nearest the logic board and remove it from the upper case.

    • If you're installing a new battery, you should calibrate it after installation:

    • Charge it to 100%, and then keep charging it for at least 2 more hours. Then, unplug and use it normally to drain the battery. When you see the low battery warning, save your work, and keep your laptop on until it goes to sleep due to low battery. Wait at least 5 hours, then charge your laptop uninterrupted to 100%.

    • If you notice any unusual behavior or problems after installing your new battery, you may need to reset your MacBook's SMC.

  6. MacBook Air 13" Early 2014 Trackpad Replacement, Trackpad: 6 단계, 이미지 1/3 MacBook Air 13" Early 2014 Trackpad Replacement, Trackpad: 6 단계, 이미지 2/3 MacBook Air 13" Early 2014 Trackpad Replacement, Trackpad: 6 단계, 이미지 3/3
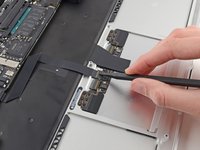
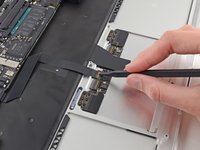
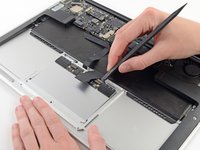
    • Use the tip of a spudger or your fingernail to flip up the retaining flap on the trackpad ribbon cable ZIF socket.

    • Be sure you are prying up on the hinged retaining flap, not the socket itself.

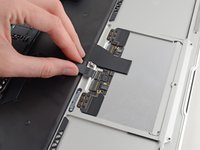
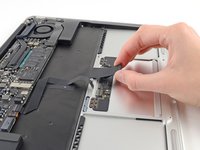
    • Pull the trackpad ribbon cable straight out of its socket toward the rear edge of the Air.

  7. MacBook Air 13" Early 2014 Trackpad Replacement: 7 단계, 이미지 1/2 MacBook Air 13" Early 2014 Trackpad Replacement: 7 단계, 이미지 2/2
    • While carefully lifting the keyboard ribbon cable with one hand, use the tip of a spudger or your fingernail to flip up the retaining flap on the keyboard ribbon cable ZIF socket.

    • Be sure you are prying up on the hinged retaining flap, not the socket itself.

    • Pull the keyboard ribbon cable straight out of its socket toward the front edge of the Air.

  8. MacBook Air 13" Early 2014 Trackpad Replacement: 8 단계, 이미지 1/1
    • Remove the following twelve screws:

    • Six 1.6 mm Phillips screws securing the trackpad to the upper case.

    • Six 1.6 mm Phillips screws securing the trackpad brackets to the trackpad.

  9. MacBook Air 13" Early 2014 Trackpad Replacement: 9 단계, 이미지 1/1
    • Remove the right and left trackpad brackets from the upper case.

  10. MacBook Air 13" Early 2014 Trackpad Replacement: 10 단계, 이미지 1/1
    • During reassembly, check the clicking action on the trackpad.

    • The 1.4 mm T5 Torx screw near the front edge of the case must be adjusted correctly.

    • If overtightened, the button will cease to click at a certain point. Adjust the set screw until the clicking side of the trackpad has minimal play.

    • It's not necessary to remove this screw in order to remove the trackpad.

  11. MacBook Air 13" Early 2014 Trackpad Replacement: 11 단계, 이미지 1/2 MacBook Air 13" Early 2014 Trackpad Replacement: 11 단계, 이미지 2/2
    • Use the flat end of a spudger to carefully lift the edge of the trackpad closest to the keyboard from its recess in the upper case by lifting it away from the brackets attached to the upper case.

    • Remove the trackpad from the upper case.

결론

To reassemble your device, follow these instructions in reverse order.

다른 34명이 해당 안내서를 완성하였습니다.

Jeff Suovanen

회원 가입일: 08/06/13

427,010 평판

안내서 259개 작성하였습니다

iFixit iFixit 회원

Staff

136 회원들

안내서 16,562개 작성하였습니다

댓글 10개

Needed Phillips PH000 screwdriver (not PH00)..

Steve - 답글

there are times when my trackpad wont click. Is there a reason why?

ZeldaAwesome - 답글

This often happens due to a swollen battery. It bumps up against the bottom of the trackpad, preventing it from clicking down. It tends to get worse over time. If removing the battery allows your trackpad to click normally, or if the battery is visibly swollen, replace your battery right away.

Jeff Suovanen -

When I reinstall my trackpad, there is too much "play" or too much room for clicking. It seems like the set screw is screwed in farther than it was originally, and it still doesn't seem to be enough. Also, the mouse isn't working; it won't move, and the click doesn't cause any action. What did I do wrong?

Anthony Hethcox - 답글

Thank you !

I fixed my trackpad!

Adrian Slabu - 답글

댓글 쓰기

조회 통계:

24 시간 전: 2

7일 전: 20

30일 전: 84

전체 시간: 29,749