이 번역은 원본 안내서의 최신 업데이트를 반영하지 않을 수 있습니다. 번역 업데이트를 돕거나 아니면 원본 안내서 보기를 참조하세요.
소개
이 안내서를 사용하여 Early 2020 MacBook Air 디스플레이를 교체하세요.
필요한 것
-
-
MacBook이 Big Sur v11.1 이상을 사용하는 경우, 자동 부팅을 비활성화 하지 못할 수도 있습니다. 절차를 정상적으로 진행하세요, 하지만 내부로 진입하는 즉시 배터리를 분리하세요.
-
P5 드라이버를 사용하여 다음 나사들을 풀어주세요:
-
7.9mm 나사 두 개
-
7.1mm 나사 두 개
-
2.6mm 나사 여섯 개
-
-
-
디스플레이와 하단 케이스 사이에 손가락을 넣어 위로 당겨 하단 케이스를 Air에서 분리하세요.
-
하단 케이스를 분리하세요.
-
하단 케이스를 제자리에 맞추고 단단히 눌러서 아랫면에 숨겨진 클립 두 개와 맞물리세요. 그들이 제자리에 끼워지는 것을 느끼고 소리가 들려야 합니다.
When reassembling, the “snaps” are in the middle of the laptop (from top to bottom), and just to the left and right of center. I assumed it was near the hinge so it took a bit for me to hear the snaps.
Laurie, the two clips are outlined in the third photo of step two. Hope this helps—happy fixing!
-
-
-
배터리 아랫면의 커넥터가 나타나도록 배터리 커넥터를 덮고있는 테이프를 충분히 벗기세요.
This image is incorrect correct for the A2179 EMC 3302 model, also doesn’t match the next image in this guide
There is other guide for the model you reffer to, I was using that one until i realize it was different, this is the one you are looking for: MacBook Air 13" Retina Late 2020
I initially thought the image was incorrect, but I was just looking for the connector in the wrong place. This picture IS correct for the A2179 EMC 3302. Note that the connector is on the left side of the heat sink (the black thing with parallel ridges in the picture and on the computer), and the connector wires gather together towards the left the side of the computer, not the back. Note that "left side" assumes the Air is upside-down, with the hinge on the side farthest away from you (I'm not doing the "right speaker is on the left side because it's upside-down" thing that iFixit does in step 5).
-
-
-
Spudger/스퍼저를 사용하여 배터리 커넥터를 로직 보드와 평행하게 밀어 로직 보드 소켓에서 빼세요.
-
-
-
-
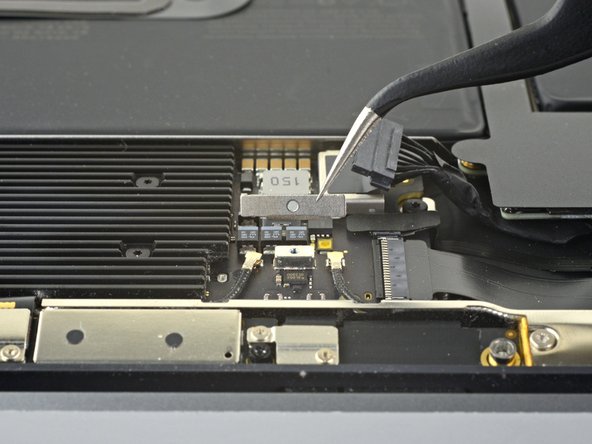
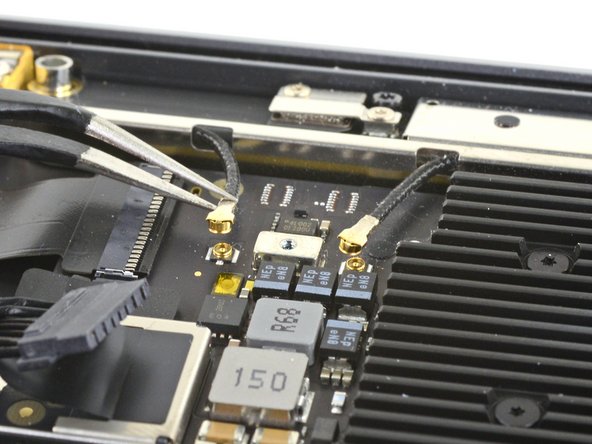
핀셋을 사용하여 안테나 커넥터 맨 아래 부분에 가깝게 잡으세요.
-
케이블을 분리하려면 똑바로 들어 올리세요.
-
두 번째 안테나 케이블에 반복하세요.
This connector is extremely fragile! I always apply a very fine flat screwdriver head to the connector on the system board so it does not pull out!
-
-
-
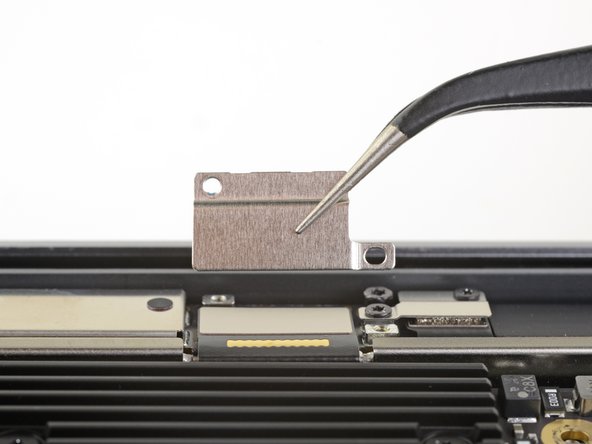
T3 Torx/톡스 드라이버를 사용하여 디스플레이 케이블 커넥터 커버를 고정하는 1.5mm 나사 두 개를 풀어주세요.
-
디스플레이 케이블 커넥터 커버를 분리하세요.
There are two smaller connector covers that cover a narrow ribbon connector. (One of them is visible in the Step 7 photo to the right of the display cable connector cover.) These covers don't have to be removed for disassembly. But my replacement display didn't include them, so I salvaged the covers from the broken display when I reassembled.
-
-
-
Spudger/스퍼저의 평평한 끝을 사용하여 디스플레이 케이블 커넥터를 안테나 보드에서 똑바로 들어 올려 분리하세요.
I have noticed that replacement assemblies from Ifixit and perhaps other suppliers do not have the smaller covers for the side cables to the left and right of the main display cable installed! Remember to transfer them from your old display to the new or you will have a POF waiting to happen!
Thank you for you advisory on the connector covers. Please tell me what POF stands for?
I'm guessing POF=point of failure.
maccentric - 답글
-
-
-
Spudger/스퍼저의 뾰족한 끝을 안테나 바와 디스플레이 힌지 사이의 틈에 끼우세요.
-
Spudger/스퍼저를 힌지에 대고 안테나 바 끝을 들어 올리세요.
-
안테나 바의 다른 쪽 끝에도 반복하세요.
-
-
-
손가락을 사용하여 안테나 바를 똑바로 들어 올려 케이스에서 분리하세요.
-
안테나 바 중간에 있는 구멍을 통해 안테나 보드를 끼우세요.
-
안테나 바를 분리하세요.
this is a bit tricky - the last one i worked on was held tight by a thin black tape, similar to the stretchy tape underneath batteries. this tape is near the motherboard underneath the path of the ribbon cables to the lcd. underneath this tape is a groove cut that the antenna slips into. actually 3 grooves, the 2 underneath the black tape and a longer channel in between. this channel grabs onto a thin part of the antenna that slips into these channels and some bumps help to “wedge” it into place by a pressure type fitting. kind of reminds me of edge of the shield on some ipads and older iphones. the bumps fit into areas and “grab” onto the area next to them. trying to create a word picture. maybe ifixit can add a real picture. definitely slows you down when you encounter resistance - don’t want to force anything. saw some dude on youtube yanking and pulling and i started yelling at him.
Thanks for your advisory, Greg. I can confirm the sticky tape about 1/2" long. It's to the left of the LVDS cable and attached to board. Looks like antennae wall sticks on vertically. Gentle prodding with spudgers from all angles finally frees it. Be patient with it.
-
-
-
T8 Torx/톡스 드라이버를 사용하여 각 힌지에서 4.9mm 나사를 세 개씩 풀어주세요 (총 여섯 개의 나사).
The hinge screws were a T9 on mine
Kirk Heppe - 답글
It's actually easier to remove 2 of the 3 screws on each hinge and then open the laptop before then removing the final screw. This prevents the display from shifting while opening and accidentally damaging other components on the logic board. As we all know, a few mm in the wrong direction on a MacBook can cause a world of trouble.
-
-
-
MacBook을 들어 올리고 상단 케이스와 90도 정도 각도가 될 때까지 조심히 디스플레이를 닫으세요.
-
디스플레이를 케이스와 90도 각도를 유지하며 케이스를 잡은 상태에서 디스플레이를 아래로 똑바로 움직여 힌지가 케이스 하단에서 빠지도록 하세요.
-
디스플레이를 분리하세요.
Great instructions. One note is that on re-assembly, slide base onto hinges and reattach hinge screws before closing down base onto screen.
-


새 교체 부품을 원래 부품과 비교하세요—설치하기 전에 나머지 부품을 옮기거나 새 부품에서 접착 뒷면을 제거해야 할 수 있습니다.
기기를 재조립하려면, 위의 단계들을 역순으로 따르세요.
전자 폐기물을 R2 또는 e-Stewards 인증 재활용 센터로 가져가세요.
수리가 계획대로 진행되지 않았습니까? 자사의
답변 커뮤니티에서 문제 해결 도움을 살펴보세요.
새 교체 부품을 원래 부품과 비교하세요—설치하기 전에 나머지 부품을 옮기거나 새 부품에서 접착 뒷면을 제거해야 할 수 있습니다.
기기를 재조립하려면, 위의 단계들을 역순으로 따르세요.
전자 폐기물을 R2 또는 e-Stewards 인증 재활용 센터로 가져가세요.
수리가 계획대로 진행되지 않았습니까? 자사의
답변 커뮤니티에서 문제 해결 도움을 살펴보세요.
다른 38명이 해당 안내서를 완성하였습니다.
다음 번역가들에게 특별히 감사 드립니다:
90%

Christian Kim님은 저희가 세상을 수리하는데 동참하신 분입니다! 기여하시겠습니까?
번역 시작하기 ›


댓글 11개
Thank you so much for this awesome walkthrough! I can’t believe how much I saved doing this myself. Works beautifully! If I could only suggest a more comprehensive “reassembly” page. There are a couple of missteps I made (eg. trying to install the antenna bar and accidentally leaving the display cable connector under it) that would have helped. In any event, thank you so much!
Thanks for the tip! I’ve added a reminder to that step.
when starting the process of installation, make sure that at least the inside hinge screw is installed and mostly tightened. once the antenna is installed, there is almost no room for that screw to be inserted without a tight scrape against the end of the antenna. a very tight fit. i sometimes only install one hinge screw, usually the center ones, and then align the lid before adding the others and tightening everything up. in this case, would save you some concern to address this beforehand.
Definitely not. Also, there is no such thing, perhaps you meant 2020? Also no.
Have never needed to repair a Mac, but when a pen was slammed in the lid of my wife’s MBA, the screen was completely gone. So I decided to have a go myself, having followed iFixit for a number of years. So a massive thank you for a simple, clear guide, with tool specs that I can’t fault. (I bought your magnetic pad, excellent!)
The new screen is in place, the system functions perfectly. You saved me money and I had real fun and confidence doing the geeking!
Thank you for this guide. I was able to complete things as described. One thing to note: I didn't see any sign of adhesive holding down the antenna bar, but there are metal ridges/dimples on a portion of the folded edge that have to be pressed into the top case in order to prevent the antenna bar from simply springing back up. I found it fiddly to find a suitable tool and generate enough force to push this folded edge fully home, but eventually managed it with careful use of a flathead screwdriver.
Screen turns on but only Apple logo loads, nothing else happens. Thoughts?
Also how to I get the 2 small metal plates on each side of antenna? Thanks
Just executed this procedure on a friends machine (using a new screen bought from AliExpress) and it was ridiculously easy to complete.
However, upon restarting, the machine took a little while to show signs of life. A few mins in fact, therefore I'd recommend exercising extra patience before pulling it apart again to check for assembly errors.
Much gratitude to @carsten for putting this together! Thank you!
P5 is also a PL4 (so confusing) - i like the wiha 26764 thanks to @mayer for this post. P5 pentalobe and 1.2 pentalobe screwdriver
greg - 답글