이 버전에는 잘못된 편집 사항이 있을 수 있습니다. 최신 확인된 스냅샷으로 전환하십시오.
필요한 것
-
-
하단 케이스를 상단 케이스에 고정하는 다음 나사 열 개를 풀어주세요:
-
13.5mm (14.1mm) Phillips/십자 나사 세 개.
-
3mm Phillips/십자 나사 일곱 개
-
-
-
배터리 케이블 커넥터에 접근할 수 있도록 배터리를 충분히 뒤로 젖히세요.
-
배터리 케이블 커넥터를 로직 보드 소켓에서 빼고 배터리를 상단 케이스에서 분리하세요.
-
배터리를 100% 충전한 다음 최소 두 시간 더 충전하세요. 그런 다음 플러그는 뽑고 정상적으로 사용하여 배터리를 방전하세요. 배터리 부족 경고가 나타나면 작업을 저장하고 배터리 부족으로 인해 절전 모드가 활성화될 때까지 노트북을 켜놓으세요. 최소한 5시간 이상을 기다리고 나서 노트북을 중단없이 100% 충전하세요.
-
새 배터리를 설치한 다음 비정상적 작동 또는 문제가 발생하면 MacBook의 SMC를 재설정해야 합니다.
-
-
이 단계는 번역되지 않았습니다. 번역을 도와주십시오
-
Use the flat end of a spudger to carefully pry the AirPort/Bluetooth ribbon cable up off its socket on the logic board.
-
-
이 단계는 번역되지 않았습니다. 번역을 도와주십시오
-
Pull the camera cable connector straight out of its socket on the logic board.
-
-
이 단계는 번역되지 않았습니다. 번역을 도와주십시오
-
Use the tip of a spudger to pry the three antenna connectors up off the AirPort/Bluetooth board.
-
-
이 단계는 번역되지 않았습니다. 번역을 도와주십시오
-
De-route all three antenna cables from their channels in the AirPort/Bluetooth housing.
-
De-route the camera cable from its channel in the AirPort/Bluetooth housing.
-
-
이 단계는 번역되지 않았습니다. 번역을 도와주십시오
-
Remove the following two screws securing the AirPort/Bluetooth housing to the upper case:
-
One 3.8 mm Phillips
-
One 8.6 mm Phillips
-
-
이 단계는 번역되지 않았습니다. 번역을 도와주십시오
-
Remove the AirPort/Bluetooth assembly from the upper case, minding any cables that may get caught.
-
-
이 단계는 번역되지 않았습니다. 번역을 도와주십시오
-
Remove the 8.6 mm Phillips screw securing the antenna/camera cable retainer to the upper case.
-
Remove the antenna/camera cable retainer from the upper case.
-
-
-
이 단계는 번역되지 않았습니다. 번역을 도와주십시오
-
Remove two of the three 6 mm T6 Torx screws securing the right side of the display to the upper case.
-
-
이 단계는 번역되지 않았습니다. 번역을 도와주십시오
-
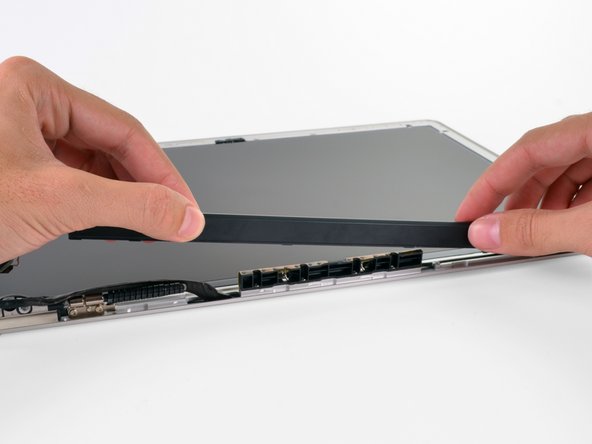
Grab the plastic pull tab secured to the display data cable lock and rotate it toward the DC-In side of the computer.
-
Pull the display data cable straight out of its socket on the logic board.
-
-
이 단계는 번역되지 않았습니다. 번역을 도와주십시오
-
Remove the 8.6 mm Phillips screw securing the display data cable retainer to the upper case.
-
Remove the display data cable retainer from the upper case.
-
-
이 단계는 번역되지 않았습니다. 번역을 도와주십시오
-
Remove two of the three 6 mm T6 Torx screws securing the left side of the display to the upper case.
-
-
이 단계는 번역되지 않았습니다. 번역을 도와주십시오
-
Open your MacBook Pro so the display is perpendicular to the upper case.
-
Place your opened MacBook Pro on a table as pictured.
-
While holding the display and upper case together with your left hand, remove the remaining T6 Torx screw from the upper display bracket.
-
-
이 단계는 번역되지 않았습니다. 번역을 도와주십시오
-
Remove the last remaining T6 Torx screw securing the display to the upper case.
-
-
이 단계는 번역되지 않았습니다. 번역을 도와주십시오
-
Grab the upper case with your right hand and rotate it slightly toward the top of the display so the upper display bracket clears the edge of the upper case.
-
Rotate the display slightly away from the upper case.
-
Lift the display up and away from the upper case, minding any brackets or cables that may get caught.
-
-
이 단계는 번역되지 않았습니다. 번역을 도와주십시오
-
Insert the tip of a spudger underneath the black rubber gasket at the bottom right corner of the display assembly.
-
Gently pry the wide edge of the gasket up from the back case.
-
-
이 단계는 번역되지 않았습니다. 번역을 도와주십시오
-
Starting with the freed corner, pull the rubber gasket off the right side of the display assembly.
-
-
이 단계는 번역되지 않았습니다. 번역을 도와주십시오
-
Continue pulling the display gasket off the display assembly across the top edge.
-
-
이 단계는 번역되지 않았습니다. 번역을 도와주십시오
-
Continue pulling the display gasket off the display assembly down the left side.
-
Pull the gasket off the bottom edge of the display to completely free it and set it aside.
-
-
이 단계는 번역되지 않았습니다. 번역을 도와주십시오
-
With the heat gun set to low, start by heating the metal bezel surrounding the LCD.
-
-
이 단계는 번역되지 않았습니다. 번역을 도와주십시오
-
Carefully insert a guitar pick between the top right corner of the bezel and the display assembly.
-
Use the guitar pick to gently pry up the adhesive along the top edge securing the bezel to the display assembly.
-
-
이 단계는 번역되지 않았습니다. 번역을 도와주십시오
-
Work along the top right edge of the display assembly, carefully prying the adhesive up with the guitar pick. Stop when you get to the iSight camera.
-
-
이 단계는 번역되지 않았습니다. 번역을 도와주십시오
-
Use a heat gun to soften the adhesive under the bezel along the left and top left edges of the display.
-
-
이 단계는 번역되지 않았습니다. 번역을 도와주십시오
-
Carefully insert a guitar pick between the top left corner of the bezel and the display assembly.
-
Use the guitar pick to gently pry up the adhesive along the left edge securing the bezel to the display assembly.
-
-
이 단계는 번역되지 않았습니다. 번역을 도와주십시오
-
Repeat the procedures in the two previous steps for the right edge of the display.
-
-
이 단계는 번역되지 않았습니다. 번역을 도와주십시오
-
Work along the top left edge of the display assembly, carefully prying the adhesive up with the guitar pick. Stop when you get to the iSight camera.
-
-
이 단계는 번역되지 않았습니다. 번역을 도와주십시오
-
Wedge a guitar pick in between the bezel and display assembly near the inner bottom left corner.
-
Work along the inner bottom left edge of the display assembly, carefully prying the adhesive up with the guitar pick.
-
Continue prying along the inner bottom edge to release the adhesive securing the bezel to the display assembly.
-
-
이 단계는 번역되지 않았습니다. 번역을 도와주십시오
-
Slowly lift the bottom edge of the bezel and gently rotate it out of the display.
-
-
이 단계는 번역되지 않았습니다. 번역을 도와주십시오
-
Lifting the left edge of the clutch cover, gently rock it back and forth on its long axis while pulling it away from the display.
-
Remove the clutch cover from the display, minding any cables that may get caught.
-
-
이 단계는 번역되지 않았습니다. 번역을 도와주십시오
-
Remove the six 2.9 mm Phillips screws securing the LCD panel to the display assembly.
-
-
이 단계는 번역되지 않았습니다. 번역을 도와주십시오
-
Pull the LCD toward the top edge of the display assembly to slide the inverter board along its lower edge out of the recess in the aluminum display assembly.
-
-
이 단계는 번역되지 않았습니다. 번역을 도와주십시오
-
Peel the piece of tape covering the display data cable connector away from the edge closest to the LCD.
-
-
이 단계는 번역되지 않았습니다. 번역을 도와주십시오
-
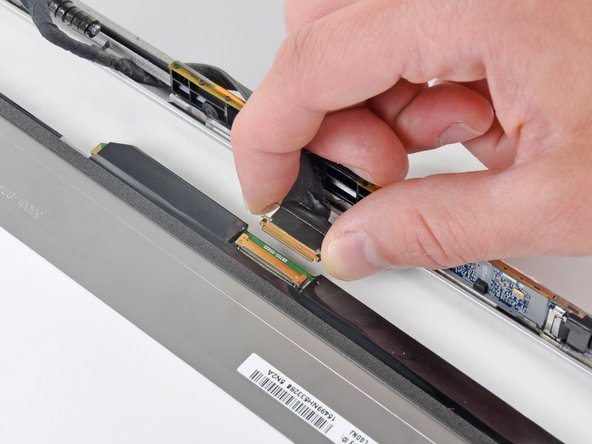
Use the tip of a spudger to flip up the thin steel retaining clip securing the display data cable to its socket on the LCD.
-
Pull the display data cable straight away from its socket on the LCD.
-
Lift the LCD out of the display assembly and set it aside.
-


다른 12명이 해당 안내서를 완성하였습니다.

댓글 2개
I had no problem with reapplying the gasket as it fits nicely into the notch.
A big THANKS to Walter! It is in deed not easy but thanks to this detailed instructions I got it working!! :)
Dirk Hoppe - 답글