주요 콘텐츠로 건너뛰기

MacBook Unibody Model A1278 AirPort Card Replacement

필요한 것

  1. MacBook Unibody Model A1278 AirPort Card Replacement, Access Door: 1 단계, 이미지 1/1
    • With the case closed, place the Unibody top-side down on a flat surface.

    • Depress the grooved side of the access door release latch enough to grab the free end. Lift the release latch until it is vertical.

  2. MacBook Unibody Model A1278 AirPort Card Replacement: 2 단계, 이미지 1/1
    • The access door should now be raised enough to lift it up and out of the Unibody.

  3. MacBook Unibody Model A1278 AirPort Card Replacement, Battery: 3 단계, 이미지 1/1
    • Be sure the access door release latch is vertical before proceeding.

    • Grab the white plastic tab and pull the battery up and out of the Unibody.

  4. MacBook Unibody Model A1278 AirPort Card Replacement, Lower Case: 4 단계, 이미지 1/1
    • Remove the following eight screws securing the lower case to the chassis:

    • One 3 mm Phillips screw.

    • Three 13.5 mm Phillips screws.

    • Four 3.5 mm Phillips screws.

  5. MacBook Unibody Model A1278 AirPort Card Replacement: 5 단계, 이미지 1/1
    • Using both hands, lift and remove the lower case off the upper case.

  6. MacBook Unibody Model A1278 AirPort Card Replacement, Display Assembly: 6 단계, 이미지 1/1
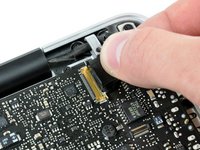
    • Disconnect the camera cable by pulling the male end straight away from its socket.

    • Be careful not to pull up on the cable as you remove it from the socket.

  7. MacBook Unibody Model A1278 AirPort Card Replacement: 7 단계, 이미지 1/2 MacBook Unibody Model A1278 AirPort Card Replacement: 7 단계, 이미지 2/2
    • De-route the camera data cable from the channel in the optical drive.

  8. MacBook Unibody Model A1278 AirPort Card Replacement: 8 단계, 이미지 1/2 MacBook Unibody Model A1278 AirPort Card Replacement: 8 단계, 이미지 2/2
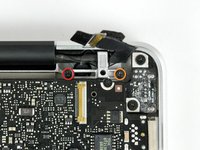
    • Remove the following screws securing the camera data cable and right speaker to the upper case:

    • One 9.9 mm partially threaded Phillips screw

    • One 9.6 mm threaded Phillips screw

    • One 4 mm Phillips screw

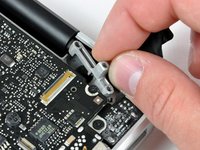
    • Slide the camera cable bracket out from under the subwoofer and remove it from the computer.

    • The iSight cable has an eyelet through which passes the left-most screw in these pictures.

  9. MacBook Unibody Model A1278 AirPort Card Replacement: 9 단계, 이미지 1/2 MacBook Unibody Model A1278 AirPort Card Replacement: 9 단계, 이미지 2/2
    • Grab the plastic pull tab secured to the display data cable lock and rotate it toward the DC-in side of the computer.

    • Pull the display data cable connector straight away from its socket.

    • Make sure to pull the connector straight away and not straight up from its socket.

  10. MacBook Unibody Model A1278 AirPort Card Replacement: 10 단계, 이미지 1/2 MacBook Unibody Model A1278 AirPort Card Replacement: 10 단계, 이미지 2/2
    • Remove the following two screws from the display data cable bracket:

    • One 7 mm Phillips screw.

    • One 5 mm Phillips screw.

    • Lift the display data cable bracket out of the upper case.

  11. MacBook Unibody Model A1278 AirPort Card Replacement: 11 단계, 이미지 1/1
    • Remove the two outer 6 mm Torx screws securing each side of the display to the upper case (4 screws total).

  12. MacBook Unibody Model A1278 AirPort Card Replacement: 12 단계, 이미지 1/1
    • Open your MacBook so the display is perpendicular to the upper case.

    • Place your opened MacBook on a table as pictured.

    • While holding the display and upper case together with your left hand, remove the 6 mm Torx screw from the lower display bracket.

  13. MacBook Unibody Model A1278 AirPort Card Replacement: 13 단계, 이미지 1/1
    • Be sure to hold the display and upper case together with your left hand. Failure to do so may cause the freed display/upper case to fall, potentially damaging each component.

    • Remove the last remaining 6 mm Torx screw securing the display to the upper case.

  14. MacBook Unibody Model A1278 AirPort Card Replacement: 14 단계, 이미지 1/3 MacBook Unibody Model A1278 AirPort Card Replacement: 14 단계, 이미지 2/3 MacBook Unibody Model A1278 AirPort Card Replacement: 14 단계, 이미지 3/3
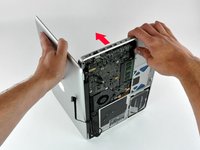
    • Grab the upper case with your right hand and rotate it slightly toward the top of the display so the upper display bracket clears the edge of the upper case.

    • Rotate the display slightly away from the upper case.

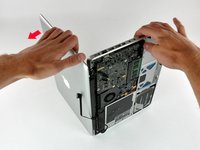
    • Lift the display away from the upper case, minding any brackets or cables that may get caught.

  15. MacBook Unibody Model A1278 AirPort Card Replacement, Clutch Cover: 15 단계, 이미지 1/2 MacBook Unibody Model A1278 AirPort Card Replacement, Clutch Cover: 15 단계, 이미지 2/2
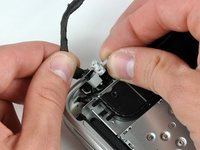
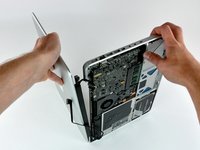
    • Grab the clutch cover as shown and slide it toward the right side of the display.

    • It should move about 1/4" and stop. Don't force it beyond this point.

  16. MacBook Unibody Model A1278 AirPort Card Replacement: 16 단계, 이미지 1/2 MacBook Unibody Model A1278 AirPort Card Replacement: 16 단계, 이미지 2/2
    • Gently rock the clutch cover back and forth on its long axis while pulling it away from the display.

    • Do this action along the length of the clutch cover until you can lift it off the framework attaching it to the display.

  17. MacBook Unibody Model A1278 AirPort Card Replacement: 17 단계, 이미지 1/1
    • Remove the clutch cover from the display.

  18. MacBook Unibody Model A1278 AirPort Card Replacement, AirPort Connectors: 18 단계, 이미지 1/2 MacBook Unibody Model A1278 AirPort Card Replacement, AirPort Connectors: 18 단계, 이미지 2/2
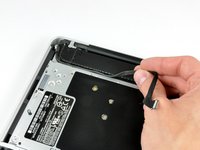
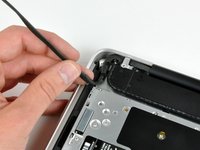
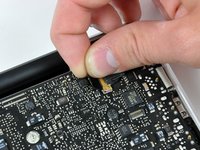
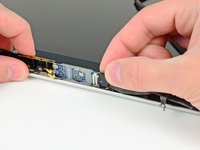
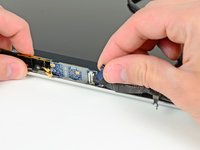
    • Use the tip of a spudger to pry both AirPort antenna connectors out of their sockets on the AirPort board.

    • Be careful not to break the sockets off the AirPort board.

  19. MacBook Unibody Model A1278 AirPort Card Replacement, AirPort Card: 19 단계, 이미지 1/1
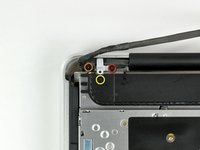
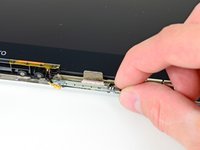
    • Remove the single 3 mm Phillips screw securing the AirPort card to the display nearest the AirPort antenna.

  20. MacBook Unibody Model A1278 AirPort Card Replacement: 20 단계, 이미지 1/1
    • Remove the single 3.3 mm Phillips screw securing the camera cable retainer to the display.

  21. MacBook Unibody Model A1278 AirPort Card Replacement: 21 단계, 이미지 1/2 MacBook Unibody Model A1278 AirPort Card Replacement: 21 단계, 이미지 2/2
    • Orient your display as shown and pull the black plastic camera cable retainer toward the right side of the display.

    • Remove the camera cable retainer.

  22. MacBook Unibody Model A1278 AirPort Card Replacement: 22 단계, 이미지 1/1
    • Carefully pull the camera cable connector toward the right side of the display and out of its socket on the AirPort card.

    • When reattaching the AirPort Cable, make sure that the U-shaped notches on one side of the cable end are not visible (facing the card). If the cable is installed incorrectly, it will cause logic board damage.

  23. MacBook Unibody Model A1278 AirPort Card Replacement: 23 단계, 이미지 1/1
    • Remove the remaining 3 mm Phillips screw securing the side of the AirPort card closest to the right clutch hinge.

  24. MacBook Unibody Model A1278 AirPort Card Replacement: 24 단계, 이미지 1/2 MacBook Unibody Model A1278 AirPort Card Replacement: 24 단계, 이미지 2/2
    • Pull the AirPort card away from its heat sink and remove it from the display.

    • Before installing a new AirPort card, be sure the thermal material on its surface is intact and aligned with the small heat sink on the display frame.

결론

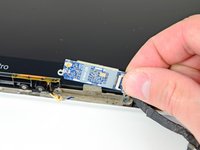
To reassemble your device, follow these instructions in reverse order.

다른 51명이 해당 안내서를 완성하였습니다.

Walter Galan

693,920 평판

안내서 1,203개 작성하였습니다

댓글 12개

I went through this because after replacing the top case, upon restart the Airport card was not recognized. I was hoping the cable had come loose, as resetting PRAM and SMC didn't fix the issue (and searching the web, a LOT of people have this issue, most without having touched the internals of their Mac). That was not the case, everything appeared correct. So I got a USB wireless dongle and called it good.

maccentric - 답글

I did it! \o/

The guide was really helpful. Be careful with all the delicate connections and DO NOT attempt to use not guide-specified tools. Yeah... You heard me, buy a decent Torx tool. :)

Gabriel Mattos - 답글

Muchas gracias por el trabajo de la guía, sin ella no habría podido reparar mi ordenador

justo - 답글

Very accurate guide. Much appreciated.

morjo21 - 답글

Thank you very much for this guide. No real problem with the good tools! After restart, the wifi comes back! Yes!!! But just a little problem … the white becomes suddenly blue and impossible to change that. I open a second time to disconnect and connect the LCD wire. It seems to be ok but after mounting the screws, my blue problem comes back! Do somebody have an idea?

Duthion - 답글

댓글 쓰기

조회 통계:

24 시간 전: 1

7일 전: 20

30일 전: 99

전체 시간: 105,827