주요 콘텐츠로 건너뛰기

Microsoft Kinect Microphone Panel Replacement

필요한 것

  1. Microsoft Kinect Microphone Panel Replacement, Case: 1 단계, 이미지 1/3 Microsoft Kinect Microphone Panel Replacement, Case: 1 단계, 이미지 2/3 Microsoft Kinect Microphone Panel Replacement, Case: 1 단계, 이미지 3/3
    • Remove the two plastic strips off the bottom of the main Kinect housing using the metal spudger's sharper side.

    • Peel off the two Xbox 360 stickers from the bottom of the case to reveal two hidden screws.

    • Some force may be required to remove the adhesive. Applying heat to the adhesive may make it easier to remove.

    • Do not overheat as it may cause damage to the internal components.

  2. Microsoft Kinect Microphone Panel Replacement: 2 단계, 이미지 1/1
    • Unscrew the six 12mm T10 Torx screws.

  3. Microsoft Kinect Microphone Panel Replacement: 3 단계, 이미지 1/3 Microsoft Kinect Microphone Panel Replacement: 3 단계, 이미지 2/3 Microsoft Kinect Microphone Panel Replacement: 3 단계, 이미지 3/3
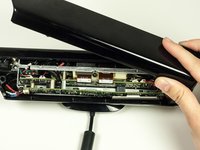
    • Remove the top portion of the case from the rest of the body.

    • Detach the side portions of the case from the body.

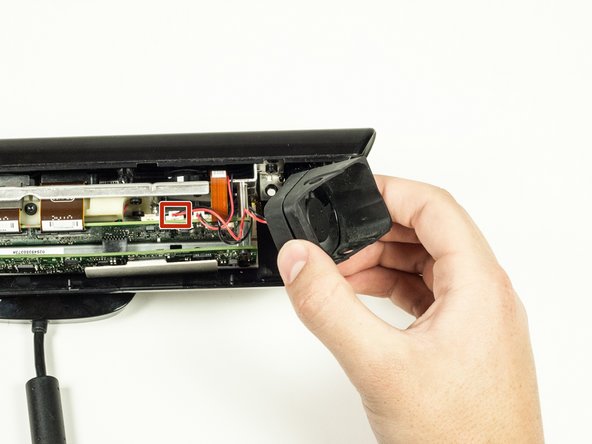
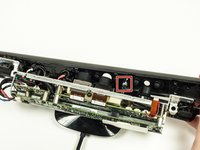
    • Remove the fan piece from the side of the body. Unplug it from the logic board to fully remove it.

    • When unplugging the fan, be sure to pull from the white connector at the end of the wire to avoid breaking it.

  4. Microsoft Kinect Microphone Panel Replacement: 4 단계, 이미지 1/1
    • Remove the bottom portion of the case by sliding it out from under the body.

    • The bottom of the case may be difficult to remove if there is any residual adhesive. If the residual adhesive prevents you from removing the case, apply gentle heat and wiggle the case out.

  5. Microsoft Kinect Microphone Panel Replacement: 5 단계, 이미지 1/2 Microsoft Kinect Microphone Panel Replacement: 5 단계, 이미지 2/2
    • Remove the four 7mm T10 Torx screws (two on each side of the metal body).

  6. Microsoft Kinect Microphone Panel Replacement: 6 단계, 이미지 1/2 Microsoft Kinect Microphone Panel Replacement: 6 단계, 이미지 2/2
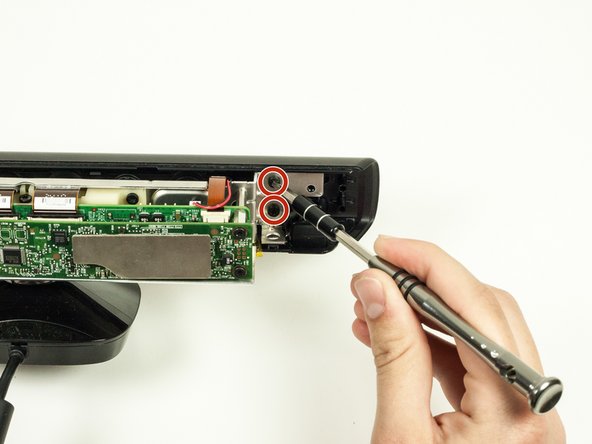
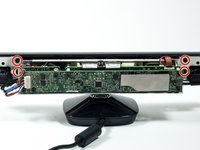
    • Remove the front portion of the case containing the lens coverings for the cameras.

    • The LED component is connected to the front portion of the case. To disconnect it, just pull it out of its plastic connector.

  7. Microsoft Kinect Microphone Panel Replacement, Microphone Panel: 7 단계, 이미지 1/1
    • Unplug the microphone from motherboard.

  8. Microsoft Kinect Microphone Panel Replacement: 8 단계, 이미지 1/1
    • Pull off the microphone panel and snake the cable that was connected to the motherboard through the hole on the camera panel.

    • Pull the cable out carefully to avoid damage.

결론

To reassemble your device, follow these instructions in reverse order.

다른 2명이 해당 안내서를 완성하였습니다.

Nick Carlucci

회원 가입일: 04/26/15

394 평판

안내서 3개 작성하였습니다

Cal Poly, Team 14-7, Amido Spring 2015 Cal Poly, Team 14-7, Amido Spring 2015 회원

CPSU-AMIDO-S15S14G7

4 회원들

안내서 6개 작성하였습니다

댓글 0개

댓글 쓰기

조회 통계:

24 시간 전: 0

7일 전: 1

30일 전: 67

전체 시간: 1,041