소개
This repair guide will help you safely access the Surface's battery pack and install a new one.
필요한 것
-
-
Carefully turn the tablet over so the screen is facing down.
-
Pull up on the bottom corners to open the stand.
-
-
-
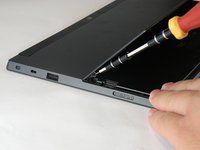
Remove the two 5.1 mm T5 Torx screws.
-
Make sure when removing the screws to be careful to prevent stripping of the head.
-
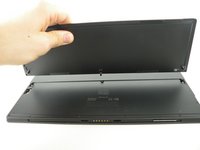
With all the screws removed gently wiggle the stand side to side until the lever in the middle is free, releasing the stand.
-
-
-
-
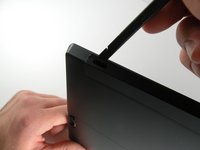
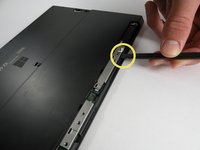
Use a spudger or similar flat headed tool to release the small bezels out lined in the image. Remove the plastic trim covering the camera with the soft flat headed tool.
-
-
-
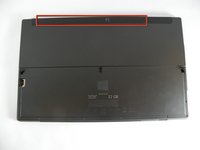
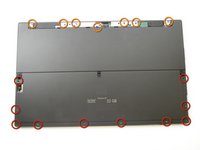
Next, remove the ten 5.92mm T5 torx screws located underneath the kickstand.
-
Remove the seven 5.87mm T5 torx screws located under the camera casing. There is a sticker covering the second screw from the left.
-
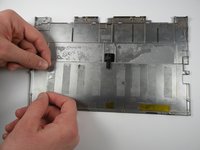
Disconnect the rear cover from the main shell of the system by loosening it with a spudger where the gaps exist.
-
Continue working your way around to each corner and loosen the snap-ons on each side until the rear cover comes off.
-
-
-
Rotate the device 180 degrees so that the bottom of the device is facing you.
-
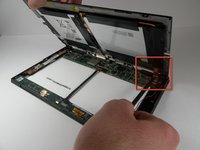
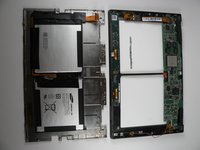
A ribbon connects the battery on the rear cover, to the motherboard. Slowly lift the bottom of the rear cover up until you can see the ribbon.
-
Use a spudger to push the ribbon away from the motherboard and parallel to the motherboard in order to remove the ribbon.
-
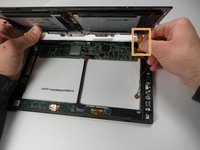
Separate the rear cover by lifting it up away from the main system.
-
-
-
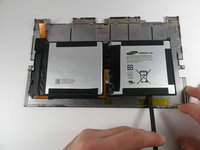
Gently slide the spudger underneath one side of the battery and work it back and forth around all sides until the battery comes off the back cover.
-


To reassemble your device, follow these instructions in reverse order.
다른 46명이 해당 안내서를 완성하였습니다.
팀

Cal Poly, Team 17-23, Forte Winter 2013 Cal Poly, Team 17-23, Forte Winter 2013 회원
CPSU-FORTE-W13S17G23
5 회원들
안내서 17개를 작성함
12가이드 댓글
An excellent guide, i would have thought i was going to break the surface if it wasn't for this guide simply showing how to remove certain items that are just clipped in place. Highly recommend obtaining a set of plastic prising tools, available from auction sites under i-phone repair tools else you will damage the plastic covers.
bf2fusion98 - 답글 공유
I have a Surface RT and the battery stopped charging. Eventually, it completely drained and was no longer useable. The charger was definitely working but connecting the charger to the Surface RT did not allow functionality.
Disconnecting and reconnecting the battery solved my issue. RT now is working. Thanks! This helped me avoid replacing the power supply.
Hapa Latina - 답글 공유
I have been scouring the internet these past few days for a solution to the same problem you had. I have been wondering if the problem was poorly attached cables or a dead battery. Yours is the first comment I've read suggesting "yes" to incorrect cable attachment. Just to clarify: you detached and re-attached your Surface RT battery cable? You did not replace the battery with a new battery?
I have a Microsoft Surface, in trying to change the battery the Surface was reassembled with glue.
Could I open it to replace the battery and then reassemble it?
Thank you.
Piero Sabino - 답글 공유
This is only for the Surface(1516) NOT the Surface 2 (1572) need S by S for 1572 battery.
68mustangjim - 답글 공유